Table of Contents
Advertisement
Quick Links
www.nicetree.co
NORTH AMERICA
E-mail: Service@nicetree.co
Address: 505, Bldg 6, Shenglong Garden phase 2,
USER
No.2 Shenglong Rd., Longcheng
St., Longgang Dist., Shenzhen
GUIDE
MANUFACTURER
Shenzhen Xiaojia Technology Co.Ltd
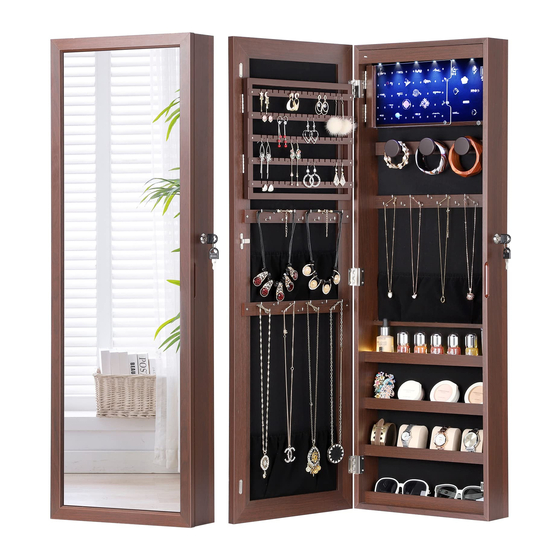
Hanging Mirrored Jewelry Cabinet with LED
02-20-2020
Model: NT-HF006
NT-HF006_V1.1_EN
MADE IN CHINA
Advertisement
Table of Contents

Related Manuals for Nicetree NT-HF006


Summary of Contents for Nicetree NT-HF006
- Page 1 NORTH AMERICA E-mail: Service@nicetree.co Address: 505, Bldg 6, Shenglong Garden phase 2, USER No.2 Shenglong Rd., Longcheng St., Longgang Dist., Shenzhen GUIDE MANUFACTURER Shenzhen Xiaojia Technology Co.Ltd Hanging Mirrored Jewelry Cabinet with LED 02-20-2020 Model: NT-HF006 NT-HF006_V1.1_EN MADE IN CHINA...
- Page 2 Thank you for purchasing the Nicetree Jewelry Cabinet. Please read this user manual carefully and keep it in a safe place for future reference. If you need any assistance, please contact our support team with your product model number and Amazon order number.
-
Page 3: Table Of Contents
CONTENTS Package Contents IMPORTANT Warning Installation Door Mount Wall Mount LED Battery Replacement Internal Structure Specifications Warranty & Customer Support... -
Page 4: Package Contents 01
Package Contents IMPORTANT Please read the following instruction carefully and use the product Note: accordingly. Please keep this manual and hand it over if you transfer the You need to purchase 3 AAA product. This summary may not include every detail of all variations and batteries for LEDs in the cabinet. -
Page 5: Installation 04
Installation 7. Open and close the door gently for long-lasting use of the hinges (the widest angle of the door is about 100 degrees). 8. Please put the article on the flat ground and away from sharp and Door Mount hard objects. -
Page 6: Wall Mount 06
Installation Step 2: Attach the two double-sided tapes to the lower part of the back to keep the cabinet from swinging. Wall Mount Step 1: Measure and mark the cabinet’s position on the wall, then drill the holes. Wall Step 3: Hang the cabinet over the door and press it towards the door to fix. Now you can use the keys to lock or open the door. - Page 7 Step 2: Insert the E Screw Anchors and F Screws. Step 4: Hang the cabinet with the F screws and press it towards the wall to fix. Wall Wall Wall Step 3: Attach the two double-sided tapes to the lower part of the back to keep the cabinet from swinging.
-
Page 8: Led Battery Replacement 09
LED Battery Replacement Internal Structure 6 LEDs were installed at the top of the inside of the cabinet during manufacturing. They are powered by 3 AAA batteries and will light up automatically when the door is opened. Ear studs (Dustproof) Earrings Bracelets Light Switch:... - Page 9 Specifications Material Real glass, Quality MDF, Soft Velvet Mirror Included ? LED Included? Dimensions 108 x 36.7 x 10.6cm / 42.5 x 14.4 x 4.2in Weight 10kg / 22lbs Warranty & Customer Support 12 months warranty If you need any assistance or have any questions, please contact our store and we will reply within 24 hours.
Need help?
Do you have a question about the NT-HF006 and is the answer not in the manual?
Questions and answers