Advertisement
Quick Links
EEI-2531
SIDEBOARD
Thank you for purchasing the MODWAY
Before you start, here are some helpful advice:
1.We suggest you spend a short time reading through this leaflet and then follow the simple step-by-step
instructions.
2.
Owing to the size and weight of the Sideboard, we recommend that
padded area, in the room that it is intended for. Approximate assembly time: 60 minutes.
3.Please do not use any tools other than those provided or recommended in these instructions.
4.Please do not throw away any of the packaging or instructions until you have checked all the components and
hardware and the furniture is fully assembled.
5.Assemble all components loosely until advised to tighten. Depending on use, it may be necessary to tighten the
components from time to time, so please save the tools that have been provided.
6.Please keep all pieces out of reach of children.
Hardware :
A)
B)
Cambolt/Metal
x 18
Ø 15 mm
Ø 6 x 35 mm
F)
G)
Dowel Big/Wood
Ø 8 x 30 mm
x 16
K)
L)
Screw/Metal
M 3.5 x 15.5 mm
x 24
P)
Q)
Screw/Metal
x 16
M 4 x 16 mm
PM1)
HN26C)
Leg Mounting Plate / Metal
70 x 62 x 17 mm
x 4
Customer Service 908-368-1025︱
SIDEBOARD !
C)
CamLock Big/Metal
x12
Ø 12 mm
H)
Hex/Allen Key/Metal
L 4
x 1
Ø 5 x 15 mm
M)
Screw/Metal
x 20
M 6.5 x 10.5 mm
M 3.5 x 13 mm
R)
Door/Drawer Knob/Metal Chrome
x 5
M 4 x 20 mm
Ø 18 x 29 mm
RM35A)
Hinge Set / Metal
x 4
350 mm
www.modway.com
it is assembled by two adults, on a carpeted or
D)
CamLock Small/Metal
x 6
M 7 x 50 mm
I)
Shelf Pin/Metal
x 8
Ø 8 mm
N)
Screw/Metal
x 18
M 8 x 39 mm
S)
Screw/Metal
Screw Cap / Plastic
x 5
Ø 15 mm
Drawer Runner / Metal
x 3
E)
Screw/Metal
Dowel Small/Wood
x 4
Ø 6 x 30 mm
J)
Bumper /Silicon
Screw/Metal
x 4
M 3.5 x 15.5 mm
O)
Screw/Metal
Wedge/Plastic
x 12
9 x 14 x 10 mm
T)
x 8
Screwdriver (Not Include)
x 6
x 8
x 24
x 1
Page 1 of 11
Advertisement

Subscribe to Our Youtube Channel
Related Manuals for modway EEI-2531


Summary of Contents for modway EEI-2531
- Page 1 EEI-2531 SIDEBOARD SIDEBOARD ! Thank you for purchasing the MODWAY Before you start, here are some helpful advice: 1.We suggest you spend a short time reading through this leaflet and then follow the simple step-by-step instructions. Owing to the size and weight of the Sideboard, we recommend that it is assembled by two adults, on a carpeted or padded area, in the room that it is intended for.
- Page 2 EEI-2531 SIDEBOARD Components: LB18A LB18A LB18A LB18A Center Board Left Side Board Top Board Bottom Board Wooden Door Right x1 Wooden Door Left Centre Board Right x1 Adjustable Shelf Back Drawer Side Drawer Right Front Drawer Side Drawer Left Back Board 2...
- Page 3 EEI-2531 SIDEBOARD STEP 1: Connecting Hardware assembly, Cambolt (A) on Top Board (1) Insert Small Dowel (F) on Sideboard (3) x 2 pcs Assembly Drawer Runner (RM35A) on Center Board Left (4) and Center Board Right (5), using Screw (L). Also insert Big Dowel (F) on both center boards.
- Page 4 EEI-2531 SIDEBOARD STEP 2: A�en�on O(Plat Mitres) Assembly Posi�on Securing the Leg Mounting Plate ( O ) to the Bottom Board (2) Flip the Bottom Board then the Connecting Hardware assembly, Cambolt (A) on it. Hardware required. PM1x4 Px16 Screwdriver not included...
- Page 5 EEI-2531 SIDEBOARD STEP 4: Insert Backboard 1 (15)x2 and Backboard 2 (14), then Securing Bottom Board (2) using Camlock (B) and finish it with Screw Cap (S). (15) Lamination facing front side Hardware required. Screwdriver not included STEP 5: Legs (LB18A) assembly...
- Page 6 EEI-2531 SIDEBOARD STEP 6: Adjustable Shelf (6) assembly with Shelf Pin (H) Edge with lamination at front Hardware required STEP 7: HN26C Securing Hinges (HN26C) using Screw (J) onto Door Left (7) and Door Hardware required. HN26Cx4 Screwdriver not included Customer Service 908-368-1025︱...
- Page 7 EEI-2531 SIDEBOARD STEP 8: Securing Door Left (7) & Door Right (8) with pre-installed hinges onto each Side Board, using Screw (L). Securing Door Knob (Q) using Screw (R) to both Wooden Doors (7)(8). Hardware required. Screwdriver not included HOW TO ADJUST THE DOOR Adjust the Hinges when necessary.
- Page 8 EEI-2531 SIDEBOARD STEP 9: Drawer Box parts Connecting hardware assembly - Securing Assembly Cambolt (A) to 1 of the Drawer Front (9), then Small Dowel (E) to Side Drawer Left (10) and Side Drawer Right (11) Hardware required. Screwdriver not included...
- Page 9 EEI-2531 SIDEBOARD STEP 11: Securing the other pair of Drawer Runner (RM35A) to the Drawer Box using Screw (M), continue with Drawer Knob (Q) using Screw (R) RM35A Hardware required. Screwdriver not included STEP 12: Repeat Step 9 - 11 to assembly 2 more drawers Now you have 3 drawers to complete the sideboard Customer Service 908-368-1025︱...
- Page 10 EEI-2531 SIDEBOARD STEP 13: Drawer with warning labels on top WARNING ATTENTION ADVERTENCIA Children have died from furniture tipover. Les enfants sont morts de basculement Los niños han muertopor vuelco de To reduce the risk of furniture tipover: dans les meubles. Réduire les risques de muebles.
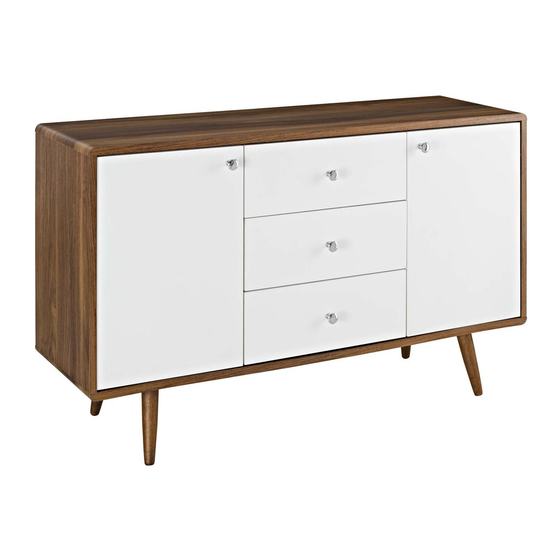
- Page 11 EEI-2531 SIDEBOARD STEP 15: Assembly is complete. The Sideboard is ready to enjoy now ! Customer Service 908-368-1025︱ www.modway.com Page 11 of 11...
- Page 12 4. Lace the end of the restraints strap through the larger hole in each brackret. Ensure the restraints strap with grids surface facing the inner loops. Bring both ends together and slide the flat end through the locking end and draw it through until all slack is removed. 5. Make sure that the strap is securely laced & locked. Customer Service 908-368-1025︱www.modway.com...
Need help?
Do you have a question about the EEI-2531 and is the answer not in the manual?
Questions and answers