Table of Contents
Advertisement
Quick Links
Advertisement
Table of Contents

Summary of Contents for Advanced Radio Smart Switch
- Page 1 Smart Switch Quick Start Guide...
- Page 2 Before installation please ensure that your batteries are fully charged. The smart switch relies on this to know how much you have used in each pack. WARNING The Smart Screen shows you how much you have used out of each pack and displays this as an indicator on the Smart Screen.
- Page 3 This means you get the maximum capacity out of both batteries all the time. * 2 x 25 amp independent circuits. Smart Switch is 2 x 25amp circuits into a high power matching battery redundancy circuit. Smart Switch actually uses 4 x 50 amp rated FET circuits for battery power matching.
-
Page 4: Installation And Mounting Instructions
Installation and Mounting Instructions In this section we will explain how to mount both the Smart Switch and the Smart Display. Mounting the Smart Switch Included with the Smart Switch are 3 pieces of 3M Clear Velcro tape (seen below). One of these pieces should be used to mount the switch. - Page 5 Mounting the Smart Display There are 2 options of mounting the Smart display. NOTE: Which ever method of mounting you choose, ensure the purple cable that comes out of the Smart Display is not crushed in anyway. Doing so will reduce the longevity of the cables.
- Page 6 Single Receiver Self Balancing Receiver Receiver Battery Input Battery 1 Or Regulator Red Input Cable Yellow OutPut Cable Smart Switch with Red OutPut Cable 2 inputs and 2 outputs Yellow Input Cable Self Balancing Receiver Battery 2 Additional Receiver Battery Input...
- Page 7 General Usage and Screen Information Important: The Smart Display that is supplied with the Smart Switch is a touch screen display. It is used in both setup and provide feedback to the user about battery voltage and milliamps used. The screen was designed to be mounted in a model for quick and easy use.
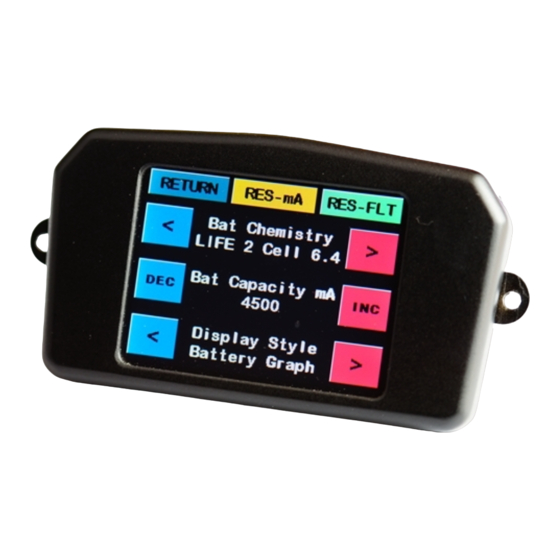
- Page 8 Power Setup Return Takes you back to the previous screen. RES-mA Resets total mA used. Please ensure both packs are FULLY charged before reset. RES-FLT Resets flight counter and timer to zero. Bat Chemistry Shows the battery chemistry you are using in the model.
-
Page 9: First Time Setup
First Time Setup We are now going to go proceed with a first time setup of the Smart Switch . Please en- sure your batteries are fully charged before you setup the smart switch. If you need any additional help with what each button or item does please read the General Usage and Screen information page located on page 7 of this manual. - Page 10 This is the battery setup screen. Using the arrows (<, >)next to Bat Chemistry cycle through until you see the chemistry you are using with the switch. The Smart Switch works with both 2S (6.0V—8.4v) and 3S (10.8—12.8V) packs The Options are Lipo, Li-ion, Life, NiCd, NiMH.
-
Page 11: Low Voltage Warning
We recommend you do not fly and you check your battery packs. IMPORTANT: The Smart Switch has been designed to work with 2S and 3S chemistries. If you receive this warning during setup, please check that you have set the correct chemistry... -
Page 12: Screen Calibration
WARNING Screen calibration is a simple but extremely important process and could render the Smart Switch unusable if done incorrectly. Only do this if the touch screen does not respond properly when touched. We recommend you use a blunt fi- ne point to follow this process. -
Page 13: Additional Screens
Display Style At the bottom of the Power Setup screen is an item called Display Style. With Smart Switch we have included 2 different battery indicators that can show on the main smart screen. These images provide a quick indication of the amount of capacity remaining in the battery packs you are using. - Page 14 No you don’t. The Smart Switch will work perfectly without the Smart Display attached. As soon as you plug in the display it will show you the all the information. The Smart Switch comes with 2 outputs. I am only using 1 receiver, what do I do with the oth- er cable? You can plug both cables into a single receiver, giving it access to more power if needed.
- Page 15 12 Month Replacement Warranty Advance Radio will replace this product within 12 months if found to be defective in material and/or workmanship when used in the intended purpose. The warranty does not cover - Shipping charges related to any warranty claim. An over voltage or over current usage be- yond stated specification.
Need help?
Do you have a question about the Smart Switch and is the answer not in the manual?
Questions and answers