
Subscribe to Our Youtube Channel
Summary of Contents for CHERUBINI METAHome
- Page 1 METAHome Gateway doppia radio Dual radio Gateway Doppelfunk-Gateway Gateway radio double Gateway radio dual ISTRUZIONI - INSTRUCTIONS - EINSTELLANLEITUNGEN INSTRUCTIONS - INSTRUCCIONES...
-
Page 3: Table Of Contents
TRANSLATION OF THE ORIGINAL INSTRUCTIONS Index: Device description ....................p. 16 METAHome Gateway application for smartphones and tablets ......p. 17 Gateway connection ..................... p. 17 LED status indicator ....................p. 17 Switching on Gateway ..................p. 18 Gateway shutdown ....................p. 18 Registration and first access to the Gateway ............ -
Page 4: Device Description
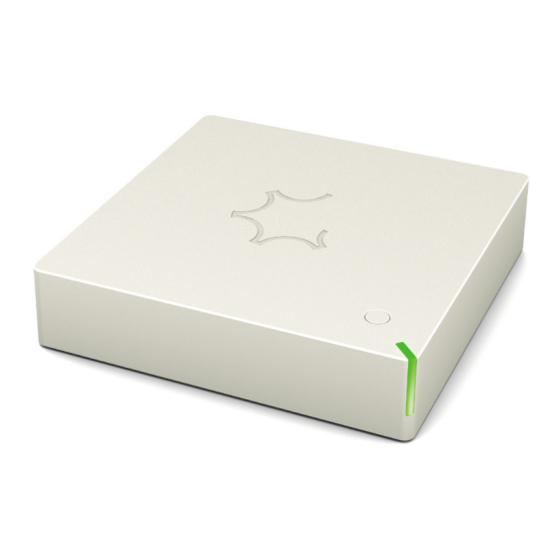
DEVICE DESCRIPTION The METAHome Gateway is a home automation control unit designed to control Z-Wave devices from any manufacturer; it also allows the control of Cherubini radio tubular motors. The METAHome Gateway will enable the control of various products for domestic use, such as lights, power loads, blinds, etc., which communicate via Z-Wave or 433 radio... -
Page 5: Metahome Gateway Application For Smartphones And Tablets
METAHOME GATEWAY APPLICATION FOR SMARTPHONES AND TABLETS To operate the METAHome Gateway control unit, you need to install the META Home app on your Smartphone or Tablet. App METAHome GATEWAY CONNECTION First, connect the device to the LAN socket via the Ethernet cable (RJ45) and connect it to the mains via its power supply. -
Page 6: Switching On Gateway
SWITCHING ON GATEWAY The Gateway turns on as soon as it is powered. If it had previously been switched off using the ON/OFF button on the Gateway, it is switched on by pressing and holding the ON/OFF button for approximately one second. The LED will illuminate with a YELLOW light. - Page 7 By entering the default credentials and clicking on the Log in button (fig.3), the App will wait for about 10 seconds (fig. 4), during which time you must click on the ON/OFF button on the Gateway to accept the connection. The LED will start flashing BLUE quickly and then GREEN quickly as soon as the connection is confirmed.
-
Page 8: Local Access
LOCAL ACCESS If the LAN does not have access to the Internet, it is possible to connect to the Gateway via local access. By clicking on “Perform local access” (fig. 9), you choose to access the Gateway directly via the local LAN, and you must specify the IP address assigned to the Gateway (fig. 10 and 11). -
Page 9: Description Of The Main Screen
DESCRIPTION OF THE MAIN SCREEN Integrated temperature, humidity and brightness sensors Under GROUPS section, you will find the list of all devices included in the Gateway. Home page... -
Page 10: Inclusion Of A Z-Wave Device
INCLUSION OF A Z-WAVE DEVICE In the main screen by clicking on the + icon, the drop-down menu for including new devices appears (fig. 14). Select the Z-Wave network and in the next screen, click on “Add device” (fig. 15). On the next screen (fig. -
Page 11: Exclusion Of A Z-Wave Device
EXCLUSION OF A Z-WAVE DEVICE In the main screen by clicking on the + icon, the drop-down menu for including new devices appears (fig. 14). Select the Z-Wave network and in the next screen, click on “Remove device” (fig. 22). In the next screen (fig. -
Page 12: Pairing And Unpairing A Device From The 433 Radio Network
PAIRING AND UNPAIRING A DEVICE FROM THE 433 RADIO NETWORK On the main screen (fig. 26), clicking on the + icon will bring up the drop-down menu for including new devices (fig. 27). Select the CRC RX radio network and in the next screen, click on the type of device you wish to pair with the Gateway (fig. - Page 13 Possible actions are: - Pair a new device: this action is only required when installing the device (motor or control unit) for the first time when no remote control has yet been paired with the device. - Pair from the remote control: Use when you want to pair the META app with a device already associated with remote control.
-
Page 14: Smart Management
SMART MANAGEMENT Through the Gateway, you can set up various smart scenarios according to your habits and needs, programming the operations of smart devices and the interactions between them. From the main screen (fig. 33), you can get to the Smart management screen (fig. 34), from which you can set Scenes, schedule devices to turn on and off and set rules for interaction between devices. -
Page 15: Eu Declaration Of Conformity
Il mancato rispetto di queste istruzioni annulla la responsabilità e la garanzia CHERUBINI. EU declaration of conformity CHERUBINI S.p.A. declares that the product is in conformity with the relevant Union harmonisation legislation: Directive 2014/53/EU, Directive 2011/65/EU. The full text of the EU declaration of conformity is available upon request at the following website: www.cherubini.it. - Page 16 CHERUBINI S.p.A. Via Adige 55 25081 Bedizzole (BS) - Italy Tel. +39 030 6872.039 | Fax +39 030 6872.040 info@cherubini.it | www.cherubini.it CHERUBINI Iberia S.L. Avda. Unión Europea 11-H Apdo. 283 - P. I. El Castillo 03630 Sax Alicante - Spain Tel.
Need help?
Do you have a question about the METAHome and is the answer not in the manual?
Questions and answers