Advertisement
Quick Links
Advertisement

Related Manuals for BMG E3D V6

Summary of Contents for BMG E3D V6
- Page 1 YouMakeTech ©2022 Page 1...
- Page 2 Step 1: Connect the E3D V6 hotend at the output of the BondTech BMG (PTFE tube length = 37 mm) YouMakeTech ©2022 Page 2...
- Page 3 Step 2: Insert the NEMA 17 Stepper motor into the BondTech BMG YouMakeTech ©2022 Page 3...
- Page 4 Step 3: Connect the BondTech E3D V6 assembly to the BMGV6 Plate M3x40 mm bolt YouMakeTech ©2022 Page 4...
- Page 5 Step 4: Attach the assembly from Step 3 to the printer carriage (holes for Ender 3 Pro shown on picture) M3x8 mm bolt M3x8 mm bolt YouMakeTech ©2022 Page 5...
- Page 6 Step 5: Attach the BMG V6 back brace M3x45 mm bolt M3x45 mm bolt YouMakeTech ©2022 Page 6...
- Page 7 Step 6: Insert the 5015 blower fan into the fan duct YouMakeTech ©2022 Page 7...
- Page 8 Step 7: Insert 2x M3 nuts to attach the fan duct assembly M3 nut YouMakeTech ©2022 Page 8...
- Page 9 Step 7 Continued M3 nut YouMakeTech ©2022 Page 9...
- Page 10 Step 8: Attach the fan duct assembly M3x20 mm bolt M3x20 mm bolt YouMakeTech ©2022 Page 10...
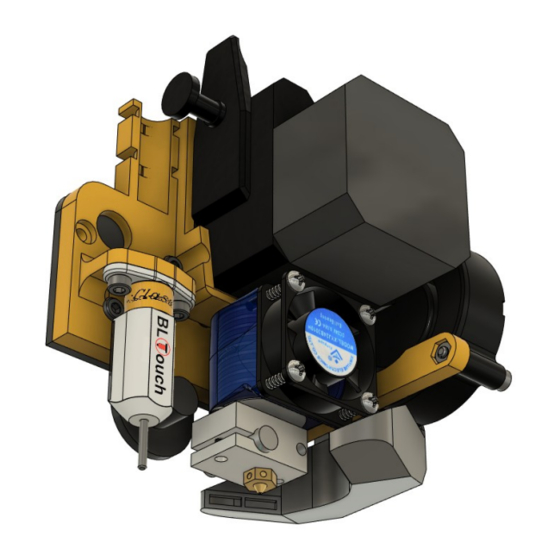
- Page 11 Step 9: Attach the BLTouch M3 nuts (x2) YouMakeTech ©2022 Page 11...
- Page 12 Step 9 Continued: Attach the BLTouch M3x8 mm bolts (x2) YouMakeTech ©2022 Page 12...
- Page 13 Step 10: Attach cables to the base with 2 zip ties Zip ties (x2) YouMakeTech ©2022 Page 13...
Need help?
Do you have a question about the E3D V6 and is the answer not in the manual?
Questions and answers