
Related Manuals for Worcester Greenstar 80mm Flexi RF Flue

Summary of Contents for Worcester Greenstar 80mm Flexi RF Flue
- Page 1 Flue kit installation instructions Floor standing gas-fired condensing appliance flue Greenstar 80mm Flexi RF Flue Flexible Flue Liner...
-
Page 2: Table Of Contents
H Danger to life from poisoning by flue gas There is a danger to life from escaping flue gas. ▶ Ensure that flues and gaskets are not damaged. Greenstar 80mm Flexi RF Flue – 6721814542 2019/09... -
Page 3: Requirements
Requirements Installation The flue installation must be fitted and terminated in accordance with your local regulations. Support Flues require adequate support throughout their entire run. Flue System Greenstar 80mm Flexi RF Flue – 6721814542 2019/09... -
Page 4: Product Information
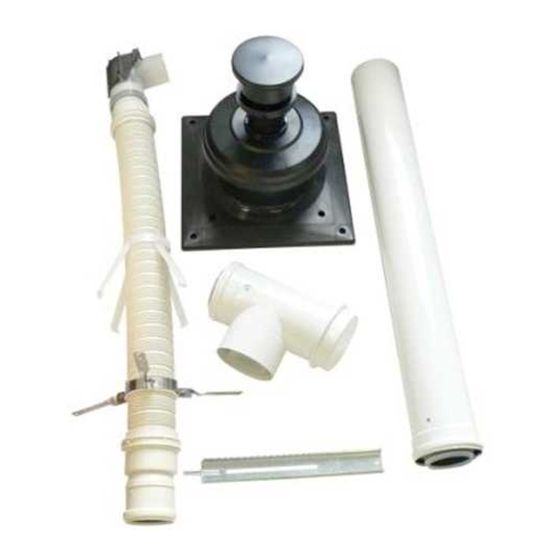
Product information Product information Room sealed 80mm flexible flue liner For use with the following Worcester Greenstar gas-fired appliances: FS 30CDi Regular FS 42CDi Regular RS Flexible flue components (80mmØ ) No. Description Quantity Flue terminal Chimney cowl Self adhesive weather seal... -
Page 5: Flue Extension Components
7. Fig. 3 Extension components Type of building Fire resistance single storey 30 minutes multi storey 90 minutes Table 7 Fire resistance of chimney material Greenstar 80mm Flexi RF Flue – 6721814542 2019/09... -
Page 6: Chimney Preparation
= 3m Table 11 Example: Horizontal flue length Vertical effective flue length (with 2 x 45° bends) L max = 12m 2 x 45° bend = 3m Table 12 Example: Vertical flue length Greenstar 80mm Flexi RF Flue – 6721814542 2019/09... -
Page 7: Installation
▶ Mark the position of elbow support, ensuring that the mark is centred within the opening made in the chimney wall. ▶ Drill a Ø 10mm hole 60mm deep into the chimney wall. Fig. 8 Drilling security hole Greenstar 80mm Flexi RF Flue – 6721814542 2019/09... -
Page 8: Installing The Flue Elbow Support
▶ Place the elbow assembly in the chimney. ▶ Ensure that the elbow support is horizontal and the elbow centrally positioned with the chimney space. ▶ Secure the assembly with a screw as shown in fig. 11 Greenstar 80mm Flexi RF Flue – 6721814542 2019/09... - Page 9 Snap off the centralising spacer at the perforated section marked 80mm to suit the flue. Secure the centralising spacer around the flexible liner as shown in fig. 14 0010029250-001 Fig. 13 Flue spacer 0010029255-001 Fig. 15 Positioning spacers Greenstar 80mm Flexi RF Flue – 6721814542 2019/09...
-
Page 10: Flexible Flue Liner Installation
1. Feed the flexible liner assembly into the chimney from the top. out. 2. Insert the adaptor into the support elbow. 4. Push the locking tabs in until they click into place and are locked. 0010028890-001 Fig. 17 0010029153-001 Fig. 16 Greenstar 80mm Flexi RF Flue – 6721814542 2019/09... -
Page 11: Installing Flue Terminal And Cowl
Secure the cowl (7) with the screws provided. If the chimney cowl is too large: ▶ Cut the chimney cowl down along the moulded marks and use the inner set of securing points. 0010029268-001 Fig. 20 Greenstar 80mm Flexi RF Flue – 6721814542 2019/09... -
Page 12: Converting The Flue Outlet
Fitting the flue adaptor To ease the assembly of the flue components: ▶ Grease all seals lightly with solvent-free grease. ▶ Ensure all seals are seated properly and are in good condition. Greenstar 80mm Flexi RF Flue – 6721814542 2019/09... -
Page 13: Extensions And Elbows
▶ Do not modify flue elbows or the tee piece. Fig. 28 Assembling extensions and elbow 0010029160-001 Fig. 26 Cutting the flue extension The flue pipe must not be closer than 25mm to any combustible material. Greenstar 80mm Flexi RF Flue – 6721814542 2019/09... -
Page 14: Fitting The Horizontal Flue
Fig. 31 Connecting tee piece to appliance flue outlet 5. Align the two inspection plates with the seal. 6. Screw the two plates together with four self tapping screws. 0010029166-001 Fig. 33 Fixing inspection plates to chimney Greenstar 80mm Flexi RF Flue – 6721814542 2019/09... -
Page 15: Servicing And Spares
3. Remove the screws that secure the inspection plate and slide the inspection plate away from the chimney. 0010029322-001 Fig. 35 Spare parts 0010029321-001 Fig. 34 Visual check Replace all end covers and the inspection plate after visual inspection of the flue system. Greenstar 80mm Flexi RF Flue – 6721814542 2019/09... - Page 16 CONTROLS AND CONNECTIVITY TEAM: 0330 123 3641 APPOINTMENTS: 0330 123 9339 SPARES: 0330 123 9779 LITERATURE: 0330 123 9119 TRAINING: 0330 123 0166 SALES: 0330 123 9669 Bosch Thermotechnology Ltd. Cotswold Way, Warndon Worcester WR4 9SW United Kingdom Tel. 0330 123 9559 worcester-bosch.co.uk...
Need help?
Do you have a question about the Greenstar 80mm Flexi RF Flue and is the answer not in the manual?
Questions and answers