
Related Manuals for Baby auto BIRO fix


Summary of Contents for Baby auto BIRO fix
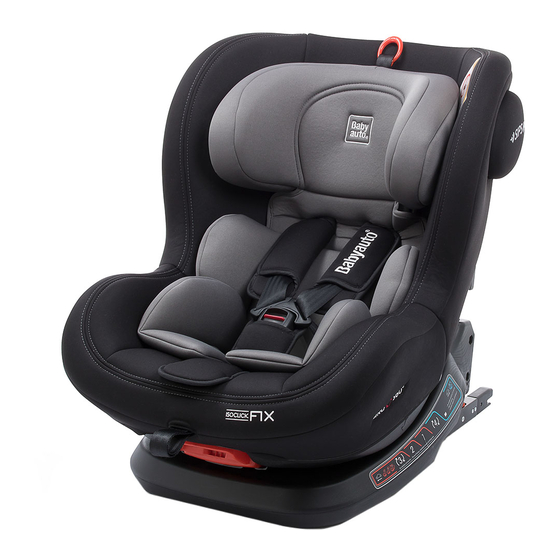
- Page 1 BIRO fix Grupo Group Groep — Apto para Suitable for Geschikt voor — 0 - 25 kg MANUAL DE USO INSTRUCTIONS FOR USE GEBRUIKSAANWIJZING...
- Page 2 NO INSTALAR LA SILLA EN EL ASIENTO DELANTERO EN SENTIDO CONTRARIO A LA MARCHA SI LOS AIRBAGS DELANTEROS ESTÁN ACTIVOS. — IF THE CAR IS EQUIPPED WITH ACTIVE FRONT SEAT AIRBAGS, IT IS PROHIBITED TO PLACE A CHILD IN A REAR-FACING SEAT IN THE FRONT OF THE CAR.
- Page 3 Español — INSTRUCCIONES DE USO - Sistema de retención infantil Grupo 0+ /1 /2. De 0 a 25 kg (de 0 a 6 años aprox.) English — INSTRUCTION MANUAL - Child safety seat Group 0+ /1 /2. From 0 kg to 25 kg (from 0 to 6 years approx) Nederlands —...
- Page 4 • Vista general • Overview • Algemeen overzicht • Puestos de instalación en el vehículo • Installatieposities in de auto • Installation positions whitin the vehicle Cinturón Diagonal Diagonale diagonal. belt. schouder gordel Cinturón Abdominal Heupgordel abdominal. belt.
- Page 5 • Instalación de la silla Grupo 0+ • Installatie van de autostoel als Groep 0+ • Installing the child seat Group 0+ CLICK CLICK ordel...
- Page 6 • Instalación del niño Grupo 0+ • Uw kind vastzetten in de autostoel Groep 0+ • Fastening the child into the seat Group 0+ CLICK • Ajuste en altura del reposacabezas • De hoogte van de hoofdsteun regelen • Regulating the headrest height...
- Page 7 • Instalación de la silla Grupo 1 • Installatie van de autostoel als Groep 1 • Installing the child seat Group 1 CLICK CLICK...
- Page 8 • Desinstalación del sist. Isoclick Fix • Desinstallatie van het Isoclick Fix Systeem • Uninstalling the Isoclick Fix system • Retirar el arnés y la hebilla del cinturón • De gordels en de gesp verwijderen • Removing the harness and the buckle...
- Page 9 • Instalación de la silla Grupo 2 • Installatie van de autostoel als Groep 2 • Installing the child seat Group 2 CLICK...
- Page 10 IMPORTANTE Lea cuidadosamente ANTES de instalar la silla infantil en el vehículo. AVISO 1. Sólo es apropiado si los vehículos homologados están provistos de cinturones de seguridad de tres puntos, homologados por el Reglamento nº 16 de la CEPE u norma equivalente. 2.
-
Page 11: Vista General
13. No deje objetos pesados en el interior del coche, porque en caso de accidente podrían lesionar al niño. 14. Compruebe que la hebilla está correctamente cerrada, porque en caso de emergencia el niño podrá ser liberado rápidamente. 15. Los artículos rígidos y las piezas de plástico de la silla de seguridad deben colocarse e instalarse de forma que no puedan, durante el uso diario del vehículo, quedar atrapados en un asiento móvil o en una puerta del coche. - Page 12 2. PUESTOS DE INSTALACIÓN EN EL VEHÍCULO DÓNDE: En los asientos traseros del vehículo NO instalar en los asientos delanteros salvo en estos casos concretos: 1. Cuando el vehículo no disponga de asientos traseros. 2. Cuando todos los asientos traseros estén ya ocupados por menores de edad de estatura igual o inferior a 135 centímetros.
- Page 13 4. Coloque la silla del niño en la bancada trasera del vehículo en dirección contraria a la marcha. 5. Introduzca los dos brazos del sistema Isoclick Fix® firmemente en los anclajes isofix del coche hasta que los brazos de bloqueo queden acoplados con un clic en ambos lados.
- Page 14 niño los arnés debe quedar bien ceñido. 5. REGULACIÓN EN ALTURA DEL REPOSACABEZAS Un reposacabezas correctamente ajustado garantiza la protección óptima del niño en la silla de seguridad. El reposacabezas debe ajustarse para que las correas de los hombros estén al mismo nivel que los hombros del niño (fig.
- Page 15 5. Sacuda la silla para comprobar que está correctamente anclada a los puntos ISOFIX del vehículo. 6. Tome el cinturón del vehículo y páselo a través de las ranuras soporte de la silla (fig. 6.4 y 6.5) y conecte el cinturón en su hebilla hasta oir un click tal y como indica la fig.
- Page 16 9. INSTALACIÓN DE LA SILLA. GRUPO 2 Solamente GRUPO 2. Desde aprox. AVISO los 4 a 6 años (15-25 Kg) Antes de instalar la silla como Grupo 2 , Deberá retirar de la silla el arnés (B), los protectores del arnés y la hebilla del cinturón (D).
-
Page 17: Limpieza Y Mantenimiento
del cinturón de seguridad del vehículo, ni impide la instalación de la silla de ninguna manera. Preste atención que el cinturón quede completamente tenso. 11. LIMPIEZA Y MANTENIMIENTO 1. Para el lavado de las cintas y partes de plástico enjabonar con detergente neutro y agua templada. - Page 18 IMPORTANT Read the instructions carefully before installing the child seat in the vehicle. NOTICE 1. Only suitable if the approved vehicle has been fitted with three-point safety belts that meet ECE standard Nº 16 or equivalent. 2. Under no circumstances should the safety seat be installed in the front seat of the car opposite the direction of travel if the car is equipped with an active airbag.
-
Page 19: General Overview
in the event of an accident. 14. Make sure that the buckle is correctly fastened so that the child can be quickly freed in case of emergency. 15.The safety seat’s rigid and plastic elements should be positioned and installed so that they cannot be trapped by a moving seat or a door during everyday use of the vehicle. - Page 20 2. VEHICLE INSTALLATION POINTS WHERE: In the vehicle rear seats. Please, do NOT install the safety seat in forward seats except for the following cases: 1. Whenever the vehicle does not count with rear seats. 2. When all rear seats are already occupied by children exceeding 135 cm height. 3.
- Page 21 5. Shake the seat to check that it is correctly anchored to the vehicle’s ISOFIX points. 6. Pass the vehicle seat belt through the slots on the security support of the safety seat and buckle the vehicle seat belt until you hear a click (fig.
- Page 22 the harness adjustment button (fig. 5.1). Tip: Only pull on the harness straps. Not the shoulder pads. 2. Adjust the headrest according to the child´s height by pulling the headrest height regulator adjusting the harness to the height of the child´s shoulder or slightly above (fig. 5.2). 6.
- Page 23 1. Loosen the harness straps by pulling them gently while pressing the harness adjustment button (fig.8.1) 2. Loosen the harness straps from the back of the seat, freeing them from the harness connector (I). Repeat the operation with the shoulder straps connector (fig.
-
Page 24: Cleaning And Maintenance
the direction of travel. 3. Pass the vehicle seat belt through the slot on the back of the safety seat until it appears at the exit as you see in the illustrations 9.2 and 9.3. 4. Place the child in the seat. 5. - Page 25 BELANGRIJK Lees de gebruiksaanwijzing aandachtig door voordat u het autostoeltje in de auto installeert OPMERKING 1. Alleen geschikt als het goedgekeurde voertuig is uitgerust met een 3-punts autogordel die voldoet aan de ECE Norm N° 16 of gelijkwaardig. 2. De autostoel mag nooit tegen de rijrichting op de voorstoel van de auto worden geïnstalleerd als de auto is uitgerust met een actieve airbag.
-
Page 26: Algemeen Overzicht
13. Laat geen zware voorwerpen los in de auto liggen, aangezien deze het kind kunnen bezeren in geval van een ongeluk. 14. Zorg ervoor dat de gesp correct is vergrendeld, zodat het kind snel bevrijd kan worden in geval van een ongeluk. 15. - Page 27 2. INSTALLATIEPUNTEN IN DE AUTO WAAR: In de achterstoelen van de auto Plaatst de autostoel NIET op de voorstoelen van de auto behalve als: 1. De auto geen achterbank heeft 2. Wanneer de gehele achterbank al bezet is door kinderen die groter zijn dan 135cm.
- Page 28 knop zal veranderen in groen aan beide zijden als deze goed is vastgemaakt (zie fig. 3.4). 5. Schud de autostoel om te controleren of deze correct is verankerd aan de ISOFIX punten van het voertuig. 6. Doe de autogordel door de gleuven van het plastic deel dat tegen de achterbank aan staat en klik de gesp van de autogordel vast totdat u een klik hoort (zie fig.
- Page 29 1. Maak de gordelriemen iets losser door er zachtjes aan te trekken en tegelijkertijd de gordelverstelknop in te drukken (fig. 5.1) Tip: trek alleen aan de gordelriemen. Niet aan de gordelbeschermers. 2. TVerstel de hoofdsteun op hoogte van het kind door aan de hoofdsteunregelaar te trekken en zo de gordel op schouderhoogte te verstellen of net iets daar boven (fig.
- Page 30 8. DE GORDEL EN DE GESP VERWIJDEREN 1. Het verwijderen van de 5-punts gordel en de gesp 1. Maak de gordelriemen los door er zachtjes aan te trekken terwijl u op de gordelverstelknop drukt (fig.8.1) 2. Haal de gordels los uit de achterkant van de autostoel en maak ze los van de gordel riem connector (I).
-
Page 31: Schoonmaken En Onderhoud
mee. 3. Haal de autogordel door de gleuf aan de achterkant van de autostoel totdat deze er aan de andere kant weer uit komt (zie fig. 9.2 en 9.3). 4. Zet het kind in de autostoel. 5. Haal de autogordel over het lichaam van het kind en haal deze door de gleuf aan de andere kant en maak de autogordel vast totdat je een klik hoort (fig 9.4). - Page 32 babyauto.com BABYAUTO GROUP GR. 0-I-II Parque Empresarial Zuatzu ECE R44/04 Edificio Donosti, 2ª planta Oficina 3 0/25 kg 20018 San Sebastián (Gipuzkoa) Spain t. (+34) 943 833 013 f. (+34) 943 833 004 e. info@babyauto.com...
Need help?
Do you have a question about the BIRO fix and is the answer not in the manual?
Questions and answers