Table of Contents
Advertisement
Product manual
Technolog Limited,
Ravenstor Road,
Wirksworth,
DE4 4FY,
United Kingdom
Cello 6S 'Water'
T: +44 (0) 1629 823611
E: technolog@technolog.com
www.technolog.com
DMR No.: 7311
Copyright Technolog Ltd. 2017. All rights reserved.
C
Information contained in this document subject to
change without prior notice.
2137PM9001 Rev. A
Sheet 1 of 41
Advertisement
Table of Contents

Summary of Contents for TECHNOLOG Cello 6S
- Page 1 Product manual Cello 6S 'Water' Copyright Technolog Ltd. 2017. All rights reserved. Technolog Limited, T: +44 (0) 1629 823611 Information contained in this document subject to Ravenstor Road, E: technolog@technolog.com change without prior notice. Wirksworth, www.technolog.com DE4 4FY, 2137PM9001 Rev. A...
-
Page 2: Table Of Contents
38 - Installation: Mounting on pipes / poles 39 - Installation: Boundary box 40 - Installation: Security sealing 41 - Installation: Battery pack replacement Copyright Technolog Ltd. 2017. All rights reserved. Technolog Limited, T: +44 (0) 1629 823611 Information contained in this document subject to Ravenstor Road, E: technolog@technolog.com... -
Page 3: Considerations (Product Overview, Environment, Installation, Approvals)
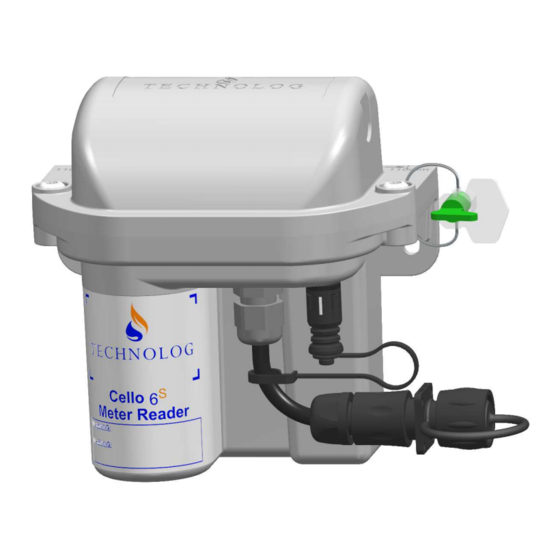
Considerations Product overview The 'water' version of Cello 6S is a battery powered, fully integrated, data logger designed primarily for the remote monitoring, recording and analysis of pulse input data in automatic meter reading ('AMR') applications within water distribution networks. Data is transmitted remotely over cellular 2G (GSM) and / or 3G (UMTS) mobile telecommunications networks. -
Page 4: Precautions (Handling, Cleaning, Lithium Battery Packs / Cells, Disposal / End Of Life)
Disposal / end of life The Cello 6S is electrical / electronic equipment and as such, at end of life, it must not be disposed of as unsorted municiple waste but collected separately in order to allow correct and environmentally sound treatment and recycling. -
Page 5: Features
("FLxM / RSD" (2m length (GSM) / 3G (UMTS). as standard)) • Internal antenna or external antenna connection options. Copyright Technolog Ltd. 2017. All rights reserved. Technolog Limited, T: +44 (0) 1629 823611 Information contained in this document subject to Ravenstor Road, E: technolog@technolog.com change without prior notice. - Page 6 Internal battery pack, user replaceable Internal battery pack connection SIM card holder (user replaceable SIM) Copyright Technolog Ltd. 2017. All rights reserved. Technolog Limited, T: +44 (0) 1629 823611 Information contained in this document subject to Ravenstor Road, E: technolog@technolog.com change without prior notice.
-
Page 7: Dimensions
Dimensions 129 mm • Approximate weight: 0.64kg Copyright Technolog Ltd. 2017. All rights reserved. Technolog Limited, T: +44 (0) 1629 823611 Information contained in this document subject to Ravenstor Road, E: technolog@technolog.com change without prior notice. Wirksworth, www.technolog.com DE4 4FY, 2137PM9001 Rev. -
Page 8: Maintenance: Entering The Enclosure
Copyright Technolog Ltd. 2017. All rights reserved. Technolog Limited, T: +44 (0) 1629 823611 Information contained in this document subject to Ravenstor Road, E: technolog@technolog.com... -
Page 9: Maintenance: Refitting The Enclosure Lid
Refit the screws and washers then, using the appropriate screw driver, carefully tighten the screws to a torque of 5)cNm Copyright Technolog Ltd. 2017. All rights reserved. Technolog Limited, T: +44 (0) 1629 823611 Information contained in this document subject to Ravenstor Road, E: technolog@technolog.com... -
Page 10: Maintenance: Sim Card Fitting / Replacement
Step 6 Refit the lid as indicated in the "Maintenance: refitting the enclosure lid" section of this manual. Copyright Technolog Ltd. 2017. All rights reserved. Technolog Limited, T: +44 (0) 1629 823611... -
Page 11: Installation: Standard Connections - Local Communications ("Comms")
At the end of the communication session, disconnect the 'FBU' and, to prevent the ingress of water and debris, refit the protective cap to the 'COMMs' connector. Copyright Technolog Ltd. 2017. All rights reserved. Technolog Limited, T: +44 (0) 1629 823611... -
Page 12: Installation: Standard Connections - Inputs / Outputs
Channel1+ White GND (0V) Note - as indicated above, a cable from the Technolog CBL001-x range may be used to attach to this connector. 'Flying lead' input cable ("FLxm" where 'xm' denotes cable length (2m as standard)) "FLxm" input connections... -
Page 13: Intallation: Standard Connections - Optional External Antenna
An 'SMA' jack socket is optionally provided for the connection of an external cellular mobile telecommunications network antenna. Where this socket is fitted the Cello 6S does not feature an internal antenna therefore in order to facility remote communications an external antenna must be fitted. -
Page 14: Installation: Commissioning - Initial Requirements
- initial requirements. Before starting the process of commissioning your Cello 6S it is to be ensured that the it has been fitted with a SIM card as per the "Maintenance: SIM card fitting / replacement" section of this manual. It also to be ensured that the computer / laptop / tablet you are using has the latest release of Technolog "Cello 6 Wizard"... -
Page 15: Installation: Commissioning - Cello 6 Wizard: Setup
- Select "OK" once the required port is indicated. Step 4 - You will now be returned to the "Welcome" page. - Select "Next" Copyright Technolog Ltd. 2017. All rights reserved. Technolog Limited, T: +44 (0) 1629 823611 Information contained in this document subject to Ravenstor Road, E: technolog@technolog.com... -
Page 16: Installation: Commissioning - Cello 6 Wizard: Signal Strength
2G (GSM) / 3G (UMTS) signal strength readings registered by the Cello's modem in its current location. - To carry out the spot test, place the Cello 6S in the preferred installation location and select "Start" - The software now initializes the Cello 6S modem and begins testing the cellular signal strength. -
Page 17: Installation: Commissioning - Cello 6 Wizard: Channel Configuration
- The initial "Configure Channels" page is now displayed. - Set the logging rate at which the Cello 6S logs the data collected from the meter to which it is attached. This is can be set between the minimum rate of 1 minute ("1 min") and the maximum rate of 1 hour (typically a 30 minute ("30 min") logging rate is... - Page 18 Installation: Commissioning - Cello 6 Wizard: Channel configuration (continued) - This is a Cello 6S 'Water' variant so neither of the "NAMUR" or "LPG" boxes are to be ticked. - Where required Cello 6S can be instructed to either send only that day's daily index reading by ticking the "Send today's meter reading"...
-
Page 19: Installation: Commissioning - Cello 6 Wizard: Setting The Time
- The "Set the time" page is now displayed showing the current time and date according to the PC / laptop / tablet being used to setup the Cello 6S as well as the time and date and the date and time already setup in the Cello 6S already setup in the Cello 6S itself. -
Page 20: Installation: Commissioning - Cello 6 Wizard: Meter Settings
- For example where the here the "Ch1" and "Tamper" options were selected: - For example where only the "Ch1" option was selected: - For example where both the "Ch1" and "Ch2" options were selected: Copyright Technolog Ltd. 2017. All rights reserved. Technolog Limited, T: +44 (0) 1629 823611... - Page 21 "Pulse + / -" inputs of the Cello 6S in the "Meter 1" text box (this box can accept up to 13 characters). - Typically the meter outputs one pulse for a given volume of water passed through it.
- Page 22 "Tamper + / -" inputs of the Cello 6S in the "Meter 2" text box (this box can accept up to 13 characters). - Typically the meter outputs one pulse for a given volume of water passed through it.
-
Page 23: Installation: Commissioning - Cello 6 Wizard: Alarm Settings - General
Installation: Commissioning - Cello 6 Wizard: Alarm settings - General Step 9 - Alarm settings - The Cello 6S has a choice of two different alarm types: "Flow" (high / low) alarms "Daily usage" (high / low) alarms - Any channel(s) enabled at the "Installation: Commissioning - Cello 6 Wizard: Channel configuration"... -
Page 24: Installation: Commissioning - Cello 6 Wizard: Alarm Settings - Flow
('Currently Low') condition. - Where there is no channel 2, review the alarm settings and when they are are set as required, select "Next". Copyright Technolog Ltd. 2017. All rights reserved. Technolog Limited, T: +44 (0) 1629 823611... -
Page 25: Installation: Commissioning - Cello 6 Wizard: Alarm Settings - Daily Usage
- Using the "Select a channel" up / down arrows, toggle between the channels and review the alarm settings for both. - When the settings for both channels are as required, select "Next". Copyright Technolog Ltd. 2017. All rights reserved. Technolog Limited, T: +44 (0) 1629 823611... -
Page 26: Installation: Commissioning - Cello 6 Wizard: Alarm Settings - Finalising
- Using the "Select a channel" up / down arrows, toggle between the channels and review the alarm settings for both. - When the settings for both channels are as required, select "Next". Copyright Technolog Ltd. 2017. All rights reserved. Technolog Limited, T: +44 (0) 1629 823611... -
Page 27: Installation: Commissioning - Cello 6 Wizard: Base Station Details
- Enter the SMS contact number at which the host computer is to be contacted in the "SMS number" field. Note that by default the SMS contact number of the Utility Data Service Limited ('UDSL') Technolog Message Service Centre ('TMSC') is shown. - Review the fields and when they are are set as required, select "Next". -
Page 28: Installation: Commissioning - Cello 6 Wizard: Pmac Details
- Once set as required, select "Next". - Where it is required that the PMAC ID and site name of the Cello 6S are sent as identifiers then the "Use Default Values" box is to be left unticked. -
Page 29: Installation: Commissioning - Cello 6 Wizard: Dialout Settings - General
10 digits of the Cello's serial number are entered here. - Regardless of set up, the frequency that the Cello 6S will send its data is to be selected in the "Send frequency" drop-down box - refer to the following sheets for details of the available options. -
Page 30: Installation: Commissioning - Cello 6 Wizard: Dialout Settings - Daily / Weekly / Monthly Send
Where this option is not required then the box is to be left unticked. - The time of day at which it is required that Cello 6S will send its data is entered in the "Wakeup time" box. -
Page 31: Installation: Commissioning - Cello 6 Wizard: Dialout Settings - Other Send Options
Where this option is not required then the box is to be left unticked. - The time of day at which it is required that Cello 6S will send its data is entered in the "Wakeup time" box. - Page 32 Commissioning - Cello 6 Wizard: Setting the time" section of this manual for details. - Configures the time of day at which Cello 6S takes its readings and sends the data so the "Wakeup time" and "Gas day start" values cannot be changed.
-
Page 33: Installation: Commissioning - Cello 6 Wizard: Dialout Settings - Finalising
- When it has been ensured that all settings are as required, select "Finish". - The configuration setup is now written into the Cello 6S - Once completed the following is displayed: - Select "OK" to close the "Cello 6 Wizard" software. -
Page 34: Installation: Commissioning - Cello 6 Wizard: Finishing
- When it has been ensured that all settings are as required, select "Finish". - The configuration setup is now written into the Cello 6S - Once completed the following is displayed: - Select "OK" to close the "Cello 6 Wizard" software. -
Page 35: Installation: Commissioning - Cello 6 Wizard: Supplementary - Diagnostic
6 Wizard" software with that particular Cello 6S, select "Exit" to terminate the software. - Where further interrogation and / or setup of the particular Cello 6S is required, select "Next". Refer to section "Step 5 - Signal strength testing" of "Installation: Commissioning"... -
Page 36: Installation: Commissioning - Cello 6 Wizard: Supplementary - Push Data
Wizard" software with that particular Cello 6S, select "Exit" to terminate the software. - Where further interrogation and / or setup of the particular Cello 6S is required, select "Next". Refer to section the "Installation: Commissioning - Cello 6 Wizard: Signal strength"... -
Page 37: Installation: Wall Mounting
Notes 1) Where the Cello 6S does not feature an external antenna connector, i.e. it only has an internal antenna, then it should be positioned as high up as possible and, where practical, away from metal structures. In order to determine optimal Cello 6S performance a signal strength test should be perfomed (as detailed in the "Installation:... -
Page 38: Installation: Mounting On Pipes / Poles
22mm to 200mm (best fit on 22mm) Notes 1) Where the Cello 6S does not feature an external antenna connector, i.e. it only has an internal antenna, then it should be positioned as high up as possible and, where practical, away from metal structures. -
Page 39: Installation: Boundary Box
Installation: Boundary box Where it is required that the Cello 6S is located in a 'boundary' type box, the Cello 6S must first be mounted in a suitable 'cradle'. For illustration purposes an Atlantic Plastics (ATPLAS) "MeterBox" and associated Technolog 2137TT6000 mounting bracket are shown. -
Page 40: Installation: Security Sealing
Installation: Security sealing The Cello 6S enclosure has been designed in two halves; the main body and a removeable lid. As per "Features" section of this manual, the main body houses the circuit board, internal antenna, SIM card and replaceable battery pack. - Page 41 PCB then approved for use with Cello 6S, remove the battery pack from may be fitted: the enclosure. Tadiran p / no. 'TL5930/FTE' Note - the removed battery pack Technolog p / no.
Need help?
Do you have a question about the Cello 6S and is the answer not in the manual?
Questions and answers
how do you de-commission a 6s and clear out the p-mac and I.D, SO IT CAN BE USED IN A DIFFERENT LOCATION