Table of Contents
Advertisement
Quick Links
I N S T R U C T I O N M A N U A L
CAUTION
RISK OF ELECTRIC SHOCK
DO NOT OPEN
CAUTION : TO REDUCE THE RISK OF ELECTRIC SHOCK.
DO NOT REMOVE COVER (OR BACK).
NO USER SERVICEABLE PARTS INSIDE.
REFER SERVICING TO QUALIFIED SERVICE PERSONNEL.
The lightning flash with arrowhead symbol, within
an equilateral triangle, is intended to alert the user
to the presence of uninsulated "dangerous
voltage" within the product's enclosure that may
be of sufficient magnitude to constitute a risk of
electric shock to persons.
The exclamation point within an equilateral
triangle is intended to alert the user to the
presence of important operating and maintenance
(servicing) instructions in the literature
accompanying the appliance.
CAUTION
.
Do not use any power supply other than
specified.
WARNING
TO REDUCE THE RISK OF FIRE OR
ELECTRIC SHOCK, DO NOT EXPOSE
THIS APPLIANCE TO RAIN OR MOISTURE.
* The CAUTION label is attached on the
bottom of camera.
All manuals and user guides at all-guides.com
Q N W 4 0 0 0
INFORMATION
This equipment has been tested and found
to comply with the limits for Class A digital
device, pursuant to Part 15 of the FCC
Rules. These limits are designed to
provide reasonable protection against
harmful interference when the equipment
is operated in a commercial environment.
This equipment generates, use, and can
radiate radio frequency energy and, if not
installed and used in accordance with the
instruction manual, may cause harmful
interference to radio communications.
Operation of this equipment in a
residential area is likely to cause harmful
interference in which case the user will be
required to correct the interference at his
own expense.
USER-INSTALLER CAUTION:
authority to operate this FCC verified
equipment could be voided if you make
changes or modifications not expressly
approved by the party responsible for
compliance to Part of the FCC Rules.
Your
Advertisement
Table of Contents

Related Manuals for Elmo QNW4000


Summary of Contents for Elmo QNW4000
- Page 1 All manuals and user guides at all-guides.com Q N W 4 0 0 0 I N S T R U C T I O N M A N U A L INFORMATION CAUTION RISK OF ELECTRIC SHOCK This equipment has been tested and found DO NOT OPEN to comply with the limits for Class A digital CAUTION : TO REDUCE THE RISK OF ELECTRIC SHOCK.
-
Page 2: Important Safety Instructions
All manuals and user guides at all-guides.com IMPORTANT SAFETY INSTRUCTIONS 1. Read these instructions. 2. Keep these instructions. 3. Heed all warnings. 4. Follow all instructions. 5. Do not use this apparatus near water. 6. Clean only with dry cloth. 7. - Page 3 All manuals and user guides at all-guides.com Housing Protection Outdoor but under Outdoor not under Height or blowing Indoor roof or eaves roof or eaves place like steel tower (Shading cover required) Caution: - Do not install this camera at sea, at coast or in coastal area or at any corrosive gas generating place.
-
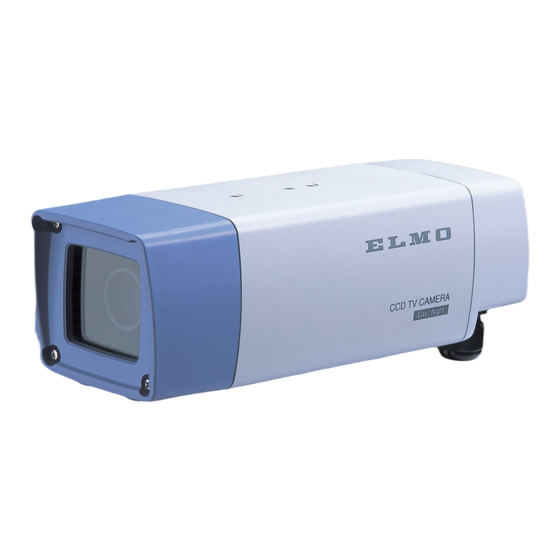
Page 4: Part Names And Functions
All manuals and user guides at all-guides.com PART NAMES AND FUNCTIONS 84 (3.3) 45 (1.8) 14 (0.6) 84 (3.3 ) 230 (9.1) 84 (3.3) 45 (1.8) 14 (0.6) All dimensions in mm (inch) Front glass Tripod fixing tapped holes (1/4-20UNC) These tapped holes are used to fix the camera on the tripod and mount the shade (optional) on the camera. - Page 5 All manuals and user guides at all-guides.com INT/LL switch INT (internal) control switch When the internal synchronization is used, set the switch to the INT side. LL (Line-Lock) control switch Matching the vertical synchronization with the power frequency is called the line-lock. When two or more cameras are switched by the video switcher to a monitor TV, the vertical sync.
- Page 6 All manuals and user guides at all-guides.com SENS-UP switch To increase the sensitivity, set this switch to ON position. DAY/NIGHT switch When the DAY/NIGHT function is used, this switch is turned ON. (See P. 9.) Camera output terminal This is an image output terminal. When the camera direction, the field angle or the focal point is adjusted, a monitor TV or other type display is connected to this terminal.
- Page 7 All manuals and user guides at all-guides.com Coaxial core clamp This clamp fixes the cores of the coaxial cable. Coaxial cable clamp This clamp fixes the sheath of the coaxial cable. Ground terminal This is a supplementary ground terminal. AC power terminal Connect this to the AC24V 60Hz power supply.
-
Page 8: How To Connect
All manuals and user guides at all-guides.com HOW TO CONNECT 1. Remove the rear cover, the GND cable, and the two 2P connectors. 2. Connect the coaxial cable and the power cable. After connecting the power cable on the terminal block, be sure to mount the protective cover. Caution: Fasten the weatherproof cap firmly, and make sure that the cable is fixed completely. - Page 9 All manuals and user guides at all-guides.com LENS 1. Built-in Lens This camera is built in with a dedicated varifocal lens. F: 1.4 f: 2.8mm~5.8mm 2. Lens adjustment Adjust the field angle of the lens with the zoom ring, and set the focus with the focus ring. After setting, lock the lens firmly with the focus ring locking knob and the zoom ring locking knob.
-
Page 10: Day/Night Function
All manuals and user guides at all-guides.com Day/Night FUNCTION This camera is provided with Day/Night function that can detect the brightness of the objects and automatically switch the color mode / black-and-white mode according to the detected brightness. This function allows the output of ordinary colored images for the outdoor monitoring during daylight and the output of black-and-white images for the night monitoring with a lack of sufficient light volume. - Page 11 All manuals and user guides at all-guides.com OPTION (1) Heater glass unit Mounting method for the heater glass unit (DF-20) Connector jack in the main unit 1. Remove the front cover. 2. The removed front cover (with four screws) is not used.
- Page 12 All manuals and user guides at all-guides.com (2) Shade (Cover for outdoor use) Mounting method for the shade (SS-20) Mount the shade (cover for outdoor use) Fixing bolt firmly over the camera main unit with the two attached fixing bolts. Use the tripod fixing tapped holes in the Through hole top of the camera main unit.
- Page 13 All manuals and user guides at all-guides.com For mounting on the ceiling mounting bracket (Under eaves and indoor specifications) Mount the camera on the ceiling mounting bracket using the tapped holes in the top of the camera and the two fixing bolts attached to the camera.
-
Page 14: Troubleshooting
All manuals and user guides at all-guides.com TROUBLESHOOTING Symptom Check point Image is not seen. Is the iris of the lens adjusted appropriately? Are the cables connected correctly? Are the power plugs of the peripheral units inserted firmly in the outlet? When Day/Night function is set to "ON"... -
Page 15: Specifications
All manuals and user guides at all-guides.com SPECIFICATIONS Model QNW4000 Power source AC24V 60Hz 0.5Hz Approx. 5.0w Power consumption Pick-up device 1/4" Color interline-transfer CCD Effective picture element 768 (H) X 494 (V) Scanning area 3.65mm (H) X 2.74mm (V) - Page 16 ELMO CO., LTD. 6-14, Meizen-cho, Mizuho-ku, Nagoya, 467-8567 Japan OVERSEAS SUBSIDIARY COMPANIES ELMO Mfg. Corp. ELMO Canada Mfg. Corp. ELMO (Europe) G.m.b.H. 1478 Old Country Road, 44 West Drive, Brampton, Neanderstr. 18 Plainview, NY 11803-5034...
Need help?
Do you have a question about the QNW4000 and is the answer not in the manual?
Questions and answers