
Subscribe to Our Youtube Channel
Related Manuals for GameSir VX2 AimSwitch


Summary of Contents for GameSir VX2 AimSwitch
- Page 1 GameSir VX2 AimSwitch E-sports Combo User’s guide Importer Alza.cz a.s. Jankovcova 1522/53 Holešovice 170 00 Prague 7 www.alza.cz...
- Page 2 Dear customer, Thank you for purchasing our product. Please read the following instructions carefully before using for the first time and keep this user manual for future reference. Pay particular attention to the safety instructions. If you have any questions or comments about the device, please contact the customer line.
-
Page 3: Package Contents
Windows 7/8/10 PS4/PS4 Slim/PS4 Pro Xbox One/Xbox One S/Xbox One X Nintendo Switch Nintendo Switch Lite REGISTRATION Register your GameSir ID online at https://gamesir.hk/ to get real-time information on your product's warranty status and a series of exclusive benefits from GameSir. -
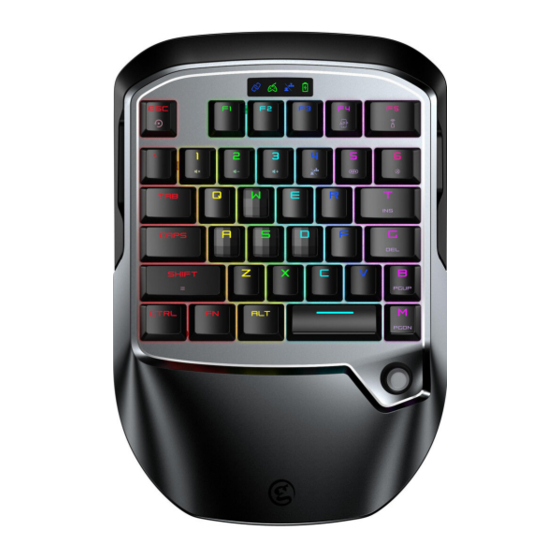
Page 4: Device Layout
DEVICE LAYOUT... - Page 5 A. Power switch ‚ B. Type-C port C. Connection status indicator D. Connection mode indicator E. Joystick mode indicator F. Battery indicator G. Joystick H. USB port (only for mouse) Reset Receiver indicator K. VX receiver L. Micro-USB cable M. Forward N.
- Page 6 Connect to PS4 a. Plug the USB cable of GM400 mouse into the USB port (only for mouse) of VX2. b. Switch on GameSir VX2, the connection status indicator will flash in green, meaning GameSir VX2 is ready to be connected.
- Page 7 Connect to Xbox One/Xbox One S/Xbox One X a. Plug the USB cable of GM400 mouse into the USB port (only for mouse) of VX2. b. Switch on GameSir VX2, the connection status indicator will flash in green, meaning GameSir VX2 is ready to be connected.
- Page 8 Controller Wired Communication, and turn it on. b. Plug the USB cable of GM400 mouse into the USB port (only for mouse) of VX2. c. Switch on GameSir VX2, the connection status indicator flashes in green, meaning GameSir VX2 is ready to be connected.
- Page 9 Type-C to USB adapter needs to be purchased by yourself) c. Plug the USB cable of GM400 mouse into the USB port (only for mouse) of VX2. d. Switch on GameSir VX2, the connection status indicator flashes in green, meaning GameSir VX2 is ready to be connected.
- Page 10 Note: If you cannot play games, but can operate the main menu, you need to follow these steps: System Setting> Controllers>Change Grip/Order, follow the on- screen prompts, and restart games. Joystick Mode The joystick functions as D-pad in default. Press FN+4 keys, the joystick mode indicator lights up ,so the joystick mode is switched to WASD function.
- Page 11 The driver is successfully installed and the VX2 is ready to work. GameSir GM400 E-SPORTS GAMING MOUSE DPI ADJUSTMENT The default DPI level of the GameSir GM400 E-sports gaming mouse is 1600. Press the DPI button on the back to switch 7 levels of DPI (400/800/1600/2400/3200/6400/12000).
- Page 12 GameSir GM400 E-SPORTS GAMEING MOUSE POLLING RATE ADJUSTMENT The default polling rate of GameSir GM300 is 1000Hz. Press the back button + DPI button to switch 4 levels of polling rate (125hz/250hz/500hz/1000hz). The backlight will flash when polling rate is switched.
- Page 13 CONNECT GAMESIR-VX2 TO G-Crux APP With the G-Crux APP, you can customize the GameSir VX2 buttons, adjust sensitivity and achieve abundant configurations. a. Switch on GameSir VX2. The connection status indicator flashes in green, GameSir VX2 is ready to be connected.
- Page 14 We are NOT responsible for accidents or damage when used for non-original • purposes. • DO NOT look directly at the optical light. It might damage your eyes. If you have any quality concerns or suggestions, please contact GameSir or your • local distributor.
- Page 15 Warranty Conditions A new product purchased in the Alza.cz sales network is guaranteed for 2 years. If you need repair or other services during the warranty period, contact the product seller directly, you must provide the original proof of purchase with the date of purchase. The following are considered to be a conflict with the warranty conditions, for which the claimed claim may not be recognized: Using the product for any purpose other than that for which the product is intended...
- Page 16 This product has been tested in accordance with the standards used to demonstrate compliance with the essential requirements set out in the relevant directives. You can find the declaration of conformity on the alza.cz website. WEEE This product must not be disposed of as normal household waste in accordance with the EU Directive on Waste Electrical and Electronic Equipment (WEEE - 2012/19 / EU).
Need help?
Do you have a question about the VX2 AimSwitch and is the answer not in the manual?
Questions and answers