Table of Contents
Advertisement
Quick Links
Advertisement
Table of Contents

Summary of Contents for Bradford BALBOA M3
- Page 2 BLANK pg. 2 File: RES_Hottub_manual_021116...
-
Page 3: Copyright
©2016 by Bradford Products, LLC. All rights reserved. Trademarks Bradford Products and Bradford Spas are registered trademarks of Bradford Products, LLC. Balboa is a registered trademark of Balboa Instruments, Inc. All other registered trademarks and trademarks are the property of their respective companies. All rights reserved. -
Page 4: Table Of Contents
Residential Spa Index Contents Copyright ............page 3 Trademarks . - Page 5 Residential Spa Index Testing Your Spa Setup Cleaning the Spa ........... . page 27 Filling the Spa with Water .
-
Page 6: Introduction
Bradford Products, LLC is designed to provide a lifetime of enjoyment and relaxation. Only quality products and materials are used in the manufacture of Bradford Spas®. Each spa is constructed using a combination of modern technology and old-world craftsmanship to give unparalleled service and beauty. -
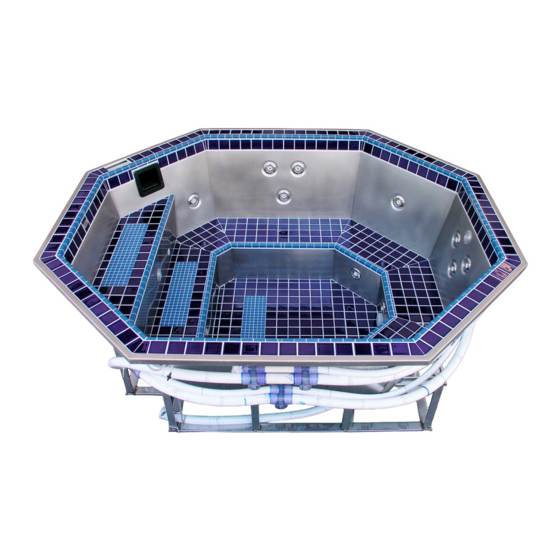
Page 7: Hottub Overview
Introduction Hot Tub Overview Bradford’s engineered stainless steel spas come in various shapes and sizes to suit your exact needs. Your spa will be delivered wrapped in plastic with all plumbing connections clearly labeled for easy connection to the equipment pack. - Page 8 Residential Spa Introduction Figure 1 : Remote Equipment Pack with labeled components 64” Clearance Required For Filter Cartridge Removal 1. Filter Pump 8. Bonding Wire 2. Jet Pump 9. Freeze Sensor 3. Electronics / Control Module 10. Temperature Sensor 4. Heater 11.
- Page 9 Residential Spa Introduction Figure 2 : Frame Mounted Equipment pack with labeled components 1. Filter Pump 5. Cooper Silver Ionizer S/S Skim Filter 2. Jet Pump 6. Current Collector 10. Bonding Wire 3. Electronics / Control Module 7. Light & Cord 4.
- Page 10 Residential Spa Introduction The following table lists the components on a standard equipment pack. Table 3 : Components of the Equipment Pack, Sub Assembly ( Remote Skid Pack ) Component Description Filter Pump Standard for all equipment packs, this pump can support up to eight hydrotherapy jets.
- Page 11 Residential Spa Introduction The following table lists the components on a frame-mount equipment pack. Table 4 : Components of the Equipment Pack, Sub Assembly ( Frame Mounted ) Component Description Filter Pump Waterway Executive 48 #3420820 - 1A, 2hp two-speed motor 230 Volt single phase Jet Pump Included only in two-pump spa configurations that support up to 16...
-
Page 12: Preparing To Install Your Spa
Residential Spa Preparing to Install Your Spa Preparing to Install Your Spa CAUTION: Read all instructions before beginning the installation. Failure to follow these instructions could cause serious body and/or property damage. Most standard residential spas can be installed in one to two days. NOTE: You will need to hire a licensed electrical contractor to wire the spa equipment pack to your household electrical panel. -
Page 13: Tools And Supplies List
Preparing the Installation Site Before you install your Bradford Spa, first decide what type of installation you will use. Because of the stainless steel support frame, you can install the spa in a variety of ways without backfilling around the spa. - Page 14 Use a Flush mount when you are planning to install the spa completely recessed into the ground or deck. Bradford Spas have been engineered to allow for permanent in-ground installation. You will need to dig a vault (pit) large enough to hold the entire spa.
-
Page 15: Selecting A Good Installation Site
Access inside the vault and around the exterior of the spa shell and plumbing should be considered. Bradford suggests 18” perimeter clearance around the spa. Ultimately the on-site conditions and homeowners choice of installation will dictate the allotted clearance around the spa shell. - Page 16 Residential Spa Preparing to Install Your Spa The following sections describe recommended practices for preparing for a recessed or flush mount installation. Preparing the Vault When preparing to dig the vault, there are a couple considerations: Depth: If you are installing the spa using a flush mount, you will need to dig a vault the depth of the entire spa plus the concrete pad.
-
Page 17: Preparing For An On Grade Mount Installation Of Spa
Install a drain on the floor of the pit. This drain will allow any water that collects in the spa pit to quickly drain away. Elevate the drain slightly to keep it from being covered by the concrete pad. NOTE: Your contractor will be able to recommend types of drains. Bradford Products does not supply drains or instructions on installing drains. -
Page 18: Placing The Equipment Pack
NOTE: If you need to place the equipment pack farther away from the spa, you will need a custom-made equipment pack. Let Bradford Products personnel know in advance to prevent delay to your project. -
Page 19: Installing The Conduit
Residential Spa Preparing to Install Your Spa If you are planning to bury the plumbing pipes and conduit for your spa, dig the trench deep enough to make sure the pipes are beneath the frost line (the depth at which the moisture in the earth freezes and thaws). -
Page 20: Connecting Water Temperature Sensor
Residential Spa Installing Your Spa Installing the Spa (cont.) 2. Check around the steel frame at the bottom of the spa. Each leg of the stainless steel frame must contact the ground directly. 3. If the concrete pad is not level, use a pry bar to lift the spa frame and insert stainless steel shims to make the spa level. -
Page 21: Installing The Freeze Sensor
Residential Spa Installing Your Spa Remote Equipment Only - Installing Freeze Sensor When freezing conditions are present (the temperature drops below 38˚F), the freeze sensor on your equipment pack will activate on all pumps to prevent the water from freezing. The freeze sensor is connected to the equipment pack by a 25’... - Page 22 Residential Spa Installing Your Spa Connecting the Equipment Pack to Your Power Source (cont.) NOTE: All spas and associated electrical components must be protected by Ground Fault Circuit Interrupters (G.F.C.I.) in accordance with the National Electrical Code, Article 680-42, January 1, 1994. 1.
-
Page 23: Making Plumbing Connections
Residential Spa Installing Your Spa Remote Equipment Only - Making Plumbing Connections Plumbing connections and stub-outs are clearly labeled to correspond between the spa and equipment pack. Use PVC pipes & fittings that are “Schedule 40 Pressure”. Pipe Diameter: 2.5” Filter / Jet Suction 2.0”... -
Page 24: Connecting The Bonding And Light Wires
Residential Spa Installing Your Spa Remote Equipment Only - Connecting the Bonding and Light Wires The bonding wire is an important safety feature of your spa. It grounds the spa to prevent stray electrical currents from injuring the spa occupants or damaging the spa. The light wire provides power to the low-voltage underwater light. -
Page 25: Installing The Spa-Side Control Panel
Residential Spa Installing Your Spa Figure 12 : Locating and Connecting Light Wire (Below) Remote Equipment Only - Installing the Spa Side Control Panel The included spa-side control panel allows you to operate the spa pump speed, water temperature, lights, and filter cycles. See the Operations and Maintenance Manuals for more information. NOTE: Do not submerge the spa-side control panel in the water. - Page 26 Residential Spa Installing Your Spa Figure 13 : Connecting the Spa-Side Control Panel Wire (Below) For “On-Frame” Mounted Equipment ONLY All plumbing, bonding, sensors, light and spa-side control will be already completed at the factory. Only the supply power will need to be done in the field by a licensed electrical contractor. pg.
-
Page 27: Testing Your Spa Setup
Residential Spa Testing Your Spa Set Up Testing Your Spa Setup Before you use your new spa, you should test the setup to make sure there are no electrical or plumbing problems. The following sections describe how to clean the spa, fill it with water, and prime the pump(s). -
Page 28: Turning On The Spa For The First Time
NOTE: See the Operations and Maintenance Manuals for important operating instructions and safety information prior to using your Bradford Spa for the first time. Do not enter the spa until you test the water chemical levels and bring the water into balance. -
Page 29: Instruction Card For M2 & M3 Systems
Residential Spa Testing Your Spa Set Up Instruction Card for M-2 and M-3 systems equipped with Deluxe Digital control panels. Control Panel Pads Temperature Adjustment (80°F–104°F) Press either pad once, and the LCD will display the set temperature, as well as the words “SET HEAT. ” Each time either of these pads is pressed again, the set temperature will increase or decrease. -
Page 30: System Programing
Residential Spa Testing Your Spa Set Up System Programming Setting the Time of Day When the spa is first powered up, the words “SET TIME” will flash on the display. To set the time, press then After is pressed once, the time will begin changing in one-minute increments. -
Page 31: Diagnostic Messages
Residential Spa Testing Your Spa Set Up Diagnostic Messages Message Meaning: No message on display. Power has been cut off to the spa. Action Required: The control panel will be disabled until power returns. Spa settings will be preserved for 30 days with a battery backup. Meaning: “Overheat”... -
Page 32: Safe Operation Instructions / Rules
104°F. Bradford Products, LLC does not recommend spa water temperatures in excess of 104°F. Consult your physician about your safety and comfort before using the spa. -
Page 33: Spa Cleaning & Maintenance
Residential Spa Safe Operation Instructions / Rules Spa Cleaning & Maintenance 1. For the stainless steel tub shell, a nylon-type scrub sponge with or without a mild abrasive cleaner may be used. Some “stainless steel” cleaners contain chemicals that are corrosive to stainless steel or very aggressive abrasives. -
Page 34: Water Testing & Balance
- skin/eye irritation - vinyl wrinkles Decreased sanitizer efficiency -skin/eye irritation Excessive sanitizer use chart 2: Total Alkalinity Bradford Recommended Range: 80 - 125 PPM Low total alkalinity problems: High total alkalinity problems: Corrosive Water Scaling Water - pitting of concrete... - Page 35 Residential Spa Safe Operation Instruction / Rules Cautions Do not allow the use or operation of spa if suction grate fitting is missing, broken or loose. Check spa temperature before each use. Do not enter the spa if temperature is above 104°F. Secure spa area against unauthorized access in compliance to all safety codes.
-
Page 36: Rust (Ferric Oxide)
Safe Operation Instructions / Rules Rust - Ferric Oxide Over the years of creating small and very large stainless steel spas and pools, Bradford has received a small number of communications reporting “…my spa (pool) is rusting!” Virtually every single communication of this nature is directly traceable to a lack of clean, IRON FREE feed and make up water, poor water management or carbon steel debris such as fasteners. -
Page 37: Treatment For Removing Metal Accumulation
SKIMMER RECESS AND SKIMMER BASKET. To further help with maintaining a beautiful pool or spa, Bradford provides a bottle of Naturally Free Metal & Scale Control with your start up kit, along with a TAYLOR “K-2005” water chemistry test kit suitable for both residential and/or commercial pools and spas. -
Page 38: Electrical Requirements
Appendix A : Electrical Requirements This appendix includes the electrical requirements for all of the outdoor equipment packs sold by Bradford Products. The following table lists the requirements for one and two pump systems with electric heaters, 5.5 kW and 11 kW. - Page 39 Residential Spa Appendix A The following table lists the requirements for one and two pump systems with gas/propane heaters. Table 6 : Electrical requirements for gas/propane heaters Configuration: Requirements BRD 1G • 240 volt 2 hp two-speed pump one pump system with •...
-
Page 40: Brd_1G
Residential Spa Appendix B - BRD_1G - Remote System pg. 40 File: RES_Hottub_manual_021116... -
Page 41: Brd_2G
Residential Spa Appendix B - BRD_2G - Remote System pg. 41 File: RES_Hottub_manual_021116... -
Page 42: Brd_111 & Brd_111F
Residential Spa Appendix B - BRD_111 & BRD 111F - Remote System pg. 42 File: RES_Hottub_manual_021116... -
Page 43: Brd_155
Residential Spa Appendix B - BRD_155 - Remote System pg. 43 File: RES_Hottub_manual_021116... -
Page 44: Brd_211 & Brd_211F
Residential Spa Appendix B - BRD_211 & BRD_211F - Remote System pg. 44 File: RES_Hottub_manual_021116... -
Page 45: Brd_255
Residential Spa Appendix B - BRD_255 - Remote System pg. 45 File: RES_Hottub_manual_021116... -
Page 46: Typical Pit Dimensions & Clearance
Obviously every installation of a residential spa will vary based on the individual location and installation type. However Bradford recommends maintaining 1’- 6” (18 inches) of clearance from the Pit Wall to the top bend under the spa lip. (see below) This allows 6'-8"... -
Page 47: Limited Warranty
(C) Bradford Products, LLC is not responsible for any incidental or consequential damages, including injury to person or property, resulting from any condition confirmed by Bradford Products, LLC to be a valid claim under this warranty or for owner’s loss of use resulting, directly or indirectly, from such a condition. -
Page 48: Customer Record
Residential Spa Customer Record Customer Record Use this area to record all spa equipment information and serial numbers. Spa Information Model Name: Serial Number: Date of Purchase (Delivery): Dealer: Dealer Address: Dealer Phone Number: Equipment Pack Information Equipment Pack Configuration Name (see Appendix A): Filter Pump Serial Number: Jet Pump Serial Number: Electronics/Control Module Serial Number:... -
Page 49: Warranty Registration
State: Zip: Phone # - (include area code): I have read and accept the terms of my warranty. Customer Signature Date Bradford Products, LLC Please return form to: 2101 Enterprise Drive NE Leland, NC 28451 Attn: Cindy pg. 49 File: RES_Hottub_manual_021116... - Page 50 pg. 50 File: RES_Hottub_manual_021116...
Need help?
Do you have a question about the BALBOA M3 and is the answer not in the manual?
Questions and answers