Table of Contents
Advertisement
Quick Links
Advertisement
Table of Contents

Summary of Contents for Freedom Scientific ONYX PRO
- Page 1 ® ONYX Camera System User Guide UDC-02451 Revision A...
- Page 2 ONYX PRO is designed to enlarge and enhance text in high contrast colors and read print aloud in order to improve the quality of life for people who are visually impaired. The extent to which this product can improve the ability to see images depends on a person’s individual condition and level of visual impairment.
- Page 3 • Carry the device using the carrying handle. • Do not swing the device while carrying it. Regulatory Information ONYX PRO is tested by a recognized body and independent laboratory for safety and regulatory compliance. Description Requirement FCC / EMC...
-
Page 4: Table Of Contents
Unpacking Instructions ................1 What’s in the Box? ..................2 Customer Supplied Hardware ..............2 ONYX PRO Setup ................... 3 Inserting and Removing the Tablet .............. 3 Charging the Tablet ..................4 Powering On the Unit / Adjusting Volume ............ 5 Camera Setup .................... -
Page 5: Introduction
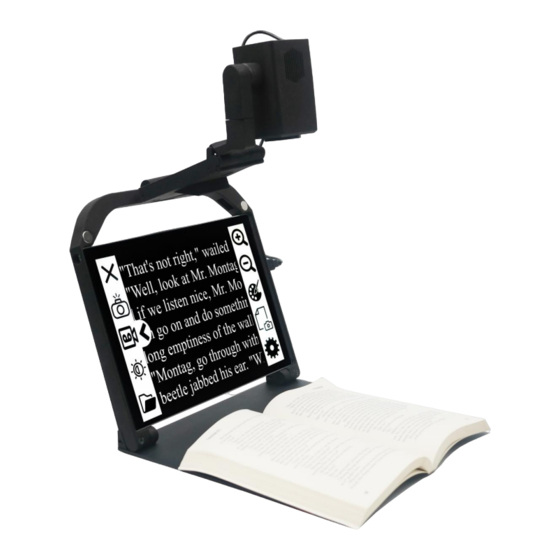
Introduction Congratulations on your purchase of the ONYX PRO! ONYX PRO is an advanced tablet-based magnifier with highly accurate reading capabilities allowing the user to listen to printed material in a clear natural sounding voice. It combines the best of a tablet and a magnification system for an all-in-one device that’s easy to use and portable. -
Page 6: What's In The Box
What’s in the Box? 1. Main Camera Attachment with ONYX PRO camera and document camera 2. Tablet stand 3. USB flash drive with ONYX PRO software Customer Supplied Hardware The following items are not included and must be provided by the customer. -
Page 7: Onyx Pro Setup
ONYX PRO Setup Inserting and Removing the Tablet Note: You must provide a Surface Pro 7 tablet to use with the ONYX PRO. Before inserting or removing a tablet ensure that the main camera, Surface Pro charger, USB devices, and headphones are unplugged from the tablet. -
Page 8: Charging The Tablet
To remove the tablet, do the following: 1. Gently push the lip on the left arm on the stand outwards and pull the tablet out (left side first). Charging the Tablet To charge the tablet, connect the charger into the charging port located on the lower right side of the tablet. -
Page 9: Powering On The Unit / Adjusting Volume
Powering On the Unit / Adjusting Volume Hold the Power button for approximately five seconds to turn the tablet on and off. To change the volume, use the Volume button which is located to the right of the Power button. -
Page 10: Camera Setup
Camera Setup Mounting the Camera To mount the camera onto the stand, do the following: 1. Align the camera insert above the mounting hole, and carefully slide it down through the mounting hole. 2. Unfold the camera and rotate it forward until the clip snaps onto the latch. 3. -
Page 11: Camera Led Light
Camera LED Light An integrated LED light is located in the main housing of the camera. The light switch is located on the right of the main housing which turns the light on and off. Rotating the Camera The camera automatically loads the last zoom and color setting depending on the rotation of the camera. -
Page 12: Onyx Pro Software
Installing Software The ONYX PRO software is provided on a USB flash drive that ships with the ONYX PRO. To install the software, do the following: 1. -
Page 13: Settings Bar
Settings Bar The Settings Bar provides all the common controls needed to operate the device and appears when the V-shaped arrow on the edge is touched. Exit – Close the software and exit to Windows Take Picture – Capture an image from the main camera to work with it further Record Video –... -
Page 14: Touch Gestures
Toggle Color Document Camera – Switch to document camera to capture/read a document Application Settings Touch Gestures Some functions do not have an icon in the menu or can be controlled using touch gestures as well. They are as follows: Action Touch Gesture Keyboard... -
Page 15: Saved Files Page
Saved Files Page The Saved Files page is used to navigate through saved folders. Use it to open, rename and delete document folders. Go back to previous page. Open folder. The preview menu will change if the file is a picture or a video. Rename folder. -
Page 16: Saved Videos Menu
Disable/Enable column detection. Delete file. Saved Videos Menu The Saved Videos menu appears if the file being previewed is a video. Go back to previous page. Pause/Play video. Previous file. Next file. Forward video 30 seconds. Rewind video 30 seconds. Delete file. -
Page 17: Brightness And Contrast Panel
Brightness and Contrast Panel The Brightness and Contrast panel lets you control the brightness and contrast of the live video from the ONYX PRO camera. Default contrast Default brightness Increase brightness/contrast Decrease brightness/contrast Document Camera A secondary camera called the document camera is housed inside the middle of the camera assembly. - Page 18 Capture – Capture the current document for further processing After pressing , a screen similar to the following will appear: Back – Return to previous page Read – The viewable document will be read aloud Save - Save document to “[USERNAME]\Pictures\ONYX PRO\[DATE]” folder (ex: ..\DefaultUser\Pictures\ONYX PRO\3-25-2021)
-
Page 19: Reading
Reading While reading, ONYX PRO will use the settings selected in Application Settings related to speech and reading. Original Mode In original mode, the original picture is displayed, and the text is highlighted using a highlight box. Go back to previous page. - Page 20 Wrapped Mode In wrapped mode, the text is displayed and highlighted digitally when reading. Go back to previous page. Previous sentence. Pause/Play Next sentence. Save text to file. Toggle text and background color. Toggle text highlight color. Zoom in. Zoom out.
-
Page 21: Application Settings
Application Settings Application settings let you set where pictures and documents are saved, set placement of the menu bar on the screen, set menu and reading language, set speech volume and rate, set color modes, restore factory settings, and more. The following describes the General, Speech, Color Modes, and About settings. - Page 22 Color Modes Choose which color modes to enable or disable using this menu. Unchecked options are skipped while cycling through the color options. About About Software and registration information. Unregister Unregister the software so it can be transferred to another PC. Restore Defaults Restore all settings to default values.
-
Page 23: Technical Specifications
Technical Specifications ONYX PRO The following specifications apply to the ONYX PRO stand, ONYX PRO camera, and document camera. ONYX PRO Stand: Stand Folded: 12” x 13” x 2” / 305 mm x 330 mm x 51 mm • Stand Unfolded: 12” x 13” x 12” / 305 mm x 330 mm x 51 mm •... -
Page 24: Service And Support
Service and Support Note: This device has no user-serviceable components. Any unauthorized attempt to service or replace internal components will void the product warranty. To contact Technical Support by web, visit support.freedomscientific.com/support and submit a technical support request to ask questions. To contact by email, send questions to support@freedomscientific.com.
Need help?
Do you have a question about the ONYX PRO and is the answer not in the manual?
Questions and answers