Table of Contents
Advertisement
Quick Links
Watkiss Automation Limited
1 Blaydon Road
Middlefield Industrial Estate
Sandy, Bedfordshire
SG19 1RZ United Kingdom
Tel: +44 (0)1767 685700
Fax: +44 (0)1767 689900
Email: info@watkiss.com
Plockmatic PowerSquare™ 224
Service Training Workbook
Right to Left Version
Issue 1, November 2014, edited January 2017
Doc. No.x05082
Name:
............................................................................
Advertisement
Table of Contents

Summary of Contents for Watkiss Plockmatic PowerSquare 224
- Page 1 Service Training Workbook Right to Left Version Issue 1, November 2014, edited January 2017 Doc. No.x05082 Name: ................Watkiss Automation Limited 1 Blaydon Road Middlefield Industrial Estate Sandy, Bedfordshire SG19 1RZ United Kingdom Tel: +44 (0)1767 685700 Fax: +44 (0)1767 689900...
- Page 2 Limited makes no warranty of any kind with regard to this material, including, but not limited to, the implied warranties of merchantability and fitness for a particular purpose. Watkiss Automation Limited shall not be liable for errors contained herein or for incidental or conse- quential damage in connection with the furnishing, performance or use of this material.
-
Page 3: Table Of Contents
Square fold: term used by Xerox to describe the Plockmatic product, which uses Watkiss technology under licence. Fold and Form ........10 Square edge: term used by Xerox to describe the Plockmatic Trim . - Page 4 Glossary of booklet making terms ....49 signatures are either sewn or stapled down the centre of the fold. Booklet making by the stitch-fold-trim method (as with Watkiss equipment) is sometimes called saddle stitching, but this is not technically correct.
-
Page 5: Introduction
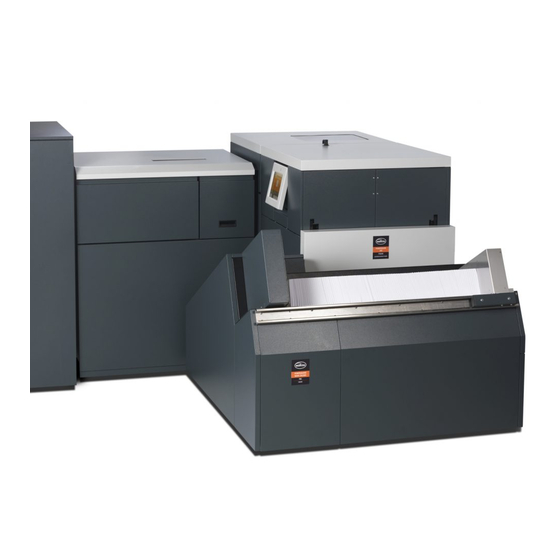
PSQ Site Requirements Introduction Introduction 17.9.4 Online PowerSquare with P2T 2-Knife Trimmer and PBS Book Stacker NOT TO SCALE Input for Mains Power Supply PowerSquare Online PowerSquare Connecting Bridge P2T Trimmer Input for Mains Power Supply Offline PowerSquare The Plockmatic PowerSquare™ 224 is an innovative, complete book making PBS Book Stacker system for digital print applications. -
Page 6: Adobe Reader And Adobe Acrobat Instructions
Introduction PSQ Site Requirements Adobe Reader and Adobe Acrobat Instructions 17.9.3 Online PowerSquare with P2T 2-Knife Trimmer If you use Adobe Reader or Adobe Acrobat to read this manual, we recommend NOT TO SCALE you follow these instructions: Make sure all the navigation buttons are visible Adobe Reader and Adobe Acrobat include navigation buttons to help you move around the file. -
Page 7: Illustrated Parts Catalogues
PSQ Site Requirements Introduction 17.9.2 Online PowerSquare with PBS Book Stacker Illustrated Parts Catalogues The Plockmatic PowerSquare™ 224 is made from these modules: NOT TO SCALE PSQK - Complete M/C PBCK - Connecting Bridge PBR5 - Rotator PRTP - Base Machine Input for Mains Power Supply PBRG - Gathering Module PRSH - Shuttle... - Page 8 Introduction PSQ Site Requirements Every exploded diagram is followed by the related part number information. The 17.9.1 Online PowerSquare part number information is given for the top level assembly, sub-assemblies and components where available. See FIGURE 3. NOT TO SCALE FIG.16 - TAMPER GATE FRAME PSQ SHUTTLE -PSHU LAST EDIT:18 AUG 09...
-
Page 9: Product Overview
For other areas, contact the supplier for the correct cable. Power 700VA (500W) maximum Consumption FIGURE 4. Plan view of the Plockmatic PowerSquare 224 showing 17.8 Printer Interface A DFA interface cable is supplied with the online PSQ. Stage Description... - Page 10 • The PSQ is 755 mm wide and fits through a standard-size doorway. A standard-size doorway is 762 mm (30") wide. Figure 2:1. End view of the Plockmatic PowerSquare 224 showing • If the PSQ is installed up or down stairs, give special consideration to how you lift and move the equipment.
-
Page 11: Description Of Operation
Quality Tolerances Description of Operation Description of Operation Trim blade marking After the PSQ is turned on, the operator configures the paper size and direction, the set-thickness and the number of stitches. The PSQ is controlled by the printer and by a system of internal sensors. The PSQ includes these modules •... -
Page 12: The Gathering Area
The lowest position for the tamper fingers is for the smallest size of paper. The highest position for the tamper fingers is for A3-size (11 x 17") Copyright © 2016 Watkiss Automation Limited paper. An active gate in the sidelay closest to the stitch head jogs the incoming sheets Quality Tolerances into a tidy set. -
Page 13: The Stitch Head And Clincher
Product Specifications Description of Operation The set is moved to the folding area when the set is stitched. When the shuttle Integrity Factors Average Document Size: moves to the folding area, the pick-up fingers loosen on the book. The shuttle is 20 sheets, 80gsm, 2 stitches operated by a 230V AC electric motor through a linear transmission. -
Page 14: Fold And Form
Description of Operation Product Specifications Fold and Form Book Thickness Minimum set thickness: When the shuttle stops in the park position, the folder blade is operated. The 1 sheet (when folded makes a 4 page booklet) folder blade pushes against the centre line of the book - located by the stitches Maximum finished book thickness: up to 10.4mm - and folds the book in half. -
Page 15: Outfeed And Stacker
Product Specifications Description of Operation Product Specifications main electric motor by a chain and clutch system. Rotary movement is changed to linear movement with a crank mechanism. March 2016 Operating 10-35°C at 35-85% relative humidity, up to 2000m amsl Outfeed and Stacker Conditions When the trim clamp is released, two solenoids move the trim stop from below the book. -
Page 16: User Interface (Gui) - Operator Menu
User Interface (GUI) - Operator Menu Replace Trimmer Blade (optional - time permitting) User Interface (GUI) - Operator Menu Replace Trimmer Blade (optional - time permitting) REP 4.18.4 (Trimmer Blade and Anvil Replacement and Setting) The user interface includes a colour touch screen and START/STOP buttons. START Button PSQ Accessories STOP Button... -
Page 17: The Touch Screen
Software User Interface (GUI) - Operator Menu Software The Touch Screen 11.1 Software System Description button gives you There are two parts to the software in the CPU: HELP STATUS more information. • The ‘application software’ controls the operation of the PSQ and includes the •... -
Page 18: Gui Buttons And Options
User Interface (GUI) - Operator Menu Power and Control GUI buttons and options 10.4 The DFA Finisher Interface PCB is the interface between the printer and the Window Buttons finisher. PAPER SIZE Enter the paper size BASIC PAGE DIRECTION Portrait or Landscape The following input and output signals are provided: PRESETS Standard paper sizes... - Page 19 Power and Control User Interface (GUI) - Operator Menu Identify the components: (use the list below) Window Buttons CONFIGURE MACHINE OPTIONS MEASUREMENT Select mm or inches as units STITCH SENSOR Turn stitch sensor on or off PRESET PAPER ISO ‘A’ sizes or US sizes SIZES SIDE TRIM (P2T) Touch to turn off communication to...
-
Page 20: Advanced Operation
Advanced Operation Power and Control Advanced Operation 10.3 Component Locations 7.4 (Location of Components) shows the location of electrical components in each module. Paper quality and machine performance Careful measurement of the paper size and set thickness is important in order Electrical components are also listed in the Parts Listings. -
Page 21: Book Quality And Machine Specifications
Power and Control Advanced Operation 10.2 Control Note: A dirty sensor or a sensor covered by paper trimmings will give a jam error. The 900-208 Main Control PCB is the interface between the GUI screen, the CPU and all the input and output functions of the machine. Paper jams that require service intervention are: The PCB has a split 28V DC supply protected by three fuses that reset on •... -
Page 22: User Interface - Service Overview
Refer to the following: • 7.1 (High Voltage Connections) shows the AC Wiring Detailed instructions for installing the are included on the service support • Watkiss PowerSquare™224 Unpacking and Installation Instructions, Right to Left Versions Locate the Unpacking and Installation Instructions The PSQs used in the service training are already installed. - Page 23 Routine Maintenance Machine Areas Routine Maintenance Machine Areas Operator Maintenance Introduction Operator maintenance is documented in Chapter 6 of the user manual and in During this section of the training, we review the different areas of the machine, Section 6.17 of the PSQ Service Manual. and the key set up procedures for each area.
- Page 24 Machine Areas Machine Areas 8.10 Machine Cycle Control At this stage of the training, you understand how the machine works and how it is controlled. Gathering Area Module The gathering area module accepts the paper from the connecting bridge. To see the full machine cycle, make a test book using the screen.
- Page 25 Machine Areas Machine Areas Shuttle - Book Gathering and Pick-up Review the following: When the paper is fed into the gathering area, the paper falls between the end- ADJ 4.9.1 (Calibrate the Trim Stop) lays and sidelays. The endlays and sidelays are adjusted by the PSQ according ...
- Page 26 Machine Areas Machine Areas Shuttle - Book Transport Trim The set is collected by the shuttle and moved to the 1st stitch position. A cam The book passes between two facing sets of conveyors in the trimmer infeed. mechanism tightens the shuttle pick-up fingers on the set when the shuttle These conveyors move the book to the trim stop.
- Page 27 Machine Areas Machine Areas Stitcher Locate the following in the Folder: The shuttle collects the set between the pick-up fingers and moves to the first Axis Home Switch stitch position. When the book is stitched and moved to the next stitch- position, ...
- Page 28 Machine Areas Machine Areas Fold and Form Locate the following: Stitch Axis Home Position Sensor When the shuttle stops in the park position, the folder blade is operated. The Stitcher Wire-feed Cam Sensor folder blade pushes against the centre line of the book - located by the stitches ...