Advertisement
Quick Links
Assembly
Instruction
IMPORTANT - RETAIN FOR FUTURE REFERENCE - READ
Tools Needed
Helpline
If you have any problems with this
product or require any replacement
fittings please contact Customer
Services Tel: 0844 844 8999
Regrettably self assembly items cannot be returned once assembly is part or fully
completed unless the item is found to be faulty. Should you need to return the
unassembled product, please repack in the original packaging.
IMPORTANT
• We suggest you spend a short time reading through this leaflet and then follow the simple
step by step instructions.
• Carefully check that you have all parts before beginning assembly.
• Keep fittings out of children's reach and keep children well away from the construction
area.
• We recommend that the packaging is used to protect the surfaces during assembly.
• A minimum of 2 persons is required to assemble this product.
PRODUCT INFORMATION
Made in Poland.
CARE INSTRUCTIONS
• For general cleaning, periodically dust with a soft cloth.
• Do not rub or scrub the surface when cleaning.
• Always use a non-silicone based furniture polish. Silicone in furniture polishes can break
down the lacquer finish.
• Any spills should be removed immediately with a soft clean damp cloth and dried immediately.
Avoid keeping furniturein direct sunlight or closeto any heat sources as this can cause
cracking,
discolouration or warping.
• Never drag pieces of furniture across the floor as this will cause damage to the joints.
All assembly fixings should always be tightened properly and periodically check all fixings and
tighten if necessary.
• The finish will mellow and change colour over time.
GLASS INFORMATION
This item contains glass. Please handle with extreme care.
Batch No: MM-42 , Date of Manufacture: May 2013
This unit contains safety film backed mirrored glass door panels of a nominal thickness of 3 mm
which are not required to be classified to BS 6206.
If a glass component is chipped or broken replace with glass of the type described on this label.
Consult the manufacturer, retailer or agent with regard to obtaining a manufacturing specification
and shape for replacement glass quoting the model number, and batch number or date of
manufacture.
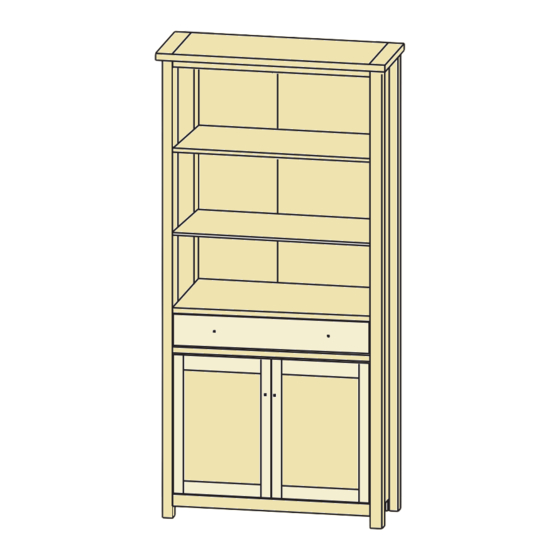
886738 STANTON DARK TALL SHELF
DESCRIPTION:
886738 STANTON DARK TALL SHELF
ASSEMBLY INSTRUCTIONS.
P9--SD 11
1
of 16
Advertisement

Related Manuals for Nex 886738

Summary of Contents for Nex 886738
- Page 1 886738 STANTON DARK TALL SHELF DESCRIPTION: Assembly 886738 STANTON DARK TALL SHELF Instruction ASSEMBLY INSTRUCTIONS. IMPORTANT - RETAIN FOR FUTURE REFERENCE - READ Tools Needed Helpline If you have any problems with this product or require any replacement fittings please contact Customer...
- Page 2 DESCRIPTION: Assembly 886738 STANTON DARK TALL SHELF Instruction FLOOR AREA 2.5 M x 2,0 M 1.5 hrs 2 PERSON ASSEMBLY REQUIRED ASSEMBLY SPACE APPROXIMATE ASSEMBLY TIME REQUIRED ASSEMBLY TOOLS ASSEMBLED DIMENSIONS 350 mm 840mm P9--SD 11 of 16...
-
Page 3: Parts List
DESCRIPTION: Assembly 886738 STANTON DARK TALL SHELF Instruction PARTS LIST NO PART LIST (1) TOP PANEL (2) BOTTOM PANEL (3) CONSTRUCTOR RAM (4) STRIP FRONT - BOTTOM (5) STRIP FRONT (6) STRIP FRONT - TOP (7) HORIZONTAL DIVIDER (8) DOOR - L... -
Page 4: Hardware List
DESCRIPTION: Assembly 886738 STANTON DARK TALL SHELF Instruction HARDWARE LIST DO NOT MIX CONTENT OF HARDWARE BOXES 5x32mm 5x39 8x28 12x10 GLUE 15x12 CAM BOLT CAM BOLT DOWEL CAM LOCK BAG 1 CAM LOCK BAG 6 BAG 1 BAG 1... - Page 5 DESCRIPTION: Assembly 886738 STANTON DARK TALL SHELF Instruction HARDWARE LIST DO NOT MIX CONTENT OF HARDWARE BOXES wpm4x25 3,5x13 HANDLE SCREW SCREW Washer BAG 2 L-250x20 BAG 5 BAG 2 BAG 5 Strap BAG 5 15mm NYLON FEET CAM COVER...
- Page 6 DESCRIPTION: Assembly 886738 STANTON DARK TALL SHELF Instruction SCREW IN CAM SCREWS PRESS IN CAM LOCKS. ARROW ON CAM ONLY DOWN TO FIRST RING. LOCK MUST FACE HOLE IN PANEL EDGE. FLUSH WITH DO NOT INSERT DOWELS PANEL IN CAM SCREW / LOCK HOLES.
- Page 7 DESCRIPTION: Assembly 886738 STANTON DARK TALL SHELF Instruction Instructions for hinge adjustment a) Side adjustment: Loosen fixing screw "A", adjust gap with screw "B" and retighten screw "A". b) Depth adjustment: Loosen fixing scerw "A", push hinge arm forwards or backwards, retighten screw "A", fix screw "B"...
- Page 8 DESCRIPTION: Assembly 886738 STANTON DARK TALL SHELF Instruction ASSEMBLY INSTRUCTION FOR DRAWER SLIDE A&B 270mm SPECIAL TIPS FOR DRAWER SLIDE A FRONT BACK 6x8mm 6x8mm BACK FRONT SPECIAL TIPS FOR DRAWER SLIDE B THIRD HOLE 3,5x13mm FRONT FRONT LAST THIRD HOLE...
- Page 9 DESCRIPTION: Assembly 886738 STANTON DARK TALL SHELF Instruction I N C O R R E C T C O R R E C T Cam post - fixed until the base of the shaft is tight and flush with the...
- Page 10 DESCRIPTION: Assembly 886738 STANTON DARK TALL SHELF Instruction I N C O R R E C T C O R R E C T P9--SD 11 of 16...
- Page 11 DESCRIPTION: Assembly 886738 STANTON DARK TALL SHELF Instruction 1/2 TURN CLOCKWISE. P9--SD 11 of 16...
- Page 12 DESCRIPTION: Assembly 886738 STANTON DARK TALL SHELF Instruction X1L x1R I N C O R R E C T C O R R E C T Cam post - fixed until the base of the shaft is tight and flush...
- Page 13 DESCRIPTION: Assembly 886738 STANTON DARK TALL SHELF Instruction X1L/ x1R 1/2 TURN CLOCKWISE. P9--SD 11 of 16...
- Page 14 DESCRIPTION: Assembly 886738 STANTON DARK TALL SHELF Instruction 1/2 TURN CLOCKWISE. P9--SD 11 of 16...
- Page 15 DESCRIPTION: Assembly 886738 STANTON DARK TALL SHELF Instruction 90° B a c k p a n e l k e e p s u n i t s q u a r e . Ta c k b a c k p a n e l...
- Page 16 DESCRIPTION: Assembly 886738 STANTON DARK TALL SHELF Instruction NOT SUPPLIED Wall fixings are not supplied with this product as different wall materials require different types of fixing devices( such as Rawl plugs used on brick work).You must use fixing devices suitable for the type of wall you intend to mount this product to.
Need help?
Do you have a question about the 886738 and is the answer not in the manual?
Questions and answers