Table of Contents
Advertisement
Available languages
Available languages
Advertisement
Chapters
Table of Contents

Related Manuals for DAIICHI TURK TRAKTOR MP228 BT

Summary of Contents for DAIICHI TURK TRAKTOR MP228 BT
- Page 1 TURK TRAKTOR MP228 BT 1DIN Size User Manuel November 2019 Ver.1.0...
-
Page 3: Table Of Contents
Contents 1. Warning................... 2. Device Introduction................ General Features................. 3. Keypad and Functions..............4. Settings..................... 5. Bluetooth Connection..............Bluetooth Pairing................... Answering Phone.................. End Call / Reject Call................Bluetooth Music..................ConnectionDiagram................. 9 Troubleshooting................10 8.Warranty Certificate................11 9.Warranty Conditions..............12... -
Page 4: Warning
Warning For product specifications and information, the operating instructions are for reference only. Information in this manual is subject to change without notice. We reserve the right to change or improve our products without obligation to warn any person or organization. Security Reminder For your safety, please do not use the entertainment system's display while driving. -
Page 5: Device Introduction
Device Introduction GENERAL FEATURES: • Radio Function • USB Function • SD Function • AUX Function • Bluetooth Function... -
Page 6: Keypad And Functions
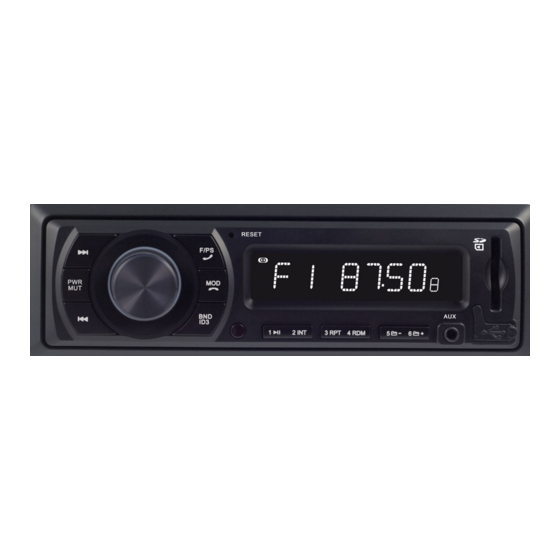
Keypad & Functions 1 >>| Button: Press this button briefly to go to the next station in radio mode. 2 seconds for manual forward search. by pressing and holding the button. While in USB / SD / BT MUSIC mode, press this button briefly to go to the next song. As long as you press and hold this button, you can fast forward the current song. - Page 7 Keypad & Functions 7 BND / ID3 Button: Press this button briefly to switch between FM1, FM2, FM3 bands in radio mode. When playing an MP3 file with ID3 tag information in USB / SD mode, press BND / ID3 repeatedly to display the ID3 tag information on the LCD screen.
- Page 8 Keypad & Functions 15 USB Port: Connect a USB memory to play a music file in MP3 / WMA / WAV format. 16 SD Port: Insert an SD card to play a music file in MP3 / WMA / WAV format. 17 LCD Display: Displays the digital clock and information about the selected function.
-
Page 9: Settings
Settings 1. SOUND Level Use the VOLUME +/- button to adjust the volume. Max. Sound level: 40 2. BASS Adjustment Press the VOLUME button repeatedly until "BAS 00" appears on the display. Use VOLUME +/- to change the setting. Bass control is not available when EQ is on. 3. -
Page 10: Bluetooth Connection
Bluetooth Connection 1 Bluetooth Pairing To pair with Bluetooth, make a device search from your phone's bluetooth menu. Then contact "Car BT" on your phone. Connection will display "BT ON". 2 Answering the Phone When the call comes in, the caller's number appears on the display. To answer an incoming call, press the F / PS / PHONE button on the panel. -
Page 11: Connectiondiagram
Connection Diagram A ISO Power Supply Socket Connection Battery +12V (Yellow) ACC (Red) Grounding (Black) B ISO Speaker Socket Connection Rear Right (+) Rear Right (-) Front Right (+) Front Right (-) Front Left(+) Front Left (-) Rear Left (+) Rear Left (-) -
Page 12: Troubleshooting
Troubleshooting Problem Reason Solution The power connection Check that the power The device does not is faulty. connections are correct. work. Fuse blown. Replace the fuse. The volume is Increase the volume. minimum. No sound. No speaker connection Check the speaker cable is made. -
Page 13: Warranty Certificate
Warranty Period: 2 Years Maximum Repair Time: 20 business days Bandrol and Serial No: In this document, Daiichi Elektronik San. Ve Tic. Inc. declares that the above equipment complies with Directive 2014/53 / EU. The full text of EC Declaration of Conformity is available at the following internet address: http: // https: // www.daiichi.com/about/ warranty is valid within the... -
Page 14: Warranty Conditions
Mounting / installing / connecting non-genuine parts or accessories not approved by the manufacturer d. Daiichi Electronics Co., Ltd. Installation or intervention by persons other than authorized service e. Products whose serial number has been altered or destroyed f. - Page 15 Note ..............................................................................................................................................................................................................................................................................................................................................................................................................................................................................................................................................................................................................................................................................................
- Page 17 Technical Support Contact Center Ferhatpaşa AVE. 16. ST. No: 38 - 34888 Ataşehir / İstanbul Tel: + 90 (216) 661 50 59 Tel: + 90 (216) 471 85 70 Tel: + 90 (216) 471 85 75 www.daiichi.com.tr merkezservis@daiichi.com.tr...
- Page 18 TÜRK TRAKTÖR MP228 BT Ses Sistemi Kullanım Kılavuzu Kasım 2019 Ver.1.0...
- Page 20 İçindekiler 1. Uyarı....................2. Cihaz Tanıtımı.................. Genel Özellikler..................3. Tuş Takımı ve Fonksiyonlar............4. Ayarlar....................5. Bluetooth Bağlantısı............... Bluetooth Eşleştirme................Telefon Cevaplama................Görüşme Sonlandırma / Çağrı Reddetme..........Bluetooth Müzik..................Bağlantı Şeması................9 7. Sorun Giderme................8.Garanti Belgesi................11 9. Garanti Şartları................12...
-
Page 21: Uyarı
Uyarı Ürünün teknik özellikleri ve bilgiler için kullanma kılavuzu yalnızca başvuru amaçlıdır. Bu kılavuzdaki bilgiler uyarı olmaksızın değişime tabidir. Herhangi bir şahsı ya da kuruluşu uyarma yükümlülüğü olmaksızın ürünlerimizi değiştirme ya da geliştirme hakkımızı saklı tutarız. Güvenlik Hatırlatması Güvenliğiniz için lütfen eğlence sisteminin ekranını sürüş halindeyken kullanmayın. Ses seviyesini, ortam sesini duyabileceğiniz şekilde ayarlayın. -
Page 22: Cihaz Tanıtımı
Cihaz Tanıtımı GENEL ÖZELLİKLERİ: • Radyo Fonksiyonu • USB Fonksiyonu • SD Fonksiyonu • AUX Fonksiyonu • Bluetooth Fonksiyonu... -
Page 23: Tuş Takımı Ve Fonksiyonlar
Tuş Takımı & Fonksiyonları 1 >>| Düğmesi: Radyo modundayken sonraki istasyona gitmek için bu düğmeye kısaca basın. Manuel ileri arama yapmak için 2 sn. düğmeye basılı tutarak aktif edebilirsiniz. USB / SD / BT MUZIK modundayken de bir sonraki şarkıya gitmek için bu düğmeye kısaca basın. - Page 24 Tuş Takımı & Fonksiyonları 7 BND / ID3 Düğmesi: Radyo modundayken FM1, FM2, FM3 bantları arasında geçiş yapmak için bu düğmeye kısaca basın. USB / SD modundayken ID3 etiket bilgisine sahip bir MP3 dosyası çalarken, LCD ekranda ID3 etiket bilgisini görüntülemek için BND / ID3 düğmesine art arda basın.
- Page 25 Tuş Takımı & Fonksiyonları 15 USB Port: MP3 / WMA / WAV formatında bir müzik dosyasını çalabilmek için USB bellek bağlayın. 16 SD Port: MP3 / WMA / WAV formatında bir müzik dosyasını çalabilmek için SD kart takın. 17 LCD Ekran: Dijital saati ve seçilen fonksiyona ilişkin bilgileri gösterir.
-
Page 26: Ayarlar
Ayarlar 1. SES Seviyesi Ses seviyesini ayarlamak için SES +/- düğmesini kullanın. Max. ses seviyesi: 40 2. BAS Ayarı Ekranda "BAS 00" görünene kadar SES düğmesine art arda basın. Ayarı değiştirmek için SES +/- düğmesini kullanın. EQ açıkken bas kontrolü kullanılamaz. 3. -
Page 27: Bluetooth Bağlantısı
Bluetooth Bağlantısı 1 Bluetooth Eşleştirme Bluetooth eşleştirmek için telefonunuzun bluetooth menüsünden cihaz araması yapın. Daha sonra telefonunuzdan "Car BT" ile bağlantı kurun. Bağlantı sağlandığında ekranda "BT ON" yazacaktır. 2 Telefonu Cevaplama Arama geldiğinde, ekranda arayan kişinin numarası görünür. Gelen aramayı cevaplamak için panel üzerindeki F / PS / TELEFON butonuna basın. -
Page 28: Bağlantı Şeması
Bağlantı Şeması A ISO Güç Besleme Soket Bağlantısı Akü +12V (Sarı) ACC (Kırmızı) Topraklama (Siyah) B ISO Hoparlör Soket Bağlantısı Arka Sağ (+) Arka Sağ (-) Ön Sağ (+) Ön Sağ (-) Ön Sol (+) Ön Sol (-) Arka Sol (+) Arka Sol (-) -
Page 29: Sorun Giderme
Sorun Giderme Sorun Sebep Çözüm Güç bağlantısı hatalıdır. Güç bağlantılarının doğru olup olmadığını kontrol Cihaz çalışmıyor. ediniz. Sigorta atmıştır. Sigortayı değiştiriniz. Ses seviyesi Ses seviyesini yükseltiniz. minimumdadır. Ses çıkmıyor. Hoparlör bağlantısı Hoparlör kablo yapılmamıştır. bağlantılarını kontrol ediniz. Radyo çalışmıyor veya Anten kablosu Anten kablosunun sıkıca otomatik istasyon arama... -
Page 30: Garanti Belgesi
Garanti Süresi: 2 Yıl Azami Tamir Süresi: 20 iş günü Bandrol ve Seri No: İşbu belge ile Daiichi Elektronik San. Ve Tic. A.Ş. yukarıdaki ekipmanının 2014 / 53 / EU sayılı direktife uygun olduğunu beyan eder. AB uygunluk beyanının tam metni aşağıdaki internet adresinden edinilebilir: http://https://www.daiichi.com/about/... -
Page 31: Garanti Şartları
Orijinal olmayan ve üretici tarafından onaylanmamış parçaların veya aksesuarların cihaza montajı/takılması / bağlanması d. Daiichi Elektronik A.Ş. Yetkili servisi haricindeki kişilerce yapılan montaj veya müdahaleler e. Seri numarası değiştirilmiş veya tahrip edilmiş ürünler f. Garanti belgesi üzerinde tahribat yapılmış cihazlar MADDE 8 a. - Page 32 ..............................................................................................................................................................................................................................................................................................................................................................................................................................................................................................................................................................................................................................................................................................
- Page 34 Teknik Destek İletişim Merkezi Ferhatpaşa Mh. 16. Sk. No: 38 - 34888 Ataşehir / İstanbul Tel: + 90 (216) 661 50 59 Tel: + 90 (216) 471 85 70 Tel: + 90 (216) 471 85 75 www.daiichi.com.tr merkezservis@daiichi.com.tr...
Need help?
Do you have a question about the TURK TRAKTOR MP228 BT and is the answer not in the manual?
Questions and answers
Nerden satın alabilirim yardımcı olursanız sevinirim