
Summary of Contents for Cocoon fires AERIS
- Page 1 Operating Manual ® • COCOON AERIS • HANGING MODEL Corresponding Model Codes: CFAB, CFABANG, CFABBLK, CFASS, CFASSANG PLEASE READ THESE INSTRUCTIONS CAREFULLY AND COMPLETELY BEFORE OPERATING THIS PRODUCT...
-
Page 2: Table Of Contents
INDEX PAGE INDEX PAGE Page 1 WARNINGS AND SAFEGUARDS Page 2 STAINLESS STEEL HANGING SYSTEM - FIXED CEILING BASE PART BREAKDOWN Page 3 STAINLESS STEEL HANGING SYSTEM - ANGLED CEILING BASE - PART BREAKDOWN Page 4 BLACK HANGING SYSTEM - FIXED CEILING BASE - PART BREAKDOWN Page 5 PARTS NAMES AND DESCRIPTIONS Page 6... -
Page 3: Warnings And Safeguards
Cocoon Fires is very safety conscious and we have taken every care in designing, manufacturing ring and assembling your Cocoon Fires Burner to ensure it operates effectively, efficiently and safely. Please exercise care when using this product and follow the instructions below. Cocoon Fires cannot be held responsible for any damage or injury caused if the information supplied in this manual are not adhered to. -
Page 4: Stainless Steel Hanging System - Fixed Ceiling Base Part Breakdown
STAINLESS STEEL HANGING SYSTEM - FIXED CEILING BASE PART BREAKDOWN Fixed Ceiling Base Extension for hanging model Poles Security NOTE: the Stainless Steel Optional: Screw hanging system comes with 50cm an option of a either a fixed (19,6in) ceiling base OR and angled ceiling base for pitched or 100cm angled fixing surfaces. -
Page 5: Stainless Steel Hanging System - Angled Ceiling Base - Part Breakdown
STAINLESS STEEL HANGING SYSTEM - ANGLED CEILING BASE - PART BREAKDOWN Angled Ceiling Base Extension for hanging model Poles NOTE: the angled ceiling NOTE: the Angled Ceiling Base Optional: base is only available for Security is only available for the 50cm the Stainless Steel hanging Screw... -
Page 6: Black Hanging System - Fixed Ceiling Base - Part Breakdown
BLACK HANGING SYSTEM - FIXED CEILING BASE - PART BREAKDOWN Fixed Ceiling Base Black Fixed Ceiling Base Black Hanging for hanging model System NOTE: the Black hanging NOTE: The Black Hanging System NOTE: the 25cm system comes with only an comes with only an option of a connection pole option of a fixed angle... -
Page 7: Parts Names And Descriptions
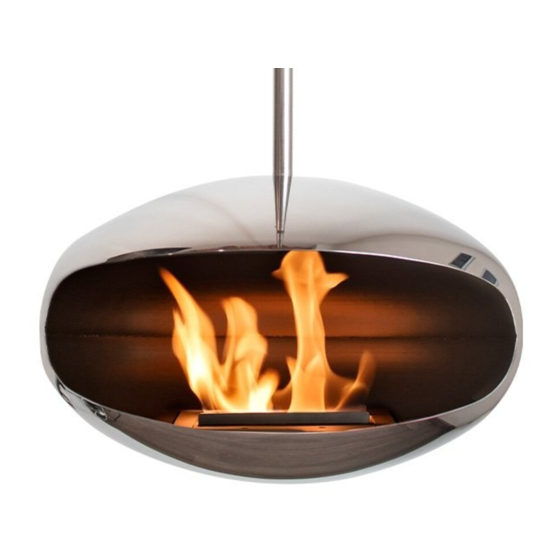
PARTS NAMES AND DESCRIPTIONS Main Body or Chimenea Dimensions: Additional Parts & Accessories: The Sliding Lid Handle is used to adjust the intensity of the flame by sliding the Sliding Lid backwards and forwards, and also to extinguish the flame by sliding the Sliding Lid into the closed position. -
Page 8: Additional Parts Names And Descriptions
ADDITIONAL PARTS NAMES AND DESCRIPTIONS The Lifting Handle is used to take the Combustion Chamber in and out of the Mount Plate inside the Main Body for filling and cleaning. Step 1 is to join Part A and Part B as shown to the left. -
Page 9: Combustion Chamber Parts Names And Descriptions
COMBUSTION CHAMBE PARTS NAMES AND DESCRIPTIONS Combustion Chamber: Handle Holes Sliding Lid Top Plate Burner Vent Filling Line Vent Plate Fuel Tank Filling Line info@cocoonfires.com www.cocoonfires.com... -
Page 10: Safety & Clearance
SAFETY & CLEARANCE WARNING: - Aim opening away from flammable objects or surfaces. - Ceiling mounting surface must be load bearing and be able to support a minimum mass of 150 kg / 330 lb or more. Total product weight is 27 kg / 59.5 lb Load Bearing Ceiling Finished Floor Level MINIMUM DISTANCES:... - Page 11 In Australia is it mandatory for all products to be supplied with a Fuel Canister which has a flame arrestor. Cocoon Fires supplies a fuel cannister with a flame arrestor in the Australian market. We recommend in all markets to use a fuel cannister with a flame arrestor.
-
Page 12: Stainless Steel Fixed Ceiling Base - Installation & Adjustment
STAINLESS STEEL FIXED CEILING BASE - INSTALLATION & ADJUSTMENT NOTE: The Cocoon Aeris Hanging Models may only be fitted onto a load bearing surface that can handle 150kg or more. Plastic fixings may not be used otherwise they could melt from the heat of the fire, all fixings must be metal. -
Page 13: Stainless Steel Angled Ceiling Base - Installation & Adjustment
STAINLESS STEEL ANGLED CEILING BASE - INSTALLATION & ADJUSTMENT NOTE: The Cocoon Aeris Hanging Models may only be fitted onto a load bearing surface that can handle 150kg or more. Plastic fixings may not be used otherwise they could melt from the heat of the fire, all fixings must be metal. -
Page 14: Black Fixed Ceiling Base - Installation & Adjustment
BLACK FIXED CEILING BASE - INSTALLATION & ADJUSTMENT NOTE: The Cocoon Aeris Hanging Models may only be fitted onto a load bearing surface that can handle 150kg or more. Plastic fixings may not be used otherwise they could melt from the heat of the fire, all fixings must be metal. -
Page 15: Hanging Model Installation & Adjustments
HANGING MODEL INSTALLATION & ADJUSTMENTS Position the Main Body onto the threaded end of the Connection Pole and secure from inside with first the washer, then the hex type nut and finally the wing type nut. NOTE: The wing type nut is a security lock for yours and the safety of others. Position the Movable Tray Bracket over the threaded stud at the base of the Main Body and adjust according to the instructions on the following page before securing with hex nut. - Page 16 HANGING MODEL INSTALLATION & ADJUSTMENTS With the Removable Tray Bracket and hex type nut loosely in place, adjust the Removable Tray Bracket backwards or forwards so that the front edge of the Mount Plate (A) sits just below the front bottom lip of the opening in the Main Body (B).
- Page 17 HANGING MODEL INSTALLATION & ADJUSTMENTS By finely adjusting the Removable Tray Bracket backward and forward (1) allows for the necessary adjustment in height (2) of the Mount Plate. NOTE: the front edge of the Mount Plate (A) must be just below the front bottom lip of the opening in the Main Body (B).
- Page 18 HANGING MODEL INSTALLATION & ADJUSTMENTS With the Mount Plate in the correct position and secured in place with the hex nut, the Combustion Chamber can now be placed inside and taken off the Mount Plate opening using the Lifting Handles supplied as shown on the previous pages. Your Cocoon Burner is now ready to use, follow the steps on the following pages to correctly and safely fill, ignite, adjust, shut off and refill the Combustion Chamber.
-
Page 19: Troubleshooting And Operational Tips
In Australia is it mandatory for all products to be supplied with a Fuel Canister which has a flame arrestor. Cocoon Fires supplies a fuel cannister with a flame arrestor in the Australian market. We recommend in all markets to use a fuel cannister with a flame arrestor. -
Page 20: Operating The Cocoon Burner
In Australia is it mandatory for all products to be supplied with a Fuel Canister which has a flame arrestor. Cocoon Fires supplies a fuel cannister with a flame arrestor in the Australian market. We recommend in all markets to use a fuel cannister with a flame arrestor. -
Page 21: Procedure If Burner Is Overfilled And Caution
PROCEDURE IF BURNER IS OVERFILLED: In case of accidental overfilling of the Fuel Tank, follow these steps: • NEVER ignite the Combustion Chamber if it is filled past the "MAX " filling line shown above Remove the Combustion Chamber from the Chimenea, using the lifting Handles. •... -
Page 22: Igniting The Combustion Chamber
IGNITING THE COMBUSTION CHAMBER Once all spilled or residual fuel has been wiped clean, and all other forms of fuel have been sealed and moved to a safe distance from the Combustion Chamber, and the Combustion Chamber has been placed back inside the Chimenea as indicated above, it is safe to consider igniting the Combustion Chamber. -
Page 23: Regulating And Extinguishing The Flame
REGULATING AND EXTINGUISHING THE FLAME To regulate the flame, insert the tips of the Sliding Lid Handle into the holes of the Sliding Lid of the Combustion Chamber and slide backwards or forwards to regulate the flame size. To extinguish the flame, insert the tips of the Sliding Lid Handle into the holes of the Sliding Lid of the Combustion Chamber and slide all the way forward until the flame is extinguished. -
Page 24: To Refill The Combustion Chamber
Chamber inside the Main Body. Maintenance & Periodic Servicing: IMPORTANT: The Matt Black Cocoon Fires Models are designed for indoor use only. 1. Periodic cleaning of unvented decorative appliance combustion surfaces is recommended as per section called TROUBLESHOOTING & OPERATIONAL TIPS. -
Page 25: Warning
WARNING Risk of Explosion: i) Never use any fuel other than the fuel specifically intended for use in the unvented decorative appliance. Never use gasoline. ii) Never refill unvented decorative appliance fuel reservoir when unvented decorative appliance is operating or still hot. iii) Never use unvented decorative appliance where flammable vapours or gas may be present.
Need help?
Do you have a question about the AERIS and is the answer not in the manual?
Questions and answers