Table of Contents
Advertisement
Quick Links
Advertisement
Table of Contents

Related Manuals for Kroks SDR Dreamkit V1D

Summary of Contents for Kroks SDR Dreamkit V1D
-
Page 2: Table Of Contents
CONTENT 1. PURPOSE AND PRINCIPLE OF OPERATION ................3 2. SPECIFICATIONS ........................3 3. COMPLETENESS ........................5 4. DEVICE STRUCTURE ......................... 5 5. TURNING ON ..........................6 6. SCREEN INTERFACE ......................... 6 7. DEVICE MENU ..........................7 7.1. Quick settings menu ......................7 7.2. -
Page 3: Purpose And Principle Of Operation
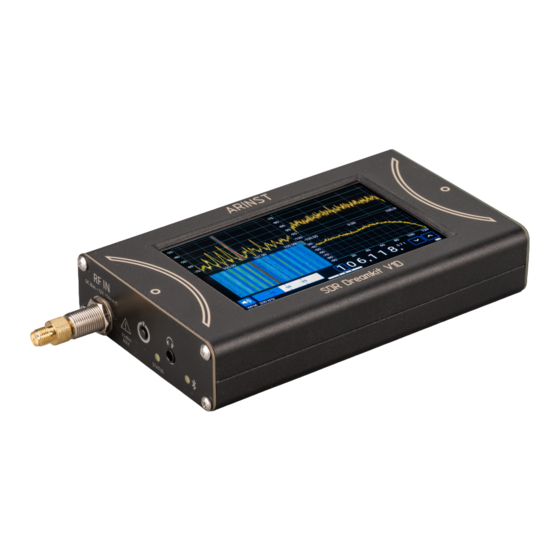
1. PURPOSE AND PRINCIPLE OF OPERATION 1.1. The ARINST SDR Dreamkit V1D portable radio receiver (hereinafter referred to as the receiver, device) is designed for receiving, displaying and listening to radio signals with various types of analog modulation. Up to 4 spectrum/waterfall graphs for different bands can be displayed on the display. The receiver is built using SDR technology, which allows you to programmatically control the settings of the device. -
Page 4: Specifications
2. SPECIFICATIONS 2.1. The technical characteristics of the device are shown in table 1. Table 1 Parameter value Working frequency range 1-3100 MHz Maximum sampling rate of quadrature channels 6 MHz Maximum width of the viewing band 5 MHz Minimum frequency resolution 1 Hz ADC bit rate 16 bit... -
Page 5: Completeness
3. COMPLETENESS 4.1. The delivery set is shown in Table 2. Table 2 Name Quantity Portable radio receiver ARINST SDR Dreamkit V1D 1 pc. Cable USB 2.0(male)-A – Mini-USB 1 pc. Adapter SMA (female) – SMA (female) 1 pc. Operation manual (product passport) 1 pc. -
Page 6: Turning On
5. TURNING ON Do not connect the RF input jack while the charger is connected or USB connected to a PC. If these recommendations are not followed, the radio receiver may fail. The use of the receiver in the open air during snowfall or rain is prohibited. If the receiver is brought in during the cold season from a cold room or from the street to a warm room, do not turn it on for a sufficient time for the condensate to evaporate from the receiver. -
Page 7: Device Menu
3 – audio device volume control button. 4 – S- meter. 5 – pull-out area of the device menu. 6 – tuning frequency selector with buttons for discrete adjustment to the selected digits. 7 – information about the type of the current demodulator and demodulation bandwidth. 8 –... - Page 8 Figure 7.2 - Main menu Structurally, the main menu consists of 5 logically grouped sections: Band, Display, Audio, Device, Presets. 7.2.1. Section «Band» The «Band» section is shown in Figure 7.3. Figure 7.3 – «Band» menu This menu allows you to set the center frequency, receiver tuning frequency, demodulator type, demodulation bandwidth, turn on/ turn off and adjust (Threshold, Pulse width, Average) the Noise blanker.
- Page 9 Figure 7.4 – «Display» menu This menu allows you to set the bandwidth (Baseband width) as well as the IF1 width. Subsection «Chart settings» allows you to configure the settings for displaying charts independently of each other. The user can set the required range of values for the amplitude (Amplitude range), as well as with the averaging parameters (Attack, Decay) select the optimal averaging of the displayed graphs.
- Page 10 Section «Device» is shown in Figure 7.6. Figure 7.6 – «Device» menu Radio receiver ARINST SDR Dreamkit V1D has the ability to supply 12V voltage to the HF input. The implementation of this function allows powering antenna amplifiers, external low-noise amplifiers (LNA), emitter repeaters, and other active devices.
-
Page 11: Working With Hdsdr
Also in the «Device» menu there is a submenu for controlling the backlight of the screen «Screen sleep». Here the user can configure the backlight to turn off after a specified time interval (1, 5, 10 minutes) in the absence of interaction with the radio interface. You can also turn off the backlight dimming function (if you want the radio receiver to always work with the screen on). - Page 12 8.1.4. Connect the device with a good USB 2.0 cable to the PC. Attention! Supported operating systems Windows 7, 8, 10 64-bit. 8.1.5. Turn on the device, after loading, go to the menu, open the section Device. 8.1.6. To switch to the HDSDR mode, press the «HDSDR MODE» button. After a few seconds, restart the device in this mode.
- Page 13 8.1.8. Run HDSDR.exe from folder HDSDR. If the previous steps are successfully completed, the device in the program will be defined as SDR Dreamkit V1D. If the device is not detected by the program, then at startup a message will appear: Check the points above.
-
Page 14: Receiver Control In Hdsdr
8.2. Receiver control in HDSDR 8.2.1. Selecting the sampling rate: 8.2.2. Setting the gain in dB:... -
Page 15: Finishing Work With Hdsdr
8.2.3. Setting the frequency: Attention! The operating frequency range of the receiver is limited to the values of 1 MHz – 3100 MHz. When you go beyond the operating range, the following message is displayed on the screen: In the program, the frequency display will not be correct when going beyond the boundaries. Set the frequency within the specified range.
Need help?
Do you have a question about the SDR Dreamkit V1D and is the answer not in the manual?
Questions and answers