Advertisement
Available languages
Available languages
Quick Links
Advertisement

Related Manuals for protech HDM-70SP

Summary of Contents for protech HDM-70SP
- Page 1 HDM-70SP Speaker Built-in Rack Mount HD Monitor スピーカー内蔵ラックマウントHDモニター Operating I nstructions 取 扱 説 明 書 Before operating the system, please read this manual thoroughly and remain it for future reference. Volume1, 1st edition Ver.1.0...
- Page 2 安全上の注意 WARNING この製 品の使用、 または使用不能から生ずる付随的な損害( 情報内容の変化・消失、 事業利益の損失、 事業の 中断など)に関して、 当社は責 任を負いかねますのであらかじめご了承ください。 取 扱 説 明 書の記載内容を守らないことにより生じた損害に関して、 当社は責任を負いかねますのであらかじめ ご了承ください。 ご使用の前に、 この 『 安全 上の注 意』 をよくお読みのうえ、 正しくお使いください。 また、 お読みに なった後は、 大 切に保管してください。 安 全 上の注 意は、 お使いになる人や、 他の人への危害、 財産への損害を未然に防ぐための内容に なっていますので、 必ずお守りください。 表...
-
Page 3: Table Of Contents
Table of contents HDM-70SP HDM-701SP 目次 Names and Functions of Parts 各部名称と働き Front panel フロントパネル Rear panel リアパネル Functions(MENU) 機能(メニュー) Connection 接続方法 Adjustment and Setting 調整および設定 Outside View & Dimmensions 外形寸法図 Specifications 仕様... -
Page 4: Names And Functions Of Parts
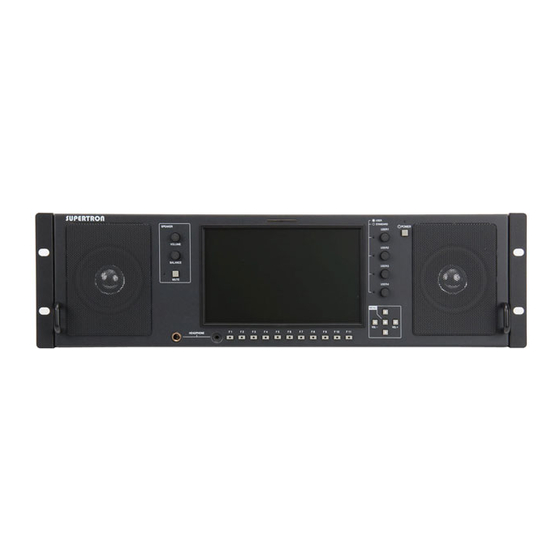
Names and Functions of Parts HDM-70SP HDM-70SP 各部名称と働き Front panel フロントパネル Screen The display screen is 7.0 inches diagonal LCD (Active area : 152.4mm 91.4mm) . スクリーンは 7.0インチ液晶、 画面寸法 152.4mm 91.4mm です。 TALLY indicator (RED/GREEN/BLUE // LEFT R/R/B // RIGHT R/G/B) Lights up when a tally signal is input to PARALLEL REMOTE connector on the rear panel. 背面の PARALLEL REMOTE コネクタに入力されるタリー信号により 赤緑青に点灯します。 POWER switch and POWER Indicator LED Turn on the power supply through the DC IN(12 V) connector. When the power is supplied, the POWER indicator LED lights on. 電源スイ ッチを ON すると、 電源表示LED が点灯します。 MENU (menu select / setting entry and audio volume) buttons Press center : Accesses to MENU displayed on the screen Enters/confirms the selected item/ selected value. Press down/up : Moves cursor down/up. Accesses to a setting item/ setting value. Press right : Enters/confirms the selected item/ selected value and moves cursor right. Increases volume of the audio output level of the front AUDIO OUT jack. Press left : Moves cursor left. Decreases volume of the audio output level of the front HEADPHONE jacks. MENU ボタン中央を押す : メニューを画面に表示します。 選択している項目を決定し、 カーソルを右に移動します。 MENUボタン下または上を押す : カーソルを下または上に移動し、 設定項目を選びます。 MENUボタン右を押す : 選択している項目を決定し、 カーソルを右に移動します。 MENUボタン左を押す : カーソルが左に移動します。 MENU が表示されていないとき、 右左のボタン(VOL +/-)は、 前面パネルの HEADPHONE ジャックのボリュームが調整できます。... - Page 5 HDM-70SP HDM-70SP 各部名称と働き Front panel フロントパネル F1/2/3/4/5/6/7/8/9/10/11 ( USER ASSIGN Preset Function ) buttons and indication LEDs Pressing a button executes the function assigned to each button in MENU setting. When the funcion operates, the indication LED on the key lights up. The functions that can be assigned to the Preset Function buttons from F1 to F11 are as follows. メニューのUSER ASSIGNの設定で F1〜F11 に割り振られているファンクションの実行を ON/OFF します。 ON のとき 表示LED が点灯します。 F1〜F11 に割り振られるファンクションの項目は次の通りです。 <Preset Function item> <メニュー 項目> USER ASSIGN Preset Functions INPUT 1 入力 1 MFG DEFAULT Setting INPUT 2 2 INPUT 3 3 プリセット ファンクションデフォルト設定 GAMMA 1.0 ガンマ 1.0 GAMMA 1.8 1.8 F1 [INPUT 1] GAMMA 2.0 2.0 F2 [INPUT 2] GAMMA 2.2 2.2 F3 [SCAN] GAMMA 2.4 2.4 F4 ...
- Page 6 HDM-70SP HDM-70SP 各部名称と働き Front panel フロントパネル USER 1/2/3/4 ( USER ASSIGN Preset Function ) Rotary knobs and indication LEDs Pressing a knob executes the functions, BRIGHT, CONTRAST, SATURATION, and SHARPNESS, assigned to each knob in MENU. When the indication LED lights up, each value of the functions is adjustable from 0 to 100 by rotating. 点灯 When the LED doesnʼt light on, each value is set to the default STANDARD value. 消灯 メニューのUSER ASSIGNの設定で USER1〜4に割り振られているファンクション (明るさ, コントラスト, 彩度, シャープネス)の実行を ON/OFF します。 ON のとき、 表示LED が点灯し、 ツマミを回して 0 - 100 の範囲で調節、 設定できます。 標示LED が点灯していないときは、 それぞれデフォルトの標準値に設定されています。 <Default setting> <STANDARD value> 標準設定 USER 1 BRIGHT 50 明るさ USER 2 CONTRAST 80 コントラスト USER 3 SATURATION 50 彩度 USER 4 SHARPNESS 0 シャープネス (1) Pressing knob selects USER setting and LED lights on. ツマミを押すと LED が点灯します。 (2) Rotating knob adjusts each value. ツマミを回すと それぞれ調節できます。 The functions that can be assigned to each the Preset Function Rotary knobs from USER1 to USER 4 are as follows. BRIGHT CONTRAST...
- Page 7 HDM-70SP HDM-70SP 各部名称と働き Rear panel リアパネル Used to output the HD-SDI embedded audio signals selected on the MENU. The audio output channels are selected on the MENU, LEFT and RIGHT CHANNEL. The audio output volume level is adjusted on the MENU, REAR VOLUME [ 0 to 40 ] メニューで選択した HD-SDI エンベデッ ドオーディオ信号を出力します。 オーディオ出力のボリューム調整はメニュー REAR VOLUMEで行います。 AUDIO OUTPUT connectors ( XLR 3-pin, male ) Used to output the HD-SDI embedded audio signals selected on the MENU. The audio output channels are selected on the MENU, LEFT and RIGHT CHANNEL. メニューで選択した HD-SDI エンベデッドオーディオ信号を出力します。 オーディオ出力の CH 選択はメニューで行います。 SDI 1/2 (HD/SD) ( SDI (HD/SD) signal input 1/2 ) connector (BNC type) Used to input HD/SD-SDI signal. Select an input signal on the MENU or by Function button. HD/SD-SDI 信号を入力します。 入力信号の選択は、 メニューまたはユーザープリセッ ト ファンクションボタンで行います。 SDI OUT (HD/SD) ( SDI (HD/SD) signal output ) connector (BNC type) Used to output HD/SD-SDI signal input to the SDI 1/2 (HD/SD) input connector.(Loop-Thru) SDI 1/2(HD/SD) コネクタに入力され、 選択されて画面に表示されている HD/SD-SDI 信号を出力します。 (ループ スルー) OPTION INPUT ( HD component/DVI signal optional input ) connector Used for input of HD component signal ( necessary HD component input adaptor, OC-COMP, optinal) or for input of DVI signal ( necessary DVI signal input adaptor, OC-DVI, optional). HDコンポーネント信号の入力またはDVI信号の入力に使用します。 別売のアダプタがそれぞれ必要です。 ※ Option HD component input adaptor = OC-COMP HDコンポーネント入力アダプター DVI signal input adaptor = OC-DVI DVI 入力アダプター...
- Page 8 HDM-70SP HDM-70SP 各部名称と働き Rear panel リアパネル PARALLEL REMOTE connector (8-pin, RJ-45) Used for the remote control: e.g. for input of the TALLY signal, INPUT signal selection and Preset Function operation as folloeing items. The pin assign, default setting is as the table shows. The control signal is to short-circuit each pin with PIN 5. リモートコントロール - 例えば, タリー信号入力, 入力切替え, プリセッ ト ファンクションのON/OFF 等に使用します。 ピンアサインはデフォルトでは表のようになっています。 コントロール信号は各ピンと5番ピンとのショートです。 Assignable function items R TALLY G TALLY B TALLY LEFT R TLY LEFT G TLY LEFT B TLY RIGHT R TLY RIGHT G TLY RIGHT B TLY INPUT 1 INPUT 2 INPUT 3 GAMMA 1.0 GAMMA 1.8 GAMMA 2.0 Pin Assign GAMMA 2.2 (Manufacturing Default) GAMMA 2.4 ピンアサイン GAMMA 2.6 WHITE BAL D65 PIN 1 [R TALLY]...
-
Page 9: Rear Panel リアパネル
HDM-70SP HDM-70SP 各部名称と働き Rear panel リアパネル DC IN 12V ( DC 12V power supply input ) connector (XLR 4-pin) Used for connection to the AC adaptor supplied 付属の ACアダプタ(DC 12V 電源) を接続します。 Fan works when the power switch is turned on. The fan operation can be set to AUTO, MAX or OFF, on the MENU, SETUP, FANCONTROL.. And FAN STOP function can be assigned to the function button, F1 to F9 on the front panel. ファンは POWER スイ ッチ ON のとき動作します。 ファンの動作は、 AUTO/MAX/OFF にメニューで設定できます。 FAN STOP 機能が フロントパネルのファンクションボタンにユーザー設定できます。... - Page 10 HDM-70SP HDM-70SP 各部名称と働き [1] MENU Operation メニューの操作について <MENU button> press center 中央 MENU : When pressing MENU center button, press up 上 MENU items are displayed on the screen. メニュー : MENU ボタン(中央) を押すと メニューが画面上に表示されます。 press right 右 press down 下 MENU Setting : (1)By pressing down(or up) button select a MENU item displayed on the screen. By pressing center(or right) button confirm the selected item. Then the cursor moves right to setting items. (2)By pressing down(or up) button select a MENU setting item. By pressing center(or right) button confirm the selected item. Then the cursor moves right to setting value. (3)By pressing down(or up) button select a setting value. By pressing center button confirm the setting value. (4)By pressing left button move the cursor back. メニューの設定 : (1)MENUボタン下(または上)を押して(カーソルを移動して)メニュー項目を選択します。 MENUボタンセンターまたは右を押すとカーソル位置の選択した項目が確定し、 カーソルが右側(第 2 列)の設定項目に移動します。 (2))MENUボタン下(または上)を押して(カーソルを移動して)設定項目を選択します。 MENUボタンセンターまたは右を押すとカーソル位置の選択した項目が確定し、 カーソルが右側(第 3 列)の設定内容(設定値)に移動します。 (3))MENUボタン下(または上)を押して設定内容(設定値)を選択します。 MENUボタンセンターを押すと設定内容(設定値)が確定します。 (4)MENUボタン左を押すとカーソルがもどります。 <MENU Item> メニュー項目 INFO [1080i/60] MODEL VAM-7850 INPUT [SDI 1] OPTION CARD N/A PICTURE INPUT SDI 1...
- Page 11 HDM-70SP HDM-70SP名称と働き [2] MENU Contents メニューの内容(項目および設定値)について <MENU Setting Item>設定項目 <Setting Value>設定値 <MENU Item>メニュー項目 RETURN SDI 1 INPUT [SDI 1] INPUT [SDI 1] SDI 2 入力 OPTION ANALOG CALIBRATE > 0/ - - - - - / 100 RETURN PICTURE BRIGHT [50] 0/ - - - - - / 100 ピクチャー CONTRAST [80] 0/ - - - - - / 100 SATURATION [50] 0/ - - - - - / 100 SHARPNESS [50] 1.0/ - - - - - / 3.0 GAMMA [2.2] AUTO RETURN COLOR [D65/709]...
- Page 12 HDM-70SP HDM-70SP 各部名称と働き ON / OFF RETURN MARKER [ON] MARKER [OFF] ON / OFF マーカー CENTER [ON] OFF ASPECT [OFF] 4 : 3 SAFTY [95%] 16 : 9 1.85 : 1 CROSS HATCH [OFF] 2.35 : 1 MARKER MAT [CLEAR] 4:3 & 1.85 LINE THICKNESS [2] 4:3 & 2.35 LINE TYPE [WHITE] OFF/99%/ - - - - /80% SMALL MEDIUM LARGE CLEAR HALFTONE BLACK 1 / 2 / 3 GRAY...
- Page 13 HDM-70SP HDM-70SP 各部名称と働き <MENU Item> <MENU Setting Item> <Setting Value> NORMAL RETURN WAVEFORM [ON] LAYOUT [NORMAL] ウェーブフォーム WAVEFORM [ON] SIZE [MEDIUM] ALM16 POSITION [RIGHT BOT] QUAD DISP TYPE [OVERLAY] QUAD2 Y OVER LIMIT [103.2%] ON / OFF Y UNDER LIMIT [- 0.9%] SMALL HISTOGRAM [OFF] MEDIUM POSITION [RIGHT BOT] LARGE LEFT TOP LEFT BOT RIGHT TOP RIGHT BOT OVERLAY / OVERLAP...
- Page 14 HDM-70SP HDM-70SP 各部名称と働き USER ASSIGN RETURN INPUT 1 INPUT 2 F1 [INPUT 1] ユーザーアサイン INPUT 3 F2 [INPUT 2] (プリセッ ト ファンクション) GAMMA 1.0 F3 [SCAN] GAMMA 1.8 F4 [ASPECT] GAMMA 2.0 F5 [MARKER] GAMMA 2.2 GAMMA 2.4 F6 [ZOOM] GAMMA 2.6 F7 [WAVEFORM MON] WHITE BAL D65 F8 [VECTORSCOPE] WHITE BAL D93 F9 [AUDIO METER] MONO COLOR CHANNEL F10 [ClipGuide]...
- Page 15 HDM-70SP HDM-70SP 各部名称と働き <MENU Item> <MENU Setting Item> <Setting Value> RETURN REMOTE R TALLY PIN 1 [R TALLY] G TALLY リモート B TALLY PIN 2 [G TALLY] LEFT R TLY PIN 3 [B TALLY] LEFT G TLY PIN 4 [MARKER] LEFT B TLY PIN 5 [GROUND] RIGHT R TLY PIN 6 [INPUT 1] RIGHT G TLY PIN 7 [INPUT 2] RIGHT B TLY INPUT 1 PIN 8 [ASPECT] INPUT 2 INPUT 3 GAMMA 1.0 GAMMA 1.8 GAMMA 2.0 PARALLEL REMOTE connector GAMMA 2.2...
- Page 16 HDM-70SP HDM- 各部名称と働き <MENU Item> <MENU Setting Item> <Setting Value> RETURN SDI STATUS [OFF] ERROR COUNT 0 SDI ステータス RESET COUNTER DISPLAY [OFF] AUTO AUTO RETURN SETUP FORMAT DISPLAY [AUTO] セットアッ プ TIMECODE [OFF] USERBIT [OFF] POWER SAVE [ALWAYS ON] VITC1 KEY LOCK [UNLOCKED] VITC2 RESET TO MFG DEFAULT > ON / OFF BACKUP USER CONFIG > ALWAYS ON RESTORE USER CONFIG > 2 MIN FAN CONTROL [AUTO] 5 MIN 10 MIN...
-
Page 17: Connection
Connection HDM-70SP HDM-70SP 接続方法 Power Supply Connection 電源の接続方法 Make sure to turn off the POWER switches of each unit before connecting. 注意 : 機器を接続する前には、 電源スイ ッチは必ず OFF してください。 Connect the DC IN connector( XLR 4-pin) on the rear panel to AC Adaptor supplied. リアパネルのDC IN コネクタにACアダプタ(付属)を接続します。 DC IN(12V) connector XLR 4-pin AC Adaptor(supplied) AC 電源アダプタ(付属) When the POWER switch is turned on and the power is supplied, the POWER Indicator LED lights up and the fans on the rear panel turn. 電源スイ ッチが ON され、 電源が供給されると電源表示LED が点灯し、 リアパネルのファンが回転します。 POWER Indication LED 電源表示LED POWER switch 電源スイ ッチ... - Page 18 HDM-70SP HDM-70SP 接続方法 HD-SDI Signal Input & Output HD-SDI信号入力および出力 Connect the SDI (HD/SD) (SDI signal input) connector (BNC type) on the rear panel to the HD-SDI output connector of a camera (or VTR, etc.) リアパネルの SDI 1/2 (HD/SD) 入力コネクタ からカメラのHD-SDI output へ接続します。 SDI 1/2 (HD/SD) connector SDI OUT(HD/SD) connector Camera (or VTR, etc.) HD-SDI output By pressing MENU button displayed the MENU and access to INPUT and set to “SDI 1” or “SDI 2”. “SDI 1” or “SDI 2” and its video format are displayed in the MENU(INFO and INPUT). Then the selected input signal can be output to the SDI (HD/SD) connector ( ; Loop Thru). The INPUT selection can be assighned to USER Presets buttons, F1-F11. フロントパネルの MENU ボタン中央を押してメニュー画面を表示し、 “INPUT”→”INPUT”→”SDI 1(or 2)” とアクセスして, SDI 入力を設定します。 INFO(インフォメーション)に入力信号、 ビデオフォーマッ トが表示されます。 またこのとき、 選択された入力信号は SDI OUT (HD/SD) コネクタから出力することができます。 入力選択は、 ユーザーアサインプリセットボタン F1〜F11に割り当てることができます。 MENU button USER ASSIGN Preset Function button メニューボタン プリセッ ト ファンクションボタン [confirm] 確定 [Access to MENU] push push push push push...
- Page 19 HDM-70SP HDM-70SP 接続方法 HD Component / DVI Signal Input HDコンポーネント / DVI 信号入力 Connect the OPTION INPUT connector on the rear panel with the HD component input adaptor(optional) or DVI input adaptor(optional) and connect it to a camera. リアパネルの OPTION INPUT コネクタ に HD コンポーネント入力アダプター(別売) または DVI 入力アダプター(別売) を 接続し、 カメラへ接続します。 OPTION INPUT connector ※ Option HD component input adaptor = OC-COMP HD component input adaptor HDコンポーネント入力アダプター DVI signal input adaptor = OC-DVI DVI 入力アダプター HD component output HDコンポーネント出力 By pressing MENU button display the MENU and access to INPUT in the MENU and set to “DVI(OPTION)”. “DVI” and its video format are displayed in the MENU(INFO and INPUT). The INPUT selection can be assigned to USER Presets buttons, F1-F11. フロントパネルの MENU ボタンを押してメニュー画面を表示し、 “INPUT”→”INPUT”→”DVI(OPTION)” とアクセスして設定します。 INFO(インフォメーション)に入力信号、 ビデオフォーマッ トが表示されます。 入力選択は、 ユーザーアサインプリセットボタン F1〜F11 に割り当てることができます。 USER ASSIGN MENU button メニューボタン Preset Functio button プリセッ ト ファンクションボタン <INPUT Setting in the MENU> メニューでの入力選択 [confirm] 確定 [Access to MENU] push...
- Page 20 HDM-70SP HDM-70SP 接続方法 Audio Signal Output オーディオ信号出力 Connect the AUDIO OUTPUT(XLR 3-pin), AUDIO OUT (Stereo, φ 3.5 mm) connector on the front or rear panel or HEADPHONE(Stereo, φ 3.5 mm and φ 6.3 mm) connectors on the front panel. オーディオ信号を出力/モニターする場合は、 リアパネルの AUDIO OUTPUT,AUDIO OUTまたはフロントパネルのHEADPHONE コネクタ に接続します。 AUDIO OUT (Stereo, φ 3.5 mm) AUDIO OUTPUT(XLR 3-pin) HEADPHONE(Stereo, φ 3.5 mm and φ 6.3 mm) By pressing MENU button access to “AUDIO” setting item and set each item to the setting value. The output CHANNEL, VOLUME level, AUDIO LEVEL METER, etc. are adjusted on the MENU. “AUDIO LEVEL METER” can be assighned to any USER Presets button, F1 - F11. フロントパネルの MENU ボタンを押してメニュー画面の”AUDIO” にアクセスして, 各々設定します。 出力チャンネル選択、 ボリューム調整、 オーディオレベルメーターのON/OFF 等は、 メニューで行います。 AUDIO LEVEL METER [ON/OFF] はメニューの”USER ASSIGN” でプリセッ ト F1- F11 に割り当てることができます。 RETURN INFO [1080i/60] 0/ - - - - - / 40 FRONT VOLUME [15] INPUT [SDI 1] REAR VOLUME [15] 0/ - - - - - / 40 PICTURE HEADROOM START [-20dB] COLOR [D65/709]...
- Page 21 HDM-70SP HDM-70SP 接続方法 Remote Control Setting リモートコントロールの設定 Connect the PARALLEL REMOTE connector on the rear panel with the 8-pin connector with cable. リアパネルの PARALLEL REMOTE コネクタ に 8ピンケーブルを接続します。 PARALLEL REMOTE connector(8-pin, RJ-45) 8-pin connector short/open 各端子を接地すると機能が ONします RJ-45 To short-circuit each pin with PIN 5 operates the function : Pin Assign (default) input of the TALLY signal, ピンアサイン(デフォルト) INPUT signal selection, Function operation ON/OFF, etc. PIN 1 [R TALLY] PIN 2 [G TALLY] 各端子に割り当てられた機能は、 その端子を5番ピンとショートすると実行されます。 PIN 3 [B TALLY] タリー信号の入力, 入力の切替え, 各機能のON/OFF 等ができます。 PIN 4 [MARKER] PIN 5 [GROUND] 接地 PIN 6 [INPUT 1] ※ By pressing MENU button access to “REMOTE” in the MENU PIN 7 [INPUT 2] and can change the PIN assign. PIN 8 [ASPECT] メニュー画面 ”REMOTE” でピンアサインの設定を変更することができます。 <Setting for REMOTE in the MENU> リモートコントロールの設定...
-
Page 22: Adjustment And Setting
Adjustment and Setting HDM-70SP HDM-70SP 調整およびセッティング Video Signal Display Adjustment ビデオ画像表示の調整 Each function of the Menus, etc. operates when a signal is input. 注意 : 各機能は、 信号が入力されているとき実行,調整ができます。 Input signal Setting By pressing MENU button display the MENU and access to “INPUT” in the MENU and set “SDI 1” or “SDI 2”. “SDI 1/2” and its video format are displayed in the MENU(INFO and INPUT). Or by pressing the preset function button select an input signal. フロントパネルの MENU ボタンを押してメニュー画面で “INPUT”→”INPUT”→”SDI 1” とアクセスして入力を設定します。 INFO(インフォメーション)に入力信号、 ビデオフォーマッ トが表示されます。 または、 プリセッ トボタンを押して選択します。 MENU button メニューボタン USER ASSIGN Preset Function button プリセット ファンクションボタン INFO [1080i/60] MODEL VAM-7850 INPUT [SDI 1] OPTION CARD N/A Input signal 入力信号 PICTURE INPUT SDI 1 COLOR [D65/709] VIDEO FORMAT 1080i/60 Video format SCREEN [16 : 9]... - Page 23 HDM-70SP HDM-70SP 調整およびセッティング Video Signal Display Adjustment ビデオ画像表示の調整 “PICTURE” Setting ピクチャーの調整 By pressing the USER 1-4 (USER ASSIGN Preset function) button adjust default setting デフォルト設定 the “PICTURE” :BRIGHT, CONTRAST, SATURATION, and SHARPNESS. USER 1-4 ボタンで 明るさ, コントラスト, 彩度, シャープネスをそれぞれ調節します。 ボタンを押してデフォルト標準値とユーザー設定値とを必要に応じて切り替えます。 BRIGHT 明るさ CONTRAST コントラスト SATURATION 彩度 SHARPNESS シャープネス INFO [1080i/60] RETURN INPUT [SDI 1] 0/ - - - - - / 100 BRIGHT [50] PICTURE 0/ - - - - - / 100 CONTRAST [80] COLOR [D65/709] 0/ - - - - - / 100 SATURATION [50] SCREEN [16 : 9]...
- Page 24 HDM-70SP HDM-70SP 各部名称と働き User Assign for Preset Function Buttons ファンクションボタンのユーザー設定 Setting a Function to each of F1 to F9 buttons By pressing MENU button on the front panel access to the MENU displayed on the screen. Access to USER ASSIGN/ F1 to F9 and set the function to each of them. フロントパネルの MENU ボタンを押してメニュー画面を表示し、 USER ASSIGN/ F1〜F11各々に設定します。 <MENU Item> INFO [1080i/60] RETURN INPUT 1/-2/-3 GAMMA 1.0/-1.8/-2.0/-2.2/-2.4/-2.6 INPUT [SDI 1] F1 [INPUT 1] WHITE BAL D65 PICTURE F2 [INPUT 2] WHITE BAL D93 COLOR [D65/709] F3 [SCAN] MONO SCREEN [16 : 9] F4 [ASPECT] COLOR CHANNEL MARKER [ON] F5 [MARKER] SCAN AUDIO [15]...
- Page 25 HDM-70SP HDM-70SP 各部名称と働き User Assign for Preset Function Buttons ファンクションボタンのユーザー設定 USER ASSIGN Function, F1 to F11 buttons operation By pressing the F1- F9 button the preset function operates as follows. F1- F9 を押すと、 各プリセッ ト ファ ンクションは次のように機能します。 FI to F11 LAYOUT QUAD assigned button function operation 16CH INPUT 1 ON INPUT 2 ON INPUT 3 ON GAMMA 1.0 ON GAMMA 1.8 ON GAMMA 2.0 ON GAMMA 2.2 ON LAYOUT QUAD2 GAMMA 2.4 ON GAMMA 2.6 ON WHITE BAL D65 ON WHITE BAL D93 ON MONO ON→ OFF→ AUDIO COLOR CHANNEL RED→ GREEN→ BLUE→ NORMAL→ PEAK SCAN OVER→ZOOM→NORMAL→ ASPECT ASPECT CHANGED TO 4:3→ TO 16:9→ ZOOMZOOM ZOOM→NORMAL→ HV DELAY ON→ OFF→ MARKER ON→ OFF→ USER MARKER ON→ (WIDTH X→ WIDTH Y→ MOVE X→ MOVE Y→ ) OFF→...
- Page 26 HDM-70SP HDM-70SP 各部名称と働き Display Setting 画面表示の設定 MARKER Setting マーカーの設定 CENTER marker [ON or OFF] , ASPECT ratio [4:3, 16:9, etc. or OFF] , On the MENU set the setting items, SAFETY marker size [80 to 99%, 100%(OFF)] , CROSS HATCH size [ LARGE, MEDIUM, SMALL or OFF] , MARKER MAT [CLEAR, HALF TONE or BLACK] , LINE THICKNESS [1, 2 or 3] , and LINE TYPE [GRAY, HALF TONE, WHITE or INVERT] , to , as follows. メニューでマーカーのアスペクト比、 表示のタイプ等を設定します。 Menu for MARKER ON / OFF RETURN MARKER [OFF] ON / OFF MARKER [OFF] マーカー CENTER [ON] OFF 4 : 3...
- Page 27 HDM-70SP HDM-70SP 各部名称と働き Display Setting 画面表示の設定 Clip Guide(ZEBRA) Setting ゼブラ [ On the MENU set the ClipGuide setting items, MODE LUMA(Y), LUMA(Y) ON MONO, CHROMA(C), CHROMA(C) ] , DISP TYPE [ZEBRA or FILL] , Y UPPER LIMIT [-7.3 to 109.1%] , ON MONO, Y & C, Y & C ON MONO Y LOWER LIMIT [-7.3 to 109.1%] , C UPPER LIMIT [0 to 255] , C LOWER LIMIT [0 to 255] , to , as follows. メニューでClipGuide(ゼブラ)の表示モード、 タイプ、 表示レベルの閾値等を設定します。 Menu for ZEBRA ON / OFF RETURN ClipGuide [OFF] ClipGuide [OFF] LUMA(Y) LUMA(Y) ON MONO MODE [LUMA&CHROMA] CHROMA(C) DISP TYPE ...
- Page 28 HDM-70SP HDM-70SP 調整および設定 AUDIO Signal Setting オーディオの設定 オーディオの設定 AUDIO Function Setting On the MENU, “AUDIO” and “AUDIO UTIL(utility)” the audio functions are set as follows. メニュー画面, ”AUDIO””AUDIO UTIL(ユーティリティー)”にアクセスして, オーディオの機能を設定します。 Menu list 0/ - - - - - / 40 RETURN INFO [1080i/60] 0/ - - - - - / 40 FRONT VOLUME [15] INPUT [SDI 1] REAR VOLUME [15] -60dB/ - - - - PICTURE HEADROOM START [-20dB] - - - - / 0dB COLOR [D65/709] HEADROOM END [-6dB] SCREEN [16 : 9] CHANNEL 1/- - - /16 LEFT CHANNEL [1CH] MARKER [ON] RIGHT CHANNEL [2CH] CHANNEL 1/- - - /16 AUDIO [15]...
- Page 29 HDM-70SP HDM-70SPD 調整および設定 AUDIO Signal Setting オーディオの設定 AUDIO output signal selection オーディオ出力の選択 On the MENU/ AUDIO/ LEFT CHANNEL/RIGHT CHANNEL, select the output signal to the AUDIO OUT connector on the rear panel and the headphone connector on the front panel from the embedded audio signals(1 to 16 channel) in the HD-SDI signal. Default factory settings : LEFT CHANNEL = 1 CH RIGHT CHANNEL = 2 CH AUDIO OUT コネクタ ( リア ) およびヘッドホンコネクタ ( フロント ) から出力するオーディオ信号は、 メニュー上で ”AUDIO” から LEFT CHANNEL/RIGHT CHANNEL” にアクセスして選択します。 デフォルトでは、 1 CH/2 CH に設定されています。 Menu list RETURN 0/ - - - - - - - / 40 FRONT VOLUME [15] AUDIO [15] REAR VOLUME [15] 0/ - - - - - - - / 40 AUDIO UTIL HEADROOM START [-20dB] CHANNEL 1/- - - /16 HEADROOM END [-6dB]...
- Page 30 HDM-70SP HDM-70SP 各部名称と働き UTILITY Setting ユーティリティーの設定 User Preset Utility Function ユーザープリセッ トユーテティリティー ファンクション(測定器機能)の設定 On the MENU, adjust and set the USER ASSIGN/Preset for the each utility function. メニューでユーティリティー機能のユーザー設定をします。 <MENU Item> メニュー項目 RETURN INFO [1080i/60] FRONT VOLUME [15] INPUT [SDI 1] REAR VOLUME [15] PICTURE HEADROOM START [-20dB] COLOR [D65/709] HEADROOM END [-6dB] SCREEN [16 : 9] LEFT CHANNEL [1CH] MARKER [ON] RIGHT CHANNEL [2CH] AUDIO [15] LOAD CH PRESET FROM > AUDIO UTIL SAVE CH PRESET TO >...
- Page 31 HDM-70SP HDM-70SP 各部名称と働き UTILITY Setting ユーティリティーの設定 UTILITY Display Layout |||||||||||||||||||||||||||||||||||||||||||||||||||||||||||||| |||||||||||||||||||||||||||||||||||||||||||||||||||||||||||||| |||||||||||||||||||||||||||||||||||||||||||||||||||||||||||||| |||||||||||||||||||||||||||||||||||||||||||||||||||||||||||||| |||||||||||||||||||||||||||||||||||||||||||||||||||||||||||||| |||||||||||||||||||||||||||||||||||||||||||||||||||||||||||||| |||||||||||||||||||||||||||||||||||||||||||||||||||||||||||||| WAVEFORM MON |||||||||||||||||||||||||||||||||||||||||||||||||||||||||||||| AUDIO LEVEL METER AUDIO LEVEL METER VECTORSCOPE VECTORSCOPE WAVEFORM DUAL SIZE LEFT TOP RIGHT TOP |||||||||||||||||||||||||||||||||||||||||||||||||||||||||||||| |||||||||||||||||||||||||||||||||||||||||||||||||||||||||||||| |||||||||||||||||||||||||||||||||||||||||||||||||||||||||||||| |||||||||||||||||||||||||||||||||||||||||||||||||||||||||||||| |||||||||||||||||||||||||||||||||||||||||||||||||||||||||||||| |||||||||||||||||||||||||||||||||||||||||||||||||||||||||||||| |||||||||||||||||||||||||||||||||||||||||||||||||||||||||||||| |||||||||||||||||||||||||||||||||||||||||||||||||||||||||||||| |||||||||||||||||||||||||||||||||||||||||||||||||||||||||||||| |||||||||||||||||||||||||||||||||||||||||||||||||||||||||||||| |||||||||||||||||||||||||||||||||||||||||||||||||||||||||||||| |||||||||||||||||||||||||||||||||||||||||||||||||||||||||||||| |||||||||||||||||||||||||||||||||||||||||||||||||||||||||||||| |||||||||||||||||||||||||||||||||||||||||||||||||||||||||||||| |||||||||||||||||||||||||||||||||||||||||||||||||||||||||||||| |||||||||||||||||||||||||||||||||||||||||||||||||||||||||||||| POSITION AUDIO LEVEL METER...
- Page 32 HDM-70SP HDM-70SP 各部名称と働き UTILITY Setting ユーティリティーの設定 AUDIO Utility Function Setting オーディオユーティリティー ファンクション(測定器機能)の設定 On the MENU, adjust and set the USER ASSIGN/Preset for the each utility function. メニューでユーティリティー機能のユーザー設定をします。 <MENU Item> メニュー項目 INFO [1080i/60] FRONT VOLUME [15] AUDIO OUT に接続する機器の HEADROOM START [-20dB] INPUT [SDI 1] HEADROOMにあわせて、 HEADROOM END [-6dB] PICTURE AUDIO LEVEL METER, LEFT CHANNEL [1CH] COLOR [D65/709] AUDIO PEAK LOG METER の RIGHT CHANNEL [2CH] レッ ドゾーン, イエローゾーンの SCREEN [16 : 9] LOAD CH PRESET FROM > 閾値を設定します。 MARKER [ON] SAVE CH PRESET TO >...
- Page 33 HDM-70SP HDM-70SP 各部名称と働き UTILITY Setting ユーティリティーの設定 WAVEFORM and VECTORSCOPE- Utility Function Setting ウエーブフォーム ・ ベクトルスコープの設定 On the MENU, adjust and set the USER ASSIGN/Preset for the each utility function. メニューでユーティリティー機能のユーザー設定をします。 <MENU Item> メニュー項目 INFO [1080i/60] ウエーブフォームの設定 INPUT [SDI 1] LAYOUT [NORMAL] レイアウト PICTURE WAVEFORM [ON] 表示のON/OFF COLOR [D65/709] SIZE [MEDIUM] 表示サイズ SCREEN [16 : 9] POSITION [RIGHT BOT] 表示位置 MARKER [ON] 表示タイプ DISP TYPE [OVERLAY] AUDIO [15]...
-
Page 34: Outside View & Dimmensions
Outside View & Dimmensions HDM-70SP 外形寸法図 HDM-70SP 449.6 152.4(Active Area) 465.6 60.5 481.4 Outside dimension (unit: mm) 外形寸法図 (単位: ミリ)... - Page 35 Specifications HDM-70SP 仕様 HDM-70SP Display 画像 TFT-LCD Active Matrix (TN) LCD Panel LCD パネル 画面サイズ Size 7.0 inch diagonal ( 152.4(H) x 91.4(V) mm ) (2 Displays in a row) アスペクト比 Aspect Ratio 16 : 9 (16 : 10) Resolution 解像度 800(H) x 480(V) x 3(RGB). Effective Pixels 視野角 Viewing Angle 130 (H), 110 (V) Color 色再現性 16.7M Colors (8 bit) Input / Output 入力 / 出力 XLR 4-pin (male) DC 電源 DC IN BNC x2: 1Vp-p, 75Ω SDI 入力 SDI(HD/SD) IN SDI 出力 BNC x1: 1Vp-p, 75Ω Loop Thru SDI(HD/SD) OUT オプション入力 HD Component/ DVI Input Port OPTION INPUT Front Stereo Jack x2(φ 3.5, φ 6.3) Rear XLR 3P,male x2,Stereo Jack(φ 3.5) ...
- Page 36 HDM-70SP Opera ting Instructions...
Need help?
Do you have a question about the HDM-70SP and is the answer not in the manual?
Questions and answers