Table of Contents
Advertisement
Available languages
Available languages
Quick Links
Advertisement
Table of Contents

Summary of Contents for Fastback 802
- Page 1 Fast Back Type 802 Made in Italy ISTRUZIONI D’USO INSTRUCTIONS FOR USE...
-
Page 2: Dispositivi Di Sicurezza
GENERALITA’ Prima di utilizzare questa macchina da caffè, leggere attentamente il manuale d'uso e conservarlo per eventuali consultazioni future. Il manuale d'uso e manutenzione aiuta ad utilizzare in modo sicuro e consapevole l'apparecchio ed a scoprire tutte le sue funzioni. Ricorda che un buon funzionamento, ma soprattutto un funzionamento in sicurezza, dipende anche dalla conoscenza dell'apparecchio e dalla sua corretta manutenzione nel tempo. -
Page 3: Norme Di Sicurezza
UBICAZIONE • Sistemare la macchina da caffè su una superficie orizzontale stabile, idonea a sopportare il peso e il calore, asciutta e lontana da fonti d'acqua e di calore. • Non posizionarla sopra altri elettrodomestici (lavatrici, lavastoviglie, frigoriferi, ecc.) • Non collocarla o non lasciarla mai all'esterno. NORME DI SICUREZZA Per evitare rischi di scariche elettriche e incendi: •... - Page 4 Per evitare rischi durante il funzionamento: •Questa macchina da caffè è destinata a essere utilizzata nelle applicazioni domestiche e similari quali: - nelle zone per cucinare riservate al personale nei negozi, negli uffici e in altri ambienti professionali; - negli agriturismo; - utilizzo da parte di clienti di alberghi, motel e altri ambienti a carattere residenziale;...
- Page 5 Attenzione Non si assumono responsabilità per eventuali danni in caso di: • Impiego errato e non conforme agli scopi previsti. • Riparazioni non eseguite presso centri d’assistenza autorizzati. • Manomissione del cavo di alimentazione. • Manomissione di qualsiasi componente della macchina. •...
- Page 6 SMALTIMENTO A fine vita dell’apparecchio, prima di smaltirlo nel rispetto delle norme della raccolta differenziata, renderlo inoperativo. Staccare la spina dalla presa e tagliare il cavo di alimentazione. AVVERTENZE PER IL CORRETTO SMALTIMENTO DEL PRODOTTO AI SENSI DELLA DIRETTIVA EUROPEA 2012/19/UE Il simbolo del cestino barrato riportato sull’apparecchio indica che il prodotto, alla fine della propria vita utile, dovendo essere trattato separatamente dai rifiuti domestici, deve essere conferito in un centro di raccolta differenziata per apparecchiature elettriche ed elettroniche, oppure riconsegnato...
-
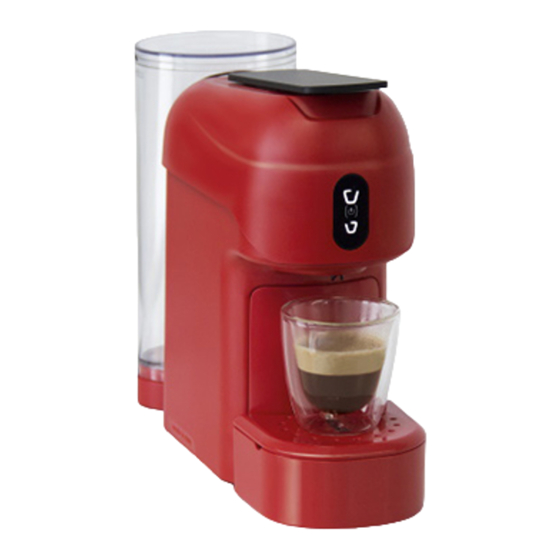
Page 7: Componenti Macchina
COMPONENTI MACCHINA 2. Erogazione lunga 1. Leva di comando per caricare le capsule 3. Erogazione 3. Erogazione caffè corta 10. Pannello comando touch Mod 2 DOSI Mod 1 DOSE 8. Serbatoio dell'acqua (estraibile) 4. Beccuccio erogatore 5. Griglia raccogligocce 6. Vaschetta raccogligocce 7. -
Page 8: Utilizzo Della Macchina
UTILIZZO DELLA MACCHINA Riempire il serbatoio •Estrarre il serbatoio (8) dalla macchina tirandolo verso l’alto, quindi rimuovere il coperchio (Fig.1) •Riempire il serbatoio fino al raggiungimento del livello massimo indicato (MAX). (Fig.2) •Chiudere il coperchio ed inserire il serbatoio (8) contro il corpo macchina in modo che la linguetta si incastri e la base del serbatoio appoggi correttamente sulla valvola dell’acqua. - Page 9 Messa in funzione/riscaldamento Mod 2 DOSI • Collegare la macchina inserendo la spina nella presa di corrente. • Accendere la macchina premendo uno dei simboli(2)o(3) o contemporaneamente i 2 simboli (2)e(3) per il Modello 2 Dosi. Per il Modello 1 Dose premere il simbolo (3) (Fig.4) I simboli (2-3) lampeggeranno ad intermittenza, fino al raggiungimento della temperatura;...
- Page 10 Preparazione del caffè e delle bevande • Utilizzare capsule specifiche per questa macchina. • Per la preparazione di un buon espresso o di una bevanda, al primo utilizzo quotidiano della macchina, ricordati di preriscaldare la tazza, utilizzando l’acqua della macchina senza l’uso della capsula.
-
Page 11: Programmazione Erogazione
Programmazione erogazione Mod 2 DOSI Mod. 2 Dosi: premere e tenere premuto il simbolo che si vuole programmare (2-3), la macchina inizierà l’erogazione; una volta raggiunto la quantità desiderata rilasciare il simbolo. La macchina terminerà quindi l’erogazione e rimarrà memorizzata la quantità. (Fig.9) Mod. -
Page 12: Riparazioni/Manutenzione
RIPARAZIONI/MANUTENZIONE In caso di guasto, malfunzionamento, o cavo di alimentazione danneggiato, non tentare di riparare l’apparecchio ma rivolgersi a personale qualificato. Non cercare mai di mettere in funzione macchine difettose o danneggiate. Solo i centri di assistenza autorizzati possono effettuare interventi e riparazioni. - Page 13 Problema Causa Soluzione Serbatoio acqua (8) vuoto o Verificare che il serbatoio acqua (8) sia correttamente inserito nel proprio non correttamente inserito alloggiamento e che l'acqua contenuta sia sufficiente Leva di comando (1) non Verificare che la leva di comando (1) sia completamente chiusa completamente chiusa Verificare se la pompa eroga acqua: una...
- Page 14 Problema Causa Soluzione Aprire completamente la leva di comando La capsula non viene (1) in modo da far uscire il supporto capsula trattenuta nel gruppo Leva di comando (1) non dal proprio alloggiamento, recuperare la infusore e cade direttamente completamente aperta capsula non utilizzata dal contenitore porta nel contenitore porta capsule (6) ed inserirla nuovamente.
-
Page 15: Technical Specifications
GENERAL Before using this coffee machine, read the user manual carefully and keep it so that you can consult it in the future. The use and maintenance manual helps you to use the machine safely and intelligently, and to discover all its functions. Remember that good operation, but above all safe operation, also depends on your knowledge of the appliance and of its correct maintenance over time. -
Page 16: Safety Standards
LOCATION • Place the coffee machine on a stable horizontal surface, suitable to bear its weight and heat, dry and far from sources of water and heat. • Do not place it on top of other household appliances (washing machines, dishwashers, refrigerators, etc.) •... - Page 17 To avoid risks during operation: •This coffee machine is intended to be used in domestic and similar applications such as: - in cooking areas reserved for staff in shops, offices and other professional environments; - in farm holiday centres; - use by guests in hotels, motels and other residential environments; - in facilities such as bed and breakfast.
- Page 18 Attention No liability is accepted for any damage resulting from: •Incorrect use not complying with the intended purposes. •Repairs not carried out at authorised service centres; •Tampering with the power cable; •Tampering with any component of the machine; •Use of non original spares parts and accessories. In these cases the guarantee is void.
- Page 19 DISPOSAL At the end of the machine’s working life, make it inoperative before disposing of it in conformity with the regulations on separate waste collection. Disconnect the plug from the socket and cut the power cable. WARNINGS FOR CORRECT DISPOSAL OF THE PRODUCT IN ACCORDANCE WITH EUROPEAN DIRECTIVE 2012/19/EU The symbol of the crossed out bin on the appliance indicates that, at the end of its working life, the product must be collected separately from other waste.
-
Page 20: Machine Components
MACHINE COMPONENTS 2. Long dispensing 1. Control lever for loading the capsules 3. Coffee 3. Short dispensing dispensing 10. Touch control panel 2-DOSE model 1-DOSE model 8. Water tank (extractable) 4. Dispensing spout 5. Drip tray grid 6. Drip tray with capsule container 7. -
Page 21: Use Of The Machine
USE OF THE MACHINE Filling the tank •Take the tank (8) out of the machine by pulling it upwards, then remove the cover (Fig.1) •Fill the tank until the indicated maximum level is reached (MAX). (Fig.2) •Close the cover and insert the tank (8) against the machine body so that the tab engages and the base of the tank rests correctly on the water valve. -
Page 22: Energy Saving Function
Starting up/heating 2-DOSE • Connect the machine by inserting the plug in the power socket. • Switch on the machine by pressing one of the symbols (2) or (3) or the 2 symbols (2) and (3) simultaneously for the 2- Dose model. - Page 23 Preparing coffee and beverages • Use capsules specifically intended for this machine. • To prepare a good espresso or a beverage, when using the machine for the first time in the day, remember to preheat the cup with water from the machine without using the capsule. This will give you the correct temperature for dispensing the beverage.
- Page 24 Programming dispensing 2-DOSE 2-Dose model: press and hold down the symbol you want to program (2-3), the machine will start dispensing; once the desired quantity has been reached, release the symbol. The machine will then stop dispensing and the quantity will be memorised. (Fig.9) 1-Dose model: press and release the symbol (3), press again immediately and hold down the symbol, the machine will start dispensing;...
-
Page 25: Repairs/Maintenance
REPAIRS/MAINTENANCE In the event of a fault, malfunction, or damaged power cable, do not attempt to repair the appliance but apply to qualified personnel. Never try to start up faulty or damaged machines. Only authorised service centres can carry out repairs of any kind. The manufacturer declines all liability for damage to property and/or persons that may occur as a result of adaptations, alterations or improvised repairs, or repairs not carried out by qualified personnel. - Page 26 Problem Cause Solution Water tank (8) empty or not Make sure that the water tank (8) is correctly correctly inserted inserted in its place and that it contains enough water Control lever (1) not completely Make sure that the control lever (1) is closed completely closed Check whether the pump is dispensing water:...
- Page 27 Problem Cause Solution Completely open the control lever (1) so that The capsule is not held in the capsule support comes out of its housing; the infusion group and falls Control lever (1) not completely recover the unused capsule from capsule directly into the capsule open container (6) and insert it again.
Need help?
Do you have a question about the 802 and is the answer not in the manual?
Questions and answers