Table of Contents
Advertisement
Quick Links
Advertisement
Table of Contents

Summary of Contents for Metreco HVAC MK1
- Page 1 MANUAL Metreco HVAC MK1 English v1-3...
-
Page 2: Warnings & Dangers
• Authorized Representative: Bernard Peirs, CEO Any questions relative to this declaration or to the safety of Metreco products should be di- rected, in writing, to the support & quality assurance department at the above address. Thank you for buying a Metreco! Warnings &... -
Page 3: Table Of Contents
• Pressure Decay Test • Vacuum Decay Test • COP Test 4.5. Customer & Systems follow-up • Follow-up on Metreco • Follow-up on PC 4.6. A word on ‘Sensor Placement’ 4.7. How to use the hoses & connectors? • Fill refrigerant •... -
Page 4: Metreco Concept
Metreco Concept Thank you for choosing the Metreco Concept. This new way of working brings you on the edge of the most recent technological possibilities in wireless developments and gives you a huge competitive advantage. SMART MOBILE MEASURING Dynamic measuring with METRECO, Smart Mobile Measuring, instead of static •... - Page 5 Back at the office Jason connects his Metreco handheld to his PC and makes a report for internal use and a customer report which is sent by e-mail.
-
Page 6: Working With Metreco
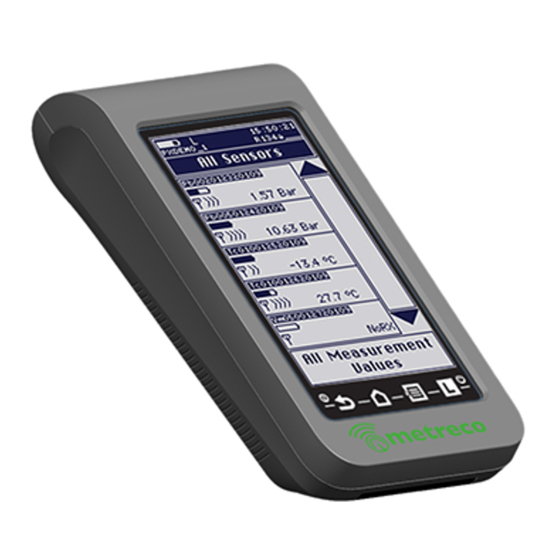
Working with Metreco Storage 1. Basics Lid with Metreco is supplied with: protective foam - 1 Charging station - case - 1 Low Pressure Sensor 20 Bar Handheld - 1 High Pressure Sensor 50 Bar - 2 Temperature sensors -50+150°C... - Page 7 Handheld Touchscreen Shortcuts USB socket Power sockets : Swipe to the right (->) 1-2-3-4 (min 1 s) : Swipe to the left (<-) over 4-3-2-1 1 Back : back to preceding menu item 2 All Sensors : to ‘All Sensors’ 3 Main Menu : to ‘Main Menu’...
-
Page 8: Configuration
3. Change the configurations as desired. Log interval Date and Time (go to ‘4.3. Logging’) Target margins Screen intensity Modifying the target margins makes the Metreco more or less tolerant to target value variations = quicker or slower reaction of the warning pop-up. -
Page 9: Measuring
- Choosing an existing ACR system - Diagnosis - Logging - Measurement report - Intervention report - Pressure Decay Test - Vacuum Decay Test - Follow-up on Metreco & PC - Using the hoses & connectors - Sensor calibration & firmware updates... -
Page 10: Acr
In order to correctly apply the treated subjects of this chapter, we strongly advise you to configure your handheld first (go to ‘2. Configurations’). 4.1. ACR System management You can define and save ACR Systems on your Metreco. • Create new ACR system 1. Go to ‘Main Menu’. - Page 11 4. Determine the Superheat, Subcool and 9. Select a spot on the system. You will get evaporator exit air temperature target. a list of available sensors eligible for this position and whose signal is received. 10. You can also press the locate button on the sensor.
-
Page 12: Choose Existing Acr System
• Choose existing ACR system If you have created and saved ACR systems, you can choose a system in your list of clients and their systems. By choosing this, the placement of the sensors of your current system will be lost. -
Page 13: Edit Current Acr System
• Edit current ACR system • Remove existing ACR system If you have created and saved ACR systems, Saved systems can be removed (deleted): you can modify the data. The main idea is to change the placement of the sensors while 1. -
Page 14: Performing Measurement And Diagnosis
ACR system. The sensors also need to be ‘placed’ on an existing system in Metreco. (‘ACR System’ - ‘Place Sensors’). By combining different sensors, e.g. pressure and temperature, extra values can be calculated. -
Page 15: Diagnosis
• Diagnosis In this chapter you will learn how to use the diagnosis tool. Metreco can suggest possible causes (*) for off-target measurements. First of all you will need to define targets for the following measurements: 1. Choose an ACR system (see 4.1.). -
Page 16: Logging & Reports
5 seconds. This data can be used in Measurement Reports. You’re getting a list of saved data (time & value) that you can retrieve from the Metreco on your PC via USB. This can then be used for technical or commercial purposes (see ‘4.5. Customer & Systems follow-up’... -
Page 17: Measurement Report
- A Measurement Report gives you the last logged measured values before ending the logging. The report is saved automatically when ending the logging and can be recalled on Metreco and downloaded on PC for later use in internal reports or reports to your customer. -
Page 18: Intervention Report
• Intervention Report In the Intervention Report you can save data on the servicing you have done and recall the data on Metreco or use it on your PC: - Leak detection (leak detector & result) - Vacuum decay test (possibility to store the vacuum sensor value) - Pressure test with N2 or N2H2 (possibility to store the pressure sensor value) - Refrigerant changes: recovered &... - Page 19 (see ‘4.4. Tests’). When choosing manual in- put, enter the measured value OR take a live read-out from your vacuum sensor, if placed on the installation and assigned in Metreco. 11. Select the used gas (N2 or N2+H2) 18. Select ‘Start/End’ and complete.
-
Page 20: Tests
4.4. Tests • Pressure Decay Test - PDT The pressure decay test gives you the possibility to follow up and log the legaly imposed pres- sure test. There is the possibility to automatically compensate the pressure for temperature variations. A temperature and pressure sensor are what you need for this test. 4. -
Page 21: Vacuum Decay Test
• Vacuum Decay Test - VDT The vacuum decay test gives you the possibility to follow up and log the legaly imposed Vac- cum test. This test is separted in 2 stages: 4. Press ‘Start Evacuation’ - Evacuation You get the Vacuum Evacuation Status - Vacuum Decay Test 1. - Page 22 • Coeffient Of Performance Test - COP The COP test allows you to measure the energy efficiency of your system. Following data is recorded: - COP: Current, Min/Max, AVG 4. Press ‘Start’ - Cooling Capacity: Current, Min/Max, AVG You get the COP Status - Ambient Temp.: Current, Min/Max, AVG.
-
Page 23: Customer & Systems Follow-Up
- Vacuum Decay Report & Saved data - Vacuum Decay Report Reports and logfiles can be retrieved from Metreco and downloaded on your PC. This data can by used in (e.g.): a technical report for your customer, a review of the perfomed servicing (keep- , a detail of an invoice, follow-up of your F-GAS files, etc. - Page 24 9. This is a .CSV-file that can be opened using any conventional spreadsheet program. You can use the data in a report. Accessing the - Measurement - Intervention Reports - Pressure Decay Test Report (long & short version) - Vacuum Decay Test Report (long & short version) ->...
-
Page 25: A Word On Sensor Placement
4.6. A word on Sensor Placement • Placing a sensor Sensors can be placed when defining the system (see ‘step 8’ in ‘4.1. ACR System Manage- ment’) and when setting up a Pressure or Vacuum Decay Test (see ‘step 3’ in ‘4.4. Tests’). The placement of the sensors is dynamic. -
Page 26: How To Use The Hoses & Connectors
4.7. How to use the hoses & connectors? Use the hoses and connectors for filling, removing and handling refrigerant. - 4 Hoses (1/4”SAE-1:4”SAE: Red, Blue, Yellow) (1/4”SAE-3/8”SAE: Yellow) - 2 T-connectors (1/4”SAE Female - 2* 1/4”SAE Male) - 1 X-connector (4* 1/4”SAE Male) - 2 R410A adaptors (1/4”SAE Male - 5/16”SAE Female) •... - Page 27 • Evacuation 1 • Evacuation 2 X-connector • Evacuation 3...
-
Page 28: Service & Support, Calibration And Updates
2. Sign in if this is your first time or Log in with your login (e-mail adress) and password. 3. Download the update file if this is a higher version than the one you have on your Metreco (see step 5 below). -
Page 29: Extra Languages And Refrigerants
6. You have 10 s to connect your Metreco to your PC with the included USB-cable. 7. Follow the instructions on your Metreco, this is what you will get on your PC: 8. Remove the .BIN file. 9. Drag the file you downloaded in ‘step 3’ in this folder. -
Page 30: Technical Data
Technical data • Metreco Handheld Code: HH01ST Name: Standard Metreco Handheld Autonomy Back-light 100%: 10,5h Autonomy Back-light off (0%): 15,5h Autonomy OFF: >200h Battery: LiPo (Lithium Ion Polymer) Wireless range: min. 200m (open air) Protection: IP64 with cap closed • Sensors... -
Page 31: Spare Parts
Spare parts : Metreco HVAC MK1: standard complete Metreco Set - MT01ST - KN01ST : Kit Vacuum: absolute vacuum sensor + valve core remover (shraeder) : Kit CO2 Transcritical: 100Bar & 200Bar pressure sensors + hoses - KC01ST - KV01ST : Kit NH3: 20bar &... - Page 32 T +32 58 42 91 00 info@metreco.com F +32 58 42 14 46...
Need help?
Do you have a question about the HVAC MK1 and is the answer not in the manual?
Questions and answers