
Summary of Contents for BAB TECHNOLOGIE APPMODULE IP
- Page 1 BAB TECHNOLOGIE GmbH APPMODULE Documentation Version 1.7.0 Type: IP, KNX, EnOcean Item no.: 10491, 10495, 13501 Manual version IV As of 12/2021 Date: 1. December 2021...
- Page 2 APPMODULE Documentation BAB TECHNOLOGIE GmbH Hörder Burgstr. 18 D-44139 Dortmund info@bab-tec.de Tel.: +49 (0) 231 – 476 425 - 30 Fax: +49 (0) 231 – 476 425 - 59 www.bab-tec.de BAB TECHNOLOGIE GmbH...
-
Page 3: Table Of Contents
Connecting the APPMODULE IP to EIBPORT ................20 Setting up the connection in the APPMODULE ................. 20 Setting up the connection in EIBPORT ..................21 Using KNX net/IP in the APPMODULE IP ..................23 APPMODULE KNX ..........................24 APPMODULE KNX commissioning ....................24 4.1.1... - Page 4 Backup the settings ........................55 Creating a backup ........................55 Restoring a backup ........................57 System / firmware update ......................58 Service ............................58 Firmware update........................58 Remote Access - HOOC ........................60 Information ............................61 Attachment ............................62 BAB TECHNOLOGIE GmbH...
- Page 5 Figure 13: Login dialog ..............................17 Figure 14: APPMODULE – Main Menu ........................... 18 Figure 15: APPMODULE Network configuration ......................19 Figure 16: APPMODULE IP Interface Extension ......................20 Figure 17: EIBPORT facility coupling job ........................21 Figure 18: APPMODULE IP Interface KNXnet/IP ......................23 Figure 19: KNX configuration ............................
-
Page 6: Appmodule
Thank you for buying the APPMODULE. The APPMODULE is a unique integration server that you can customise using the apps from the BAB APPMARKET. This documentation will help to familiarise you with the product and facilitate implementation. BAB TECHNOLOGIE GmbH Figure 1: APPMODULE KNX Product name:... -
Page 7: Functional Overview
In addition to the download of the purchased applications, there is the option of integration into the terminal configurator including the purchase of a Smart Home App. Figure 2: APPMODULE – How it works You can find the APPMARKET on https://www.bab-appmarket.de/ BAB TECHNOLOGIE GmbH... -
Page 8: Technical Data
Browser: current standard browser SCOPE OF DELIVERY AND INTERFACES The scope of delivery of APPMODULE includes the following content: 1x APPMODULE IP, KNX or EnOcean (currently being planned) 1x enclosed CD 1x 2.50 m antenna with magnetic base (for EnOcean only) -
Page 9: Factory Setting On Delivery
There are different ways to minimise the risks. That depends on the system and customer requirements. These measures must always have the required independence from the operation of the system (APP MODULE with APP) and must always be available. BAB TECHNOLOGIE GmbH... -
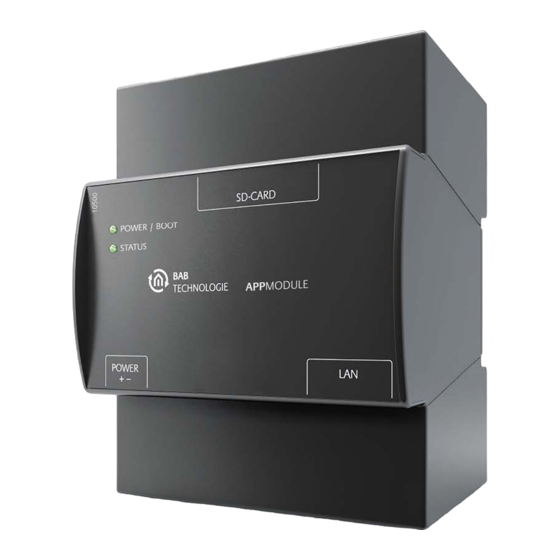
Page 10: Assembly
In the next step, snap the device onto the mounting rail according to DIN EN 60715. Figure 3: APPMODULE connection diagram APPMODULE features KNX connection (type 10495) via screw plug-in terminal Power supply via screw plug-in terminal 12-32V DC USB connection (is not activated) RJ-45 female connector for Ethernet LAN BAB TECHNOLOGIE GmbH... -
Page 11: Led Status
Then the LED is permanently illuminated green, while the "Status" LED flashes green (simulates a "heartbeat"). The flashing frequency increases depending on the device utilisation. It takes approx. 2 minutes to start the APPMODULE. BAB TECHNOLOGIE GmbH... -
Page 12: Initial Operation
If the device is in the condition of delivery, it can be accessed at the above-mentioned IP address and the network settings must be adjusted to the address range, where necessary. Please follow Adjusting the network settings of your computer the information given in the chapter " " for this purpose. BAB TECHNOLOGIE GmbH... -
Page 13: Calling Up The Appmodule Web Interface
“Information” shows general system information. Use the user data to log in to the web interface: "Log In". (Information on the authorisation Initial Operation settings can be found in chapter " ") Figure 5: Logging in to the web interface BAB TECHNOLOGIE GmbH... -
Page 14: Adjusting The Network Settings Of Your Computer
Open the IP address settings (under Windows 7): Click "Start Button" --> "Control Panel" --> "Network" Select "Network Connection", then "LAN Connection" ("Intel PRO1000 GT" in the figure below). Figure 8: Windows Network and Sharing Center BAB TECHNOLOGIE GmbH... -
Page 15: Figure 9: "Ethernet" Status
APPMODULE Documentation Then click "Properties": Figure 9: "Ethernet" status Select "Internet protocol Version 4 (TCP/IPv4)" and click "Properties" again: Figure 10: Properties of the LAN connection BAB TECHNOLOGIE GmbH... -
Page 16: Figure 11: Tcp/Ipv4 Properties
PC by following the steps described above as soon as you have configured the APPMODULE correspondingly. If the IP address of your PC and your APPMODULE are in the same network mask, you can continue with the configuration. BAB TECHNOLOGIE GmbH... -
Page 17: Adjusting The Network Settings Of The Appmodule
Note: Logging in only works if the browser is authorised to save cookies! The view on the start page changes. You can now access the following levels: App Manager Configuration Information Log Out BAB TECHNOLOGIE GmbH... -
Page 18: Figure 14: Appmodule - Main Menu
NTP is a free service for synchronising the system time of Internet-compatible devices. If it is not possible to establish the connection to an NTP-Server, the system time must always be checked and adjusted manually (see menu General " ") NTP-Server list: e.g. http://www.pool.ntp.org/zone/europe BAB TECHNOLOGIE GmbH... -
Page 19: Figure 15: Appmodule Network Configuration
APPMODULE after the change has been made. Specialty when activating DHCP If you have activated DHCP for the APPMODULE according to the steps mentioned above, please use the BAB STARTER like depicted in the chapter “Network” to find out the current IP-address. BAB TECHNOLOGIE GmbH... -
Page 20: Appmodule Ip
The IP APPMODULE (10491) is an IP for EIBPORT available thanks to the facility coupling protocol implemented. A KNXnet/IP server is also implemented. CONNECTING THE APPMODULE IP TO EIBPORT Before the APPMODULE can communicate with EIBPORT, facility coupling needs to be set up. -
Page 21: Setting Up The Connection In Eibport
To set up the connection in EIBPORT, you will need the EIBPORT “Facility coupling” job. For detailed information on the job, please see the EIBPORT documentation. In EIBPORT, open the “Job editor” (“Editor” – “Window” – “Job editor”) and add a new “Facility coupling” job. Figure 17: EIBPORT facility coupling job BAB TECHNOLOGIE GmbH... - Page 22 Please do not change this value. The system ID must be “0”. Rule #1: Enter the wildcard rule “*/*/*” in both fields (source & target). This rule transfers all group addresses. The job is active as soon as you save and the group addresses are transferred. BAB TECHNOLOGIE GmbH...
-
Page 23: Using Knx Net/Ip In The Appmodule Ip
APPMODULE Documentation USING KNX NET/IP IN THE APPMODULE IP The IP APPMODULE contains a complete KNXnet/IP server. KNXnet/IP Routing can be used for a connection to KNX (must be provided by another device with a KNX interface, e. g. a KNX-IP-Router) and KNXnet/IP Tunneling as an interface for ETS. -
Page 24: Appmodule Knx
Note: For the ETS project, please use a dummy application to record the use of the physical address of the APPMODULE. Access the website of the APPMODULE and log on (see “ Calling up the APP MODULE web interface”). Switch to the “Configuration” > “KNX” menu. Figure 19: KNX configuration BAB TECHNOLOGIE GmbH... -
Page 25: Figure 20: Knx - Physical Address
Note: These addresses are required for establishing a connection for the commissioning software ETS for use of the APPMODULE as an interface to KNX. As of ETS 5, at least 2 free addresses are required here. Save the configuration. Figure 22: Saving the configuration BAB TECHNOLOGIE GmbH... -
Page 26: Knx Configuration
The KNX-specific settings of the APPMODULE are made in the “KNX” menu. The KNX settings are available both for a APPMODULE KNX (10495) and for the APPMODULE EnOcean (13501) & APPMODULE IP (10491). For the APPMODULE EnOcean & APPMODULE IP, the settings are used to configure the KNXnet/IP server. -
Page 27: Address Settings (Virtual Group Addresses)
(from 0/0/0 to 31/7/255) to the KNX bus without exception. Information: Telegrams from the virtual address range are not sent to the KNX bus, but can be used for internal communication in the APPMODULE. BAB TECHNOLOGIE GmbH... -
Page 28: Ets Inside Server
KNX Inside Server for the required KNX network. To do this, you only have to make the appropriate settings so that the APPMODULE acts as a KNX IP router, linked in via KNX IP. BAB TECHNOLOGIE GmbH... -
Page 29: Appmodule Enocean
80-07-01 Eltako Tipp-Funk-Taster-Tracker Eltako TF-TTB Vier Byte Profil Beschreibung a5-10-05 Temperatur, Sollwert, Anwesenheit a5-08-01 Bewegungsmelder mit Licht, Temperatur Sensor Ein Byte Profil Beschreibung d5-00-01 Eingangskontakt Profil Beschreibung f6-02-01 Rocker Switch f6-03-01 Taster mit vier Wippen f6-10-00 Fenstergriff BAB TECHNOLOGIE GmbH... -
Page 30: Calling Up The Enocean Editor
Thus, it is important to know which EnOcean profile is to be emulated to address a LINKMOUDULE actuator correctly. The actuator manufacturer will inform you about which profile the actuator utilizes. BAB TECHNOLOGIE GmbH... -
Page 31: Enocean Configuration
You will find information about this in chapter " Addressing". In order to access the corresponding APPMODULE configuration mask, please consider the Calling up the EnOcean Editor chapter" "). The window generally consists of three areas: Figure 26: EnOcean Configuration - Devices BAB TECHNOLOGIE GmbH... -
Page 32: Figure 27: Enocean Configuration - Monitor
Settings: You can configure the EnOcean module here. EnOcean Devices Lists all EnOcean devices sorted by device id (trans. id). EnOcean Monitor Lists all received EnOcean telegrams sorted by the time at which they were received. BAB TECHNOLOGIE GmbH... -
Page 33: Enocean Settings
The telegram is repeated by one repeater only. Level 2: The telegram is repeated by two repeaters. RX sensitivity Determine the receiving sensitivity in which you want the EnOcean module to work. You can choose between "Low" and "High". BAB TECHNOLOGIE GmbH... -
Page 34: Enocean Device Teach-In Procedure
2. When you have detected the device of interest, mark it with the mouse, press the right mouse Properties button and click ' '. Alternatively, double-click on the device. EnOcean Device Configuration 3. The window " " will open. Via this dialogue, the EnOcean devices will be "adapted. Figure 30: EnOcean Device Configuration BAB TECHNOLOGIE GmbH... -
Page 35: Figure 31: Parameters
Single rocker Double rocker If you choose switch type "Double rocker with dual press action", the APPMODULE will give your two rockers switch a third switch function. This function will be triggered when you press both rockers simultaneously. BAB TECHNOLOGIE GmbH... - Page 36 As soon as this step is taken, the entered KNX telegrams are triggered via EnOcean signals. In order to be able to use the addresses more easily later, you should enter them into the ESF data with a definite designation (see Chapter "KNX Addressing") BAB TECHNOLOGIE GmbH...
-
Page 37: Emulating Enocean Devices
A new window will be opened. Add feedback device Depending on which actuator is supposed to be controlled, the matching device profile needs to be determined. The new emulated device will be added to the list of “EnOcean devices” BAB TECHNOLOGIE GmbH... - Page 38 Here, the profile the emulated device should use is selected. For more information regarding parameter and address configuration, please see Configuration example for EnOcean „ “. Simulate push the button Here you can simulate a push button for each rocker, which sends a telegram. BAB TECHNOLOGIE GmbH...
-
Page 39: Knx Addressing
15/7/255 is designated as real address space and the address space from 16/0/0 to 31/7/255 as virtual address space. Note: For the communication between EnOcean and KNXnet/IP Routing, only the real address space is used. BAB TECHNOLOGIE GmbH... -
Page 40: Configuration Example For Enocean Push-Button (Rocker)
EIS 1 telegram with value 1. Upon releasing the button, another telegram with value 0 will be be sent. You can assign one address for either position (I and O). Blind: Assign one address each for the commands “Move” and “Step” (EIS 1). BAB TECHNOLOGIE GmbH... -
Page 41: Delete Enocean Devices
Click on “Delete” to delete it. Afterwards, save the settings. Only then will the device really be deleted. If you do not save the settings after deleting devices, they will only be removed from the list but reappear with their configuration intact once they are rediscovered. BAB TECHNOLOGIE GmbH... -
Page 42: Ets Project Import
After the installation of an app for the APPMODULE the ETS project is available to you. Click with the left mouse button to the right of the input field for the group address. Figure 36: Open the "Group Address Selection" window BAB TECHNOLOGIE GmbH... -
Page 43: Figure 37: Group Address Selection
"Select" button or double-click the group address with the left mouse button. In both cases, the group address is transferred to the group address field. Figure 38: Assign group address BAB TECHNOLOGIE GmbH... -
Page 44: Configure Custom Addresses
With a click on Save the group address is saved in the APPMODULE. Note: If group addresses and the corresponding data points are greyed out in an imported ETS project, these data points are currently not implemented in the APPMODULE and are not required by any app. BAB TECHNOLOGIE GmbH... -
Page 45: App Manager
3. You have entered the menu, where a list of all on the device already installed Apps are shown. In order to install another App, click on " Install App". See figure below, highlighted red. Figure 41: Install APP BAB TECHNOLOGIE GmbH... -
Page 46: Figure 42: Select App
APPMARKET and click “OK”. See “ ” for information on purchasing apps. Figure 42: Select APP 5. As soon as the next window opens, the installation was successful. Now, click on "OK" and parameterise your APP. Figure 43: Installation successful BAB TECHNOLOGIE GmbH... -
Page 47: Instance
3-digit display, no matter in which way they were entered. Note: Virtual group addresses (16... 31) can be used internally to control interoperations between the apps. The virtual group addresses are not sent to the bus. BAB TECHNOLOGIE GmbH... -
Page 48: Automatic Smart Home App Update
Figure 47: Smart Home App Update available Click on the button "Update available". A window opens with the "ChangeLogs" of the APP. All changes between the currently installed Smart Home App version and the App version provided for the update are displayed BAB TECHNOLOGIE GmbH... -
Page 49: Figure 48: Release Notes For The Update File
The update of the app does not overwrite existing group addresses. Individual group addresses can be given If deleted, if the function to which the group address belonged is omitted. New functions must be assigned a new group address. After the update, check the configuration of the Smart Home App. BAB TECHNOLOGIE GmbH... -
Page 50: Configuration
NTP service. See “ ”. Note: The system time must be correct for the software to run properly. Please make sure that the system time is always correct. If synchronisation with NTP is not possible, correct the system time manually. BAB TECHNOLOGIE GmbH... -
Page 51: Network
NTP is a free service for synchronising the system time of Internet-compatible devices. If time synchronisation is not possible, please correct the system time General manually. See “ ”. NTP server list: e.g. http://www.pool.ntp.org/zone/europe Figure 51: APPMODULE – Network settings BAB TECHNOLOGIE GmbH... -
Page 52: Module
APPMODULE versions, IP (10491), KNX (10495) and EnOcean (13501). With IP (10491) and EnOcean (10495), the configuration regulates KNXnet/IP communication. For more information, please see “KNX configuration”. ENOCEAN EDITOR Displayed with the EnOcean APPMODULE device module (13501). More information on configuration is available in “APP MODULE EnOcean”. BAB TECHNOLOGIE GmbH... -
Page 53: User Administration
If a mobile device should no longer be used, this device can be deleted and for memory released. The functionality of the Smart Screen is described in a separate documentation. BAB TECHNOLOGIE GmbH... -
Page 54: Rem Ote Servicing
Remote Servicing access is started. This process takes a few seconds and the Remote Servicing Access ID is displayed. Copy the ID and send it to info@bab-tec.de. Figure 53: Remote servicing Before you activate Remote Servicing Access, contact Support. BAB TECHNOLOGIE GmbH... -
Page 55: Backup The Settings
The address status table and logging table are backed up. This is important, as it ensures that the status information can also be restored. Otherwise, status information will be established on the basis of the current telegram communication. BAB TECHNOLOGIE GmbH... -
Page 56: Figure 55: Selecting Apps And App Instances For Backup
Comments regarding the backup can be added in the “Comments” field. Click on “Create backup” to launch the backup process. The backup file is generated by the system and provided automatically for download using the browser download dialogue. BAB TECHNOLOGIE GmbH... -
Page 57: Restoring A Backup
Apps and app instances: Restores the app-related data. Individual apps and instances can be selected for restore from the drop-down menu (see figure above). BAB TECHNOLOGIE GmbH... -
Page 58: System / Firmware Update
Note: Generate a new backup including all apps and app instances before you launch the update (see Backup the settings “ ”). The update process restores the factory settings. Open “Configuration” – “System”. Figure 57: Configuration – System BAB TECHNOLOGIE GmbH... -
Page 59: Figure 58: Keep Network Settings
has been successfully completed. The update restores the device factory settings (except for the network settings; see above). Individual settings are only loaded again when you restore a backup (see “ Backup the settings ”). BAB TECHNOLOGIE GmbH... -
Page 60: Remote Access - Hooc
The HOOC Gateway Manager Configuration menu is located on the APPMODULE webinterface under the “Remote Access” menu. 1. Please call up the web interface of your APPMODULE: <IP address APP MODULE> 2. Click on the menu item „Remote Access“, here highlighted red. Figure 60: APPMODULE - Remote Access HOOC BAB TECHNOLOGIE GmbH... -
Page 61: Information
APPMODULE Documentation INFORMATION Important information on the APPMODULE can be found here. Please have this information ready if support is required. Figure 61: System Information BAB TECHNOLOGIE GmbH... -
Page 62: Attachment
14 Byte Character string EIB/KNX devices exchange fixed prescribed data formats with each other. These are defined in types. The old designations of the types are EIS (EIB Interworking Standard). The new designations are DPT (Data Point Type) BAB TECHNOLOGIE GmbH...