Advertisement
Quick Links
Advertisement

Related Manuals for Smake HoopStation EPS

Summary of Contents for Smake HoopStation EPS
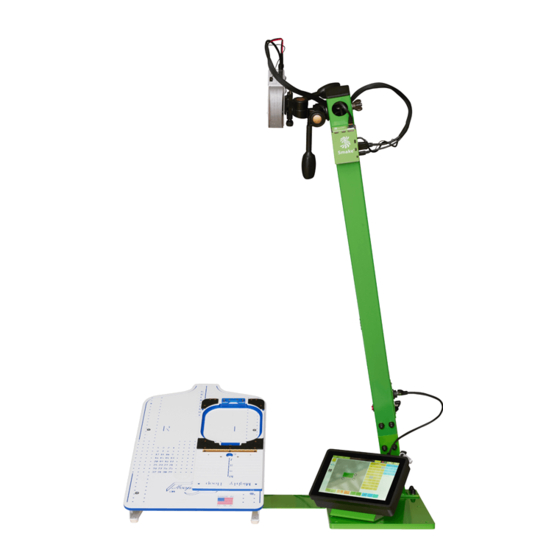
- Page 1 HoopStation HoopStation EPS Assembly instructions...
- Page 2 Requirements To operate the HoopStation you need the Mighty Hoop HoopMaster Station and the 5.5“ frame. Smake | HoopStation | Manual 1 / 25...
- Page 3 Preparations Smake | HoopStation | Manual 2 / 25...
- Page 4 Base 4× 4× 4× Smake | HoopStation | Manual 3 / 25...
- Page 5 Base 2× 4× 4× Smake | HoopStation | Manual 4 / 25...
- Page 6 Base 2× 2× 2× Smake | HoopStation | Manual 5 / 25...
- Page 7 HoopMaster Fixture Station 1× 8× 3× Smake | HoopStation | Manual 6 / 25...
- Page 8 HoopMaster Fixture Station Smake | HoopStation | Manual 7 / 25...
- Page 9 TouchBox 4× 1× 1× Smake | HoopStation | Manual 8 / 25...
- Page 10 TouchBox Optional Use the adhesive pads to prevent damage to the plate. Smake | HoopStation | Manual 9 / 25...
- Page 11 Media-unit 4× 4× 4× Smake | EPS Jump | Assembly Manual 10 / 25...
- Page 12 Connect the PC PUSH Smake | HoopStation | Manual 11 / 25...
-
Page 13: Mount The Projector
10 Mount the projector Smake | EPS Jump | Software Manual 12 / 25... - Page 14 11 Power Smake | HoopStation | Manual 13 / 25...
- Page 15 If you do not want to use these functions you can connect the TouchBox directly to the HoopStation. (page 21) We recommend to run the HoopStation on the network if possible. Only then up- dates and new functions are possible. Smake | HoopStation | Manual 14 / 25...
- Page 16 Note In the new hardware version the network connection is located in the lower part of the black box, the power plug is now on the side. DC Power-Plug Ethernet / Network Smake | HoopStation | Manual 15 / 25...
- Page 17 Then connect another network cable between HoopSta- tion and switch, shown here in blue. Finally connect the switch to your company network with a network cable, shown here in yellow. Smake | HoopStation | Manual 16 / 25...
- Page 18 13 Adjust the image focus Adjust the image focus Move the focus ring to the left or to the right to adjust the image focus. Smake | HoopStation | Manual 17 / 25...
- Page 19 The control panel grid guides you through the process of using the control panel buttons to launch active options inside your onscreen display menu. The control panel grid represents the 8 buttons sur- rounding the button on the control panel. Smake | HoopStation | Manual 18 / 25...
-
Page 20: Projector Position
13.2 Projector Position Projector Position Press this button to access the following image position settings: Please turn off the „Auto Keyston Set the „Projector Possition„ to „Front Ceiling“ Smake | HoopStation | Manual 19 / 25... - Page 21 13.3 Keystone Keystone Press this button to correct distorted images re- sulting from an angled projection. Please set the Keystone to „-1“ Smake | HoopStation | Manual 20 / 25...
- Page 22 14 Connection stand-alone Connect a network cable to the TouchBox and the switch, shown here in red. Smake | HoopStation | Manual 21 / 25...
- Page 23 Use the X, Y and Z axes to align the projector with the projections so that the projected lines match the lines of the Mighty Hoop Station. Also use the carriage where the projector is mounted to adjust the angle. Smake | HoopStation | Manual 22 / 25...
-
Page 24: Technical Data
Power supply 110-240V ∼ 50-60Hz 1.2A Environment +5°C - +35°C / 30% - 70% Humidity Delivery contents • Power supply unit with EU / US plug • Mounting material • Mounting tools Smake | HoopStation | Manual 23 / 25... - Page 25 16.1 Technical data Smake | HoopStation | Manual 24 / 25...
- Page 26 For more information and instructions visit our web- site www.smake.com or scan the QR Code. Smake | HoopStation | Manual 25 / 25...
Need help?
Do you have a question about the HoopStation EPS and is the answer not in the manual?
Questions and answers