Advertisement
Quick Links
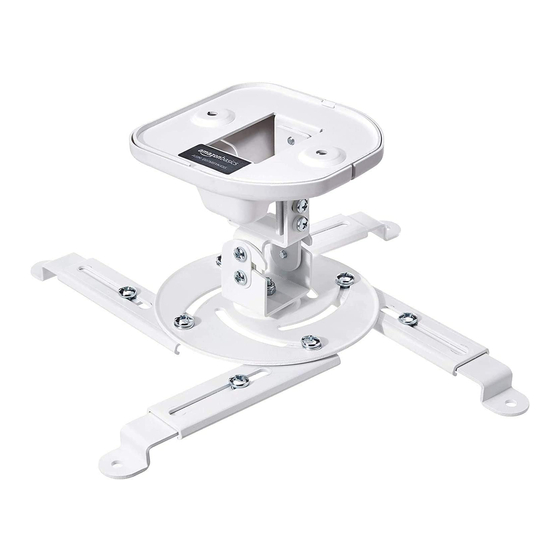
UNIVERSAL PROJECTOR MOUNT
INSTRUCTION MANUAL
SPECIFICATIONS
Maximum Load: 15 kg (33 lbs)
Tilt Range: - 15° to 15° up/down
Swivel Range: up to 360°
Distance from Ceiling: 12.8 cm (5.0")
BOX CONTENTS
Ceiling Plate (x1)
Extension arm (x4)
Mount Body (x1)
Instruction Manual (x1)
Mount Base (x1)
Hardware Kit (x1)
WARNINGS
Read these instructions before you begin. If you are unsure
1
of any part of the process, contact a professional contractor or
installer for assistance. Improper installation can result in injury
or damage.
2
The ceiling or mounting surface must be capable of
supporting the combined weight of the mount and the
projector; if not, the structure must be reinforced.
Locate pipes, wires, or any other hazards in the area where you
3
wish to install the mount before drilling.
4
Safety gear and proper tools must be used. Failure to do so
can result in injury or damage.
5
Follow all instructions and recommendations regarding
adequate ventilation and suitable locations for mounting your
projector. Consult the owner's manual for your particular
display for more information.
CAUTION: This mount is intended for use only with the
maximum weight of 15 kg (33 lbs). Use with heavier than the
maximum weights indicated may result in instability causing
possible injury.
TOOLS REQUIRED
Phillips Head Screw Driver
Electric or Portable Drill
3 mm (1/8") Drill Bit and Stud Finder for Drywall Installation
8 mm (5/16") Masonry Bit for Concrete Installation
HARDWARE KIT
(A) Wood Screw M6.3 x63 (x2)
(H) M5 Washer (x4)
(B) Wall Anchor (x2)
(I)M4 Washer (x4)
(C) M3 x12 (x4)
(J) M5 small washer (x2)
(D) M4 x 12 (x4)
(K) M6 Washer (x4)
(E) M5 x 10 (x8)
(L) M5 larger washer (x4)
(F) M5 x 12 (x4)
(M) M5 plastic washer (x4)
(G) M6 x 12 (X8)
INSTALLATION
Part 1A – Mounting to the Ceiling (Drywall)
1
Attach the Mount Body to the
ceiling plate using the M5 x 10
screw (E), M5 small washer (J),
M5 plastic washer (M) from the
kit (see Fig. 1).
Part 1A – Mounting to the Ceiling (Drywall) (continued)
2
Attach the M5 large washer (L)
to the Mount Body using the M5
x 10 screw (E) from the kit (see
Fig. 2). Leave the screw loose
enough so that the mount can
be hooked onto the mount
body.
3
Use a high-quality stud finder to
locate a ceiling joist where you wish to install your mount.
Mark both edges of the joist to help identify the exact center.
Wood studs should be 2" x 4", at minimum:1.5" x 3.5" (38mm x
89mm) (see Fig. 3).
4
Place the ceiling plate over the
joist and mark two locations for
securing the plate to the ceiling
(see Fig. 4).
5
Set the ceiling plate aside and
drill two holes 2.5" (64 mm) deep
using a 1/8" (or 3 mm) size drill
bit at each marked location.
6
Install the ceiling plate using
two lag Bolts (A) in the "A" and "B"
holes. Do not over tighten lag
Bolts (see Fig. 5).
Part 1B –Mounting to the Ceiling (Concrete)
1
Attach the mount body to the
ceiling plate using the M5 x 10
Fig. 1
screw (E), M5 small washer (J),
(M)
M5 plastic washer (M) from the
(E)
kit (see Fig. 6).
(J)
Fig. 2
(E)
(L)
Fig. 3
Fig. 4
Fig. 5
(A)
Fig. 6
(M)
(E)
(J)
Advertisement

Subscribe to Our Youtube Channel
Summary of Contents for AmazonBasics MP0070
- Page 1 TOOLS REQUIRED Part 1A – Mounting to the Ceiling (Drywall) (continued) UNIVERSAL PROJECTOR MOUNT Attach the M5 large washer (L) Phillips Head Screw Driver Fig. 2 to the Mount Body using the M5 Electric or Portable Drill x 10 screw (E) from the kit (see 3 mm (1/8”) Drill Bit and Stud Finder for Drywall Installation INSTRUCTION MANUAL Fig.
- Page 2 Part 2 – Attaching the Projector to the Mount (continued) Part 1B – Mounting to the Ceiling (Concrete)(continued) OPERATION AND ADJUSTMENT Attach the M5 large washer (L) Fig. 7 Fig. 12 to the Mount Body using the M5 Swivel adjustment can be made by simply turning your x 10 screw (E) from the kit (see projector in the desired direction (see Fig.
Need help?
Do you have a question about the MP0070 and is the answer not in the manual?
Questions and answers