
Summary of Contents for eta ETAbox Speed
- Page 1 2017-04-25 0000000154 V.005 X.35.0, X.39.0 93053-001 ETAbox Speed with discharge screw 17 and 21 Operating Instructions...
- Page 2 ETA Heiztechnik Gewerbepark 1 A-4716 Hofkirchen an der Trattnach Tel: +43 (0) 7734 / 22 88 -0 Fax: +43 (0) 7734 / 22 88 -22 info@eta.co.at www.eta.co.at...
-
Page 3: Table Of Contents
Contents General ................4 General information . -
Page 4: General
On non-compliance with this safety instruction, there is Copyright a risk of major physical injury. All contents of this document are property of ETA Heiztechnik GmbH and are protected by copyright. Preface Any reproduction, transfer to third parties or use for other purposes is prohibited without written permission from the owner. - Page 5 Repair of defects For repairs of defects carried out by the customer or by a third party, ETA shall only bear the costs or remain obligated by warranty if this work was approved in writing in advance by the customer service of ETA...
-
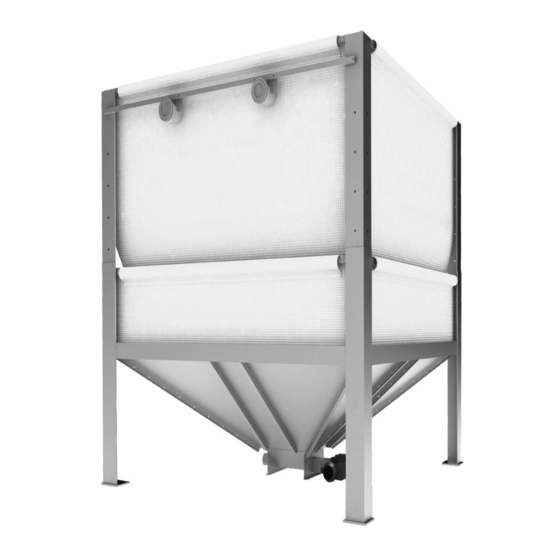
Page 6: Technical Data
Storage volume / capacity at H = 2100 mm 3.9 m³ 2.5 t 5.6 m³ 3.6 t Storage volume / capacity at H = 2500 mm 5.0 m³ 3.2 t 7.3 m³ 4.7 t Floor load at maximum filling www.eta.co.at... -
Page 7: Installation Room
Installation room General information Installation room General information Outdoor installation is possible Outdoor installation is possible if the ETAbox is protected from the effects of weather. A waterproof Minimum size of the installation room roof as well as side covers are absolutely essential. For installation, on 3 sides the boiler room must be at The pellet hoses must also be protected against UV least 200 mm bigger and one side at least 1000 mm... -
Page 8: Sample
The filling nozzles can be extended if required. • One of the two side inspection ports must be easily accessible for monitoring the fill level in the fabric sack of the ETAbox. www.eta.co.at... - Page 9 Installation room Sample Required clearance for filling...
-
Page 10: Information About Pellet Hoses
Earthing The pellet hoses must be earthed as they acquire an electrostatic charge during pellet transport. A copper litz wire is moulded into the pellet hoses for earthing. Fig. 4-2: Note bending radius www.eta.co.at... - Page 11 Information about pellet hoses On the ends of the pellet hoses, free around 5 cm of copper litz wire from the hose and bend it inwards into the hose. This establishes a contact between conveyor and the boiler. At the boiler, the copper litz wires are clamped to the earthing cable near the pellet hose attachment nozzles.
-
Page 12: Installation
If space is tight in the installation room, turn the extraction unit so that the connectors for the pellet hoses all point in the right direction. Thus the frame will no longer need to be turned after assembly. www.eta.co.at... - Page 13 Installation Find the 4 hopper panels with the side edging on the Then hook the 3 other hopper panels with the edging connecting web. offset (see diagram) onto the frame and screw them into the extraction unit. Fig. 5-1: Hopper panel with edging Hook a hopper panel into the frame and hand tighten this with an M 8x 20 screw on the extraction unit.
- Page 14 Installing the clamps Thread-in a rectangular cross bar on each side of the Loosely attach 3 clamps to each cross bar with fabric sack in both upper straps and in the bottom pipe 2 M8 x 60 screws and nuts. strap. www.eta.co.at...
- Page 15 Installation Fix the threaded pipe on the underside of the fabric sack with the clamps. Tighten the M8 x 60 screws for this. Threading the fabric sack into the frame First align the fabric sack so that both filling openings point to the correct side of the installation room.
- Page 16 Tighten the lashing strap on the top side, to avoid sagging of the fabric sack. Do not over-tighten to prevent damage. Tie both openings for the filling nozzles to the fabric sack with bands, so that no dust can escape during filling. Fig. 5-3: Lashing strap www.eta.co.at...
- Page 17 Installation Attaching pellet hoses to the ETAbox On the ends of both pellet hoses, free around 5 cm of copper wire from the hose and bend it inwards into the pellet hose. Push both pellet hoses onto the ETAbox connectors and fasten them with the hose clamps.
- Page 18 Connect the copper litz wires from both pellet hoses to the yellow-green earthing cable (next to the nozzles). Attaching filling instructions Stick the filling instructions supplied onto the ETAbox next to the filling nozzles or at the entrance to the in- stallation room. Fig. 5-7: Filling instructions www.eta.co.at...
-
Page 19: Configuration
Configuration Configuration Content of this configuration Establishing a [Pellets] connection Only the steps required for the configuration of this Establish a new connection by pressing the button product are described below. The configuration of the [New connection] select connection complete heating system is described in the "Configu- type [Pellets] The producers and consumers must be ration"... -
Page 20: Electrical Connections
CAUTION! Flexible stranded conductors The drive's power is automatically monitored by the ETA regulation. Thermal protection (overload If flexible stranded conductors are not used for the protection) is already integrated into the drive. The wiring, the contacts in the plug connections will be thermal protection terminal is not connected to the subjected to excessive mechanical strain. -
Page 21: Commissioning
Commissioning Commissioning Illustrations Low feed pressure during filling The following figures represent ETAbox 21. They Set the feed pressure on the tank truck of the pellet are also applicable to other versions of ETAbox. feed to low, so that the pellets are not injected into the ETAbox at too high a speed and therefore shatter. - Page 22 Since we at ETA don't want to leave the burn- back protection of our boilers to chance, we equip all ETA pellet boilers with a rotary valve so that even during operation there is no open connection between the combustion chamber and the pellet store. Though...
-
Page 23: Cleaning And Maintenance
Cleaning and maintenance Cleaning and maintenance Illustrations The following figures represent ETAbox 21. They are also applicable to other versions of ETAbox. Cleaning the ETAbox The ETAbox is to be cleaned every 5 years and the resulting dust removed. This is why it is best to carry out the cleaning before filling. -
Page 24: Troubleshooting
Fig. 10-1: Cover 3. Slide the barrier plates into the slits so that the pellets cannot trickle down. Fig. 10-2: Barrier plates 4. Remove the maintenance cover to get to the discharge screw. Fig. 10-3: Maintenance cover www.eta.co.at... -
Page 25: Dismantling, Disposal
Dismantling, disposal 11 Dismantling, disposal Dismantling Dismantling is done in the reverse order of assembly. Clean the parts and remove them in accordance with the local regulations for workplace safety and environ- mental protection. Disposal Disposal including all components must be done in an environmentally friendly manner according to waste disposal laws. - Page 26 www.eta.co.at...
- Page 28 DOWNLOAD www.eta.co.at...
Need help?
Do you have a question about the ETAbox Speed and is the answer not in the manual?
Questions and answers