Table of Contents
Advertisement
Quick Links
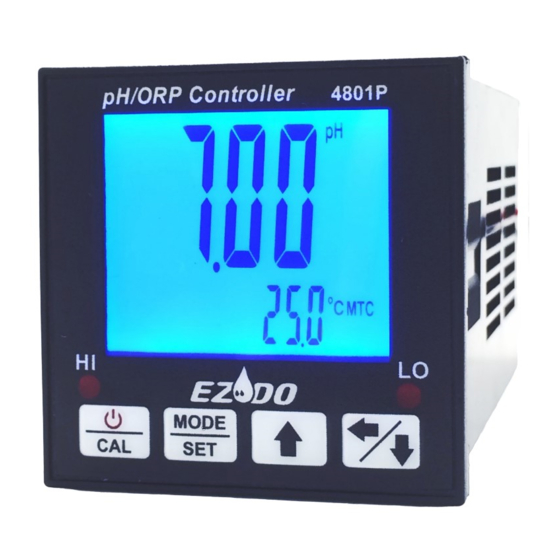
Introduction:
Thank you for choosing this pH/ORP controller. This 1/16 DIN controller offers dual
backlight LCD display, high accuracy, LED indicators, two control relays, and automatic or
manual temperature compensation.
Specifications:
pH
Range
-2.00~16.00 pH
Accuracy
±0.01+1 digit
Resolution
0.01 pH
Compensation
ATC: 0~100 ° C
Deadband
Temperature
Compensation
Limit Relays (2)
Relay status indicators Front panel LED lamp
Power supply
Panel Cutout
Meter Dimensions
Accessories:
9V DC/AC(100~240V) adaptor
Adapter connection wire
4801P pH/ORP controller
ORP
-1999 ~ -200 mV
-199.9 ~ 499.9 mV
500 ~ 1999 mV
±2+1 digit
0.1/1 mV
N/A
pH: 0.00 to 2.00 pH
ORP: 0 to 200 mV
o
ATC (0-100
C) via 30K Thermistor or MTC
SPDT contacts rated for 5A at 115V
9V DC
1/16th DIN 1.81 x 1.81" (46 x 46mm)
4.7 x 1.77 x 1.77" (105 x 45 x 45mm)
Temp.
0~110 ° C
±0.2+1 digit
0.1 ° C
Advertisement
Table of Contents

Summary of Contents for Ezodo 4801P
- Page 1 4801P pH/ORP controller Introduction: Thank you for choosing this pH/ORP controller. This 1/16 DIN controller offers dual backlight LCD display, high accuracy, LED indicators, two control relays, and automatic or manual temperature compensation. Specifications: Temp. Range -2.00~16.00 pH -1999 ~ -200 mV 0~110 °...
- Page 2 Installation: <Mounting the controller> 1. Make a 1.77 x 1.77" (45 x 45 mm) panel cutout (1/8" to 3/8" thickness) 2. Slide the controller into the cutout until the bezel is flush with the panel. 3. Slide the mounting bracket over the rear of the controller and press snugly against the rear of the panel.
- Page 3 <Display and Buttons> 1. pH or ORP reading 2. Calibration mode 3. Calibration error indicator 4. HI relay energized LED indicator 5. LO relay energized LED indicator 6. Auto temperature compensation(ATC) or Manual temperature compensation(MTC) 7. Temperature reading and unit 8.
- Page 4 Calibration: <pH> 1. Make sure the sensor is pH electrode and switch mode to pH mode. 2. Dip the electrode and the temperature probe into the buffer solution pH 7.00. Stir gently and wait until the reading is stable. Press and hold for 3 sec.
- Page 5 HI, LO and Deadband Setpoints <HI and LO Relay> Relays switch state when their user-programmable setpoint is exceeded. They switch again when the limit is no longer exceeded. If the measurement exceeds the high setpoint, the high relay will switch state. If the measurement is lower than the low setpoint, the low relay will switch state.
- Page 6 < Programming the Setpoints and the Deadband > 1. Press to choose pH or ORP mode. The controller will store the settings for pH and ORP separately. 2. Press and hold button until a beep sound, and then press to enter setting mode.
- Page 7 Other settings <Back light> 1. Press and hold until a beep sound, release and then press and hold again. 2. Press to choose On, OFF, and Auto: On: back light is always on. OFF: back light is always off. Auto: back light will be on for 30 seconds while any button is pressed and then off. <Reset the controller to default setting>...
Need help?
Do you have a question about the 4801P and is the answer not in the manual?
Questions and answers