Table of Contents
Advertisement
Quick Links
Advertisement
Table of Contents

Related Manuals for Alloy S-Style Guitar Kits

Summary of Contents for Alloy S-Style Guitar Kits
- Page 2 Copyright © 2014, 2015, 2016 Alloy Instruments, Inc. Alloy Instruments Inc. disclaims all liability, including infringement on proprietary rights, relating to the use of the information in this document. No license, express or implied, by estoppal or otherwise, to any intellectual property rights is granted herein.
-
Page 3: Table Of Contents
1.0 Welcome and Introduction ..........1 1.1. - Page 4 30 June 2016 STAssem Version 1.1...
-
Page 5: Welcome And Introduction
Welcome and Introduction Thanks and congratulations on your purchase of an Alloy Guitars Kit! We believe that after you build your first kit, you will be hooked! We hope that you will come back to us for future kits - perhaps a different model, or a “fancier” kit with better components - or just to try a different finishing technique. -
Page 6: Prepare For Assembly
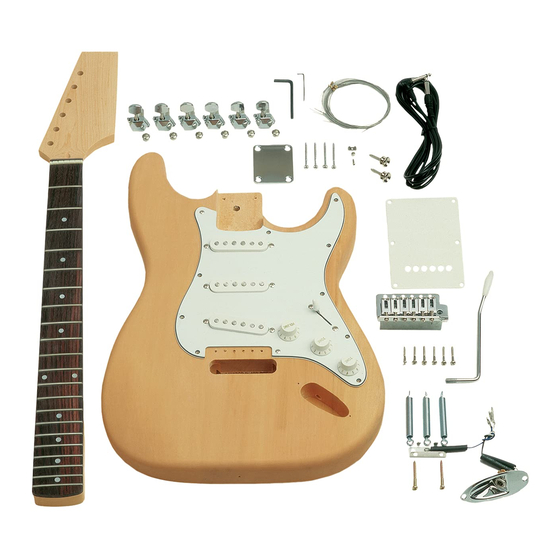
Prepare for assembly. Get a cup of coffee. Have a snack. Assembling a guitar is a process that takes time, patience, and thought. It is not to be rushed. You will want to cherish this instrument for years to come, so go slow and be patient. The assembly process is broken into the following sections: •... - Page 7 13.String Retainer Trees (Trees, Screws, Sleeves) X 2 (Note: sleeves are different heights.) 14.Screws 15.Allen Wenches (1 Small, 1 Medium) 16.Fretboard Radius Guage 17.Alloy Guitars Pick! If anything is missing or not correct, please contact our customer service department ASAP! (www.AlloyGuitars.com, 888-214-8314, help@alloyguitars.com) Figure 2 Body...
- Page 8 Figure 6 Strings Figure 7 Bridge and Mounting Screws Figure 8 Tremolo Claw and Springs Figure 9 Back Body Cover Figure 10 Neck Plate w/ Screws Figure 11 Tremolo Arm Figure 12 Tuning Machines 30 June 2016 STAssem Version 1.1...
- Page 9 Figure 13 Output Jack and Plate Figure 14 Strap Pins Figure 15 String Retainer Trees Figure 16 Screws Figure 17 Allen Wrenches Figure 18 Alloy Pick! STAssem Version 1.1 30 June 2016...
-
Page 10: Tools You Will Need
2.2. Tools you will need We do everything we can to make building your guitar straight-forward. Besides the materials to finish the guitar (paint, stain, sealant, etc.) you shouldn’t need anything else that most people don’t already have in their garages (such as a soldering iron, or saws). Nor do you need to do any exacting measurements that might make it difficult to get a high quality instrument. -
Page 11: Finish
Finish Before you assemble your guitar, we suggest you complete all finishing of the wood components. Otherwise, you will need to disassemble the guitar before finishing it. Now... we know that most of you will want to assemble your guitar right out of the box and worry about finishing it later. -
Page 12: Assembly
Assembly Once your guitar body and neck “High Scratch Risk Zones!” ahead. The last thing have the look you desire and is you want to do is scratch the surface of your COMPLETELY dry, it is time for final beautiful guitar. You will see “High Scratch Risk assembly. -
Page 13: Install The Tuning Machines
• 2 jack plate mount holes • On the back of the body • 6 back cover holes • 4 neck mounting holes • 2 tremolo pocket screw holes • On the horn and bottom edge • 2 strap button holes 4.4. -
Page 14: Install The Tremolo Claw
Figure 22 Painters tape and screws installed Figure 23 Tuner with wrench 4.5. Install the Tremolo Claw The claw is held in place using two screws which are Tremolo claw screws and Neck driven into the body and adjusted as needed to control screws are big and long and can string tuning, tremolo, and note bending capabilities. -
Page 15: Install The Neck
Figure 26 Tape to Protect Body Figure 27 Claw with Screws 4.6. Install the Neck Start with the body resting on a sturdy, flat, soft surface. • LOOK AT AND UNDERSTAND THE PICTURES. The neck should only be inserted from the top, not from the end. -
Page 16: Install The Jack Plate
well for all of the holes in the plate. At this point, you can continue the tightening of the screws. All of the screws should be tightened enough to hold the body and neck together snug, but they should not be completely tightened down. -
Page 17: Install The Pickguard
• Remove any tape used to protect the finish. Figure 32 Wire feed for Jack Figure 33 Wire Fed Through Figure 34 Protective tape 4.8. Install the Pickguard All the electrical connections come together! • Ensure all the pickguard mounting holes in the body are open and clean. •... - Page 18 • Install the knob on the pickup selector switch. Figure 35 WRONG routing of wires Figure 36 Correct routing of wires Figure 37 Output connector Figure 38 Bridge ground connector Figure 39 Slide top of Figure 40 And let the Figure 41 ...before sliding it pickguard toward neck...
-
Page 19: Install The Bridge
Troubleshooting! • If the components will not slide easily into the body, or the pickguard will not sit flat, lift the pickguard slightly and ensure all wires are in wireways and spaces within the body. • You may have to rearrange the wires several times to get them into body. It can be a tight fit. Be patient and don’t force the pickguard down as this can bend components and break wires. -
Page 20: Installing The Strap Buttons
• Carefully turn guitar over and place on work surface. Figure 42 Underside of Block Figure 43 Bridge aligned with Figure 44 Attached with 2 Holes screws, resting on body Figure 45 Bridge rocks up... Figure 46 ...and down freely Figure 47 First spring installed Figure 48 Using Pliers... -
Page 21: Neck Fine Alignment
• Just before the button is tight against the body, remove the tape. • Final tighten carefully by hand. Do not over tighten! • Repeat for the second button, again removing the tape when the screws is almost in. • Hand tighten the second button. -
Page 22: Install The Strings And Initial Tuning
• At this point the neck and the bridge are set. Figure 54 Line to check alignment Figure 55 String to edge distance matches Troubleshooting! • If the neck will not align, gently remove the screws and lift the neck out if the neck pocket. •... -
Page 23: Install The String Trees
store and you will find one for free. Figure 56 Strings Figure 57 E String in tremolo Figure 58 String through tuner 4.13. Install the String Trees String trees are used to change the angle at which a string passes over the nut. If this angle is too low, the string may buzz, or may jump out of the slot on the nut durig play. - Page 24 • While looking straight down on the head of the neck, look through the hole in the binder and mark the center line between the strings across the 2 3/8” line. (Figure 63) • Remove the binders and check your markings. The goal is to place the string trees at the proper distance from the nut and centers between the strings the hold.
- Page 25 Figure 61 Measure 2 1/4” Figure 62 Hole Over 3 and 4 strings Figure 63 Hole Over 1 and 2 strings Figure 64 Tree Hole Locations Marked Figure 65 Strings Loosened STAssem Version 1.1 30 June 2016...
- Page 26 Figure 66 Tape on drill and neck thickness Figure 67 String Trees almost tight 30 June 2016 STAssem Version 1.1...
-
Page 27: Final Setup
Final Setup At this point your guitar is assembled and is ‘whole string’ tuned. Go ahead, play it a little, finally! You will probably notice that it plays OK, but you may want to adjust various parts of the setup for your playing and to improve tuning. -
Page 28: Set The String Height
rod. This can be tedious but is worth the effort! • Here are a few videos on this processes: • https://www.youtube.com/watch?v=PHHepmTX3So (John Carruthers). • https://www.youtube.com/watch?v=4j3QryKIXrc • There are many other videos and guides on the web. 5.2. Set the String Height The string action or string height is the distance that the strings are above the frets while at rest. -
Page 29: Adjust The Intonation
• Play a little, see how it feels. If OK, move to next step, if not readjust the string height. Figure 68 <1/8” Stack Figure 69 Bridge lifted with paper shim Figure 71 Adjusting saddle screw Figure 70 6 String at 1/16” Figure 72 1 String Adjusted 5.3. - Page 30 strings varies depending on which fret is being depressed. The physical properties cause tuning difficulties across the fretboard and along its length. For example a string can be perfectly in tune when played open (e.g., an open D) but play slightly flat or sharp when the D one octave higher is played at the 12 fret.
-
Page 31: Adjust The Nut Height
note). Search Youtube for many videos demonstrating this technique. Figure 73 Adjusting the Bridge saddle 5.4. Adjust the Nut Height This is the point in the setup process where one would normally adjust the nut for height, angle and slot width, according to player preferences. - Page 32 • Once the tremolo springs are adjusted to your satisfaction, install the back plate onto the guitar with the supplied screws. • Lay the guitar on the front. • Remove the protective tape from the back of the guitar. • Place the tremolo pocket cover over the pocket and line up the holes.
-
Page 33: The End
The End Your guitar is finished. Play it like you mean it. Please share your experience with us by providing any comments, corrections, or suggestions at www.alloyguitars.com. We would love to share our customer’s success stories. Please send us pictures of your completed instruments to info@alloyguitars.com. - Page 34 30 June 2016 STAssem Version 1.1...
Need help?
Do you have a question about the S-Style Guitar Kits and is the answer not in the manual?
Questions and answers