Advertisement
Quick Links
Advertisement

Related Manuals for COLORADO KILL A WATT EZ

Summary of Contents for COLORADO KILL A WATT EZ
- Page 1 ENERGY SAVINGS FOR SCHOOLS How to use the tools in your kit...
- Page 2 CONTENTS Kill A Watt EZ ....................1 Acu-Rite Humdity Monitor .................. 3 Carbon dioxide Detector ..................5 URCERI Light Meter ..................9 Images: Right: Energy Savings for Schools. Colorado Energy Office. 2018. ColoradoESS.org. Below: High Performing School Program. Colorado Energy Office. 2018.
-
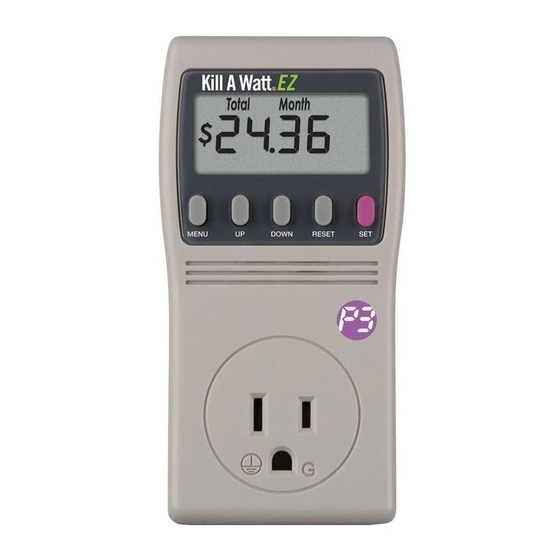
Page 3: Kill A Watt Ez
KILL A WATT EZ A Kill A Watt EZ is a watt meter. What’s a watt meter? It’s a device that lets users plug in appliances and read how much electricity the appliances are consuming as well as how much that electricity costs. - Page 4 b. Press the UP and DOWN keys to set your desired rate. The meter accepts rates ranging from $0.000 to $9.999. c. Press SET again to save the new rate. “SAVE” will appear briefly on the screen. 4. To show the cost of the power being used by the appliance, press the MENU key until “Cost”...
-
Page 5: Acu-Rite Humdity Monitor
ACU-RITE HUMDITY MONITOR This device measures temperature and humidity, high and low humidity and temperature trends, and humidity level comparison to ideal indoor humidity for your space and health. Humidity is the amount of water particles in the air. For maximum accuracy, place the monitor in a clean, dry area out of direct sunlight and away from any heat sources, vents, or humidity sources. - Page 6 2. To switch between Fahrenheit and Celsius, press the “ F” button on the back of the monitor. 3. High and low temperature and humidity records are displayed. The 24-hour record is automatically reset after 24 hours from the time the batteries were installed. The all- time record is collected continuously from the time the batteries were installed.
-
Page 7: Carbon Dioxide Detector
CARBON DIOXIDE DETECTOR This device monitors and tracks levels of indoor carbon dioxide, temperature, and humidity. Carbon dioxide is a greenhouse gas breathed out by people and absorbed by plants. Too much carbon dioxide in the air can make people sick. This device has a buzzer that indicates when the carbon dioxide levels have reached undesirable levels. - Page 8 d. Alternatively, the date and time can be synced to the computer’s built-in clock by connecting the device to the computer using the USB cable and clicking “Set Time” in the software program. Figure 3. Features of the CO2 Detector from the Instruction Manual...
- Page 9 4. To record data, connect the device to the computer using the USB cable and open the computer software program. a. Click “Set Param” and set up the desired parameters. b. Option 1: Tethered Data Logging i. Select the “Immediately” option for the Current Time to indicate that you want the data recorded right away.
- Page 10 3. Leave the device in the fresh air for another 5-10 minutes. Make sure that you walk away from the device so as not to influence the calibration with your breath. 4. Once calibration is complete, the display will show “1” if it was successful or “0”...
-
Page 11: Urceri Light Meter
URCERI LIGHT METER This device measures light intensity and temperature. Light intensity is a way of measuring the amount of energy being moved by light waves (or, more basically, brightness). An explanation of the various buttons on the device from the instruction manual are shown in Figure 5. - Page 12 6. Press the “MIN MAX” button to show the minimum and maximum captured data. To return to real-time measurements, press and hold the “MIN MAX” button for 2 seconds. 7. To change the light units between FC (foot-candles) and LUX (lumens per square meter), press the “FC LUX”...
Need help?
Do you have a question about the KILL A WATT EZ and is the answer not in the manual?
Questions and answers