Table of Contents

Subscribe to Our Youtube Channel
Related Manuals for Samsung SGH-E880


Summary of Contents for Samsung SGH-E880
- Page 1 * Some of the contents of this manual may differ from your phone, depending on the software installed or your service provider. Printed in Korea Code No.:GH68-XXXXXA World Wide Web English. 02/2004. Rev 1.0 http://www.samsungmobile.com...
- Page 2 GPRS TELEPHONE SGH-E880...
-
Page 3: Table Of Contents
Contents Important safety precautions......7 Unpacking ............9 Your phone............. 10 Phone layout ............10 Display..............13 Camera ..............16 Flash..............16 Getting started ..........17 Installing the SIM card ..........17 Charging the battery ..........19 Switching the phone on or off........21 Selecting functions and options........ - Page 4 Contents Using the menus ..........47 Accessing a menu function by scrolling ....... 47 Using shortcuts ............48 List of menu functions ..........49 Call records ............ 54 Current contacts ........54 (Menu 1.1) Missed calls ..........55 (Menu 1.2) Dialled calls ..........
- Page 5 Contents Messages............90 Create new message ......... 91 (Menu 5.1) My messages ........... 99 (Menu 5.2) Templates ..........109 (Menu 5.3) Delete all ..........110 (Menu 5.4) Settings ..........111 (Menu 5.5) Memory status ........117 (Menu 5.8) File manager ..........118 Images ..........
- Page 6 Contents Access codes ..........172 Phone password ............ 172 PIN ..............173 PUK ..............173 PIN2 ..............174 PUK2 ..............174 Barring password........... 175 Health and safety information ...... 176 SAR certification information ........176 For body operation..........178 Precautions when using batteries ......179 Road safety ............
-
Page 7: Important Safety Precautions
Important safety precautions Read these guidelines before using your wireless phone. Failure to comply with them may be dangerous or illegal. Road safety at all times Do not use a hand-held phone while driving; park the vehicle first. Switching off when refuelling Do not use the phone at a refuelling point (service station) or near fuels or chemicals. - Page 8 Accessories and batteries Use only Samsung-approved accessories and batteries. Use of any unauthorised accessories could damage your phone and may be dangerous. Use only Samsung-approved batteries and recharge your battery only with Samsung-approved chargers. Qualified service Only qualified service personnel may repair your phone.
-
Page 9: Unpacking
Your package contains the following items: Handset Travel Charger Battery User’s Manual You can obtain the following accessories for your phone from your local Samsung dealer: • Standard/Extended battery • Hand strap • Car charger • Bluetooth handsfree car kit • Car cradle •... -
Page 10: Your Phone
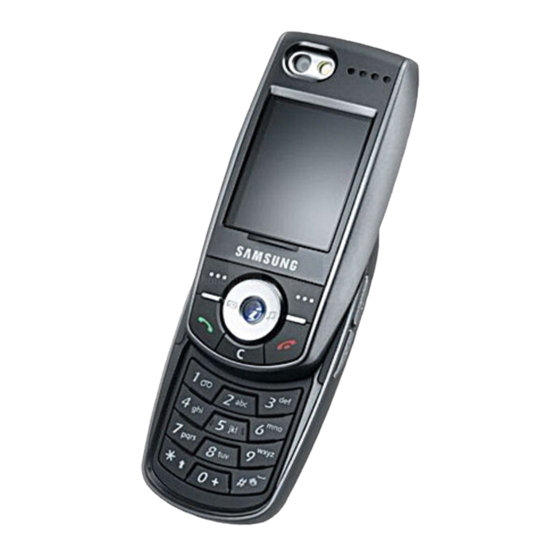
Your phone Phone layout The following illustrations show the main elements of your phone: Earpiece Display Navigation (Up/ Down/Left/Right) keys Soft key (right) Volume keys WAP access/ Soft key (left) Confirm key Power on/off/ Dial key Menu exit key Clear key Alphanumeric keys Special function... - Page 11 Your phone Key(s) Description Performs the functions indicated on the bottom line of the display. (soft keys) In Idle mode, allows you to access your favourite menu options directly. For further details about shortcuts, see page 147. In Menu mode, scrolls through the menu options and Phonebook.
- Page 12 Your phone Key(s) Description (continued) Enters special characters. Performs various functions. (on the left side) Adjusts the volume level for various sounds for the phone. With the phone closed, turns on the flashlight or activates the clock on the external display when held down. (on the right side) In Idle mode, accesses the Camera menu.
-
Page 13: Display
Your phone Display Display layout The display has three areas: Icons Text and graphics area Soft key function Menu Name indicators Area Description First line Displays various icons. See page 14. Middle Displays messages, instructions, and any information that you enter, such as the number you are dialling. - Page 14 Your phone Icons Icon Description Shows the received signal strength. The greater the number of bars, the stronger the signal. Appears when a call is in progress. Appears when you are out of your service area. When it displays, you cannot make or receive a call.
- Page 15 Your phone Icon Description (continued) Appears when you have set the phone to vibrate for an incoming call. Appears when Quiet mode is active. Shows the level of your battery. The more bars you see, the more power you have remaining.
-
Page 16: Camera
Your phone Camera The camera module on the back of your phone allows you to take a photo and record a video while on the move. For further details about the Camera feature, see page 133. Flash You can use the flash next to the camera to take photos when it’s dark. -
Page 17: Getting Started
Getting started Installing the SIM card When you subscribe to a cellular network, you are provided with a plug-in SIM card loaded with your subscription details, such as your PIN, any optional services available, and so on. Important! The plug-in SIM card and its contacts can be easily damaged by scratches or bending, so be careful when handling, inserting, or removing the card. - Page 18 Getting started 3. Slide the SIM card into the SIM card socket, as shown, so that the card locks into position. Make sure the gold-coloured contacts on the card face into the phone. Note: Remove the SIM card, slide it upwards, as shown, and take it out of the socket.
-
Page 19: Charging The Battery
Getting started 5. Press the battery until it clicks into place. Make sure that the battery is properly installed before switching the power on. Charging the battery Your phone is powered by a rechargeable Li-ion battery. A travel charger comes with your phone for charging the battery. - Page 20 Getting started 2. Plug the adapter into a standard AC wall outlet. The LED on the charger indicates the charging progress by the following colours: • Red: the battery is being charged. • Green: the battery is completely charged. • Orange: the battery is not correctly plugged in or is operating at a too high or too low.
-
Page 21: Switching The Phone On Or Off
Getting started Switching the phone on or off 1. Open the phone. 2. Press and hold the key until the phone switches on. 3. If the phone asks you to enter a password, enter the password and press the OK soft key. Note: The password is preset to “00000000”... -
Page 22: Selecting Functions And Options
Getting started Selecting functions and options Your phone offers a set of functions that allow you to customise and use it. These functions are arranged in menus and sub-menus, accessed using the two soft keys, Using the soft keys The roles of the soft keys vary, depending on the function you are currently using;... - Page 23 Getting started Selecting options To view the various functions and options available and to select the one you want: 1. Press the appropriate soft key. 2. To Press the select the: Select soft key or • function displayed key. • option highlighted view the next function or Down key.
-
Page 24: Call Functions
Call functions Making a call 1. When the idle screen displays, enter the area code and phone number, then press the key. 2. When you want to end your call, press the key or close the phone. Note: When you have activated the Auto redial option in the Extra settings menu (Menu 9.2.4), the phone automatically redial up to 10 times if the person does not answer the call or... - Page 25 Call functions Redialling the last number The phone stores the numbers of the calls you’ve dialled, received, or missed, if the call recipient or caller can be identified. To recall any of these numbers: 1. In Idle mode, press the key to display a list of the most recent numbers used.
- Page 26 Call functions Storing a number in Phonebook Note: You also use the Add new contact menu (Menu 2.2) to store a number. For details, see page 60. To store a number in the phone’s memory: 1. Enter the number you want to store and press the Options soft key.
- Page 27 Call functions • Ringer ID: Select a unique ringer melody for the entry. By selecting a different tone for each entry, incoming voice calls having a caller ID can be distinguished from each other. • Group: Select one of the default relation groups, where the entry is included.
- Page 28 Call functions 6. If you want another location, press the C key to clear the location number and enter the number you want. 7. Press the Save soft key. 8. To Press the use the entry Options soft key. For further options details, see page 59.
-
Page 29: Adjusting The Volume
Call functions To dial a number from the phone’s memory: 1. In Idle mode, press and hold the 0 key to display “+.” 2. Enter the location number you want and press key. 3. You can press the Left or Right key to find other numbers. -
Page 30: Answering A Call
Call functions Answering a call When somebody calls you, the phone rings and displays the incoming call image. The caller’s phone number or name, if stored in Phonebook, displays. 1. Press the key or the Accept soft key or open the phone to answer the incoming call. - Page 31 Call functions To view a missed call immediately: 1. If the phone is closed, open the phone. 2. Press the View soft key. 3. To Press the scroll through the Up or Down key. missed calls, if necessary access the options Options soft key.
-
Page 32: Quickly Switching To Quiet Mode
Call functions Quickly switching to Quiet mode Quiet mode is convenient when you wish to stop the phone from ringing, in a theatre for example. In Idle mode, press and hold the key until the “Quiet mode” message and the Quiet mode icon ) display. -
Page 33: Entering Text
Entering text When using your phone, you will often need to enter text, such as when storing a name in Phonebook, creating your personal greeting, or scheduling events on your calendar. You can enter alphanumeric characters by using your phone’s keypad. -
Page 34: Changing The Text Input Mode
Entering text Changing the text input mode When you are in a field that allows characters to be entered, you will notice the text input mode indicator on the display. Example: Writing a text message Text message Text input mode indicator Options Back... - Page 35 Entering text 2. Select the other letters in the same way. • To insert a space, press the key. • You can move the cursor by pressing the Navigation keys. To delete letters, press the C key. Press and hold the C key to clear the entire display.
-
Page 36: Using T9 Mode
Entering text Using T9 mode T9 is a predictive text input mode that allows you to key in any character using single keystrokes. This text input mode is based on a built-in dictionary. To enter a word in T9 mode: 1. -
Page 37: Using Numeric Mode
Entering text To add a new word into the T9 dictionary: 1. After pressing the keys corresponding to the word you want to add, press the 0 key to display the alternative words. 2. When there are no more alternative words, the display shows Add on the bottom line. -
Page 38: Using Symbol Mode
Entering text Using Symbol mode Use Symbol mode to insert symbols. Press the select a symbol corresponding number key. display more symbols Up or Down key. clear the symbol(s) C key. insert the symbol(s) OK soft key. into text... -
Page 39: Options During A Call
Options during a call You can access a number of control functions that you can use during a call. Putting a call on hold You can place the current call on hold whenever you want. You can make another call while you have a call in progress if your network supports this service. -
Page 40: Using The Speaker
Options during a call When you have an active call and a call on hold, you may switch between the two calls, changing the one on hold to active and placing the other on hold. To switch between the two calls, simply press the Swap soft key. -
Page 41: Call Waiting
Options during a call Call waiting You can answer an incoming call while you have a call in progress, if your network supports this service and you have set the Call waiting menu (Menu 9.5.3) to Activate. You are notified of an incoming call by a call waiting tone. -
Page 42: Switching The Voice Clarity Feature On Or Off
Options during a call To return to the normal phone mode: 1. Press the Options soft key. 2. Select Switch to phone and press the Select soft key. Switching the Voice Clarity feature on or off You can increase the microphone’s sensitivity to allow the other person on the phone to hear your voice even though you may be whispering. -
Page 43: Switching Off The Microphone (Mute)
Options during a call Switching off the microphone (Mute) You can temporarily switch off your phone’s microphone so that the person on the phone cannot hear you. Example: You wish to say something to a person in the room, but do not want the person on the phone to hear you. -
Page 44: Using Phonebook
Options during a call Using Phonebook You can use the Phonebook option during a call to search for or store entries. For further details about the Phonebook feature, see page 58. Sending a sequence of DTMF tones You can send DTMF tones as a group after entering the entire number you need to send. -
Page 45: Using Sim Services
Options during a call Using SIM services The SIM service menu is available if you use a SIM card that provides additional services, such as news, weather, sports, entertainment, and location services. Available services may vary, depending on your service provider’s service plans. For further details, see your SIM card instructions or contact your service provider. - Page 46 Options during a call Having a private conversation with one participant 1. During a multi-party call, press the Options soft key. 2. Select Split and press the Select soft key. 3. Highlight a person from the call participant list and press the Select soft key. Now you can talk privately to that person.
-
Page 47: Using The Menus
Using the menus The phone offers a range of functions that allow you to tailor it to your needs. These functions are arranged in menus and sub-menus and can be accessed by scrolling or by using shortcuts. Accessing a menu function by scrolling 1. -
Page 48: Using Shortcuts
Using the menus Using shortcuts Menu items, such as menus, sub-menus, and options, can be accessed quickly by using their shortcut numbers. Press the Menu soft key and enter the number of the menu you want. Note: The numbers assigned to each menu are indicated on the list on page 49. -
Page 49: List Of Menu Functions
Using the menus List of menu functions The following list shows the menu structure and indicates the number assigned to each option and the page where you can find a description of each feature. 1. Call records (see page 54) 1.1 Current contacts 1.2 Missed calls 1.3 Dialled calls... - Page 50 Using the menus 3. Applications (see page 69) 3.1 Java world 3.1.1 Downloads 3.1.2 Settings 3.1.3 Memory status 3.2 MP3 player 3.3 Voice recorder 3.4 World time 3.5 Alarm 3.6 PIN sync 3.7 Calculator 3.8 Converter 3.8.1 Currency 3.8.2 Length 3.8.3 Weight 3.8.4 Volume 3.8.5 Area...
- Page 51 Using the menus 5. Messages (see page 90) 5.1 Create message 5.1.1 Text message 5.1.2 Multimedia message 5.1.3 Email 5.2 My messages 5.2.1 Inbox 5.2.2 Drafts 5.2.3 Outbox 5.2.4 Sent box 5.2.5 Email box 5.2.6 My folders 5.3 Templates 5.4 Delete all 5.5 Settings 5.2.1 Text message 5.2.2 Multimedia message...
- Page 52 Using the menus 9. Settings (see page 145) 9.1 Time & Date 9.2 Phone settings 9.2.1 Language 9.2.2 Greeting message 9.2.3 Short cut 9.2.4 Extra settings 9.3 Display settings 9.3.1 Idle 9.3.2 Skin 9.3.3 LCD brightness 9.3.4 Back light 9.4 Sound settings 9.4.1 Incoming call 9.4.2 Keypad tone 9.4.3 Message tone...
- Page 53 Using the menus 9. Settings (continued) 9.7 Security 9.7.1 PIN check 9.7.2 Change PIN 9.7.3 Phone lock 9.7.4 Change password 9.7.5 Privacy 9.7.6 SIM lock 9.7.7 FDN mode 9.7.8 Change PIN2 9.8 Connect settings 9.9 Reset settings * Shows only if supported by your SIM card.
-
Page 54: Call Records
Call records In this menu, you can view the: • calls you have dialled, received, or missed. • length of your calls. • cost of your calls, depending on your SIM card. Note: You can access the call records of all 3 types of calls by pressing the key in Idle mode. -
Page 55: Missed Calls (Menu 1.2)
Call records Send message: allows you to send an SMS or MMS message to the number. For further details, see page 91. Delete: allows you to delete the call record or all records. Missed calls (Menu 1.2) This menu lets you view the most recent calls you have received, but did not answer. -
Page 56: Delete All (Menu 1.5)
Call records Delete all (Menu 1.5) This menu allows you to delete all of the records in each call type separately. You can also delete all of your call records at one time. 1. Select a call type and press the key to place check mark. -
Page 57: Call Cost (Menu 1.7)
Call records Call cost (Menu 1.7) This network feature lets you view the cost of calls. This menu may not be available, depending on your SIM card. Note: This feature is not intended to be used for billing purposes. The following options are available: Last call cost: shows the cost of the last call you made. -
Page 58: Phonebook
Phonebook You can store phone numbers and their corresponding names in both your SIM card and your phone’s memory. They are physically separate but are used as a single entity, called Phonebook. Note: Depending on your particular SIM card, the maximum number of phone numbers the SIM card can store may differ. - Page 59 Phonebook 3. Once you have found the number, press the key to dial. Alternatively, press the Options soft key to access the contact options; for further details, see the next section. On the contact list, press the Options soft key to access the following options: View: shows information about the selected contact.
-
Page 60: Add New Contact (Menu 2.2)
Phonebook Add new contact (Menu 2.2) This menu allows you to add a new entry into Phonebook. In the phone’s memory, a name can contain up to 5 numbers in different categories: Mobile, Home, Office, Fax, and Other. You can save only one number in a SIM card entry. - Page 61 Phonebook 3. When you have finished entering the contact information, press the Save soft key. 4. To Press the access the options Options soft key. For further details, see page 59. dial a number Down key to scroll to a number and press the key.
-
Page 62: Group (Menu 2.3)
Phonebook Group (Menu 2.3) In this menu, you can create and manage caller groups to organise your Phonebook entries. Creating a new caller group 1. On the Group screen, press the Options soft key. 2. Select Add and press the Select soft key. 3. - Page 63 Phonebook Viewing members in a group To view the names in a caller group, scroll to the group and press the key. The list of the members in the group appears. Press the Options soft key to access the following options: View: shows you the contact information of a member.
-
Page 64: Speed Dial (Menu 2.4)
Phonebook Speed dial (Menu 2.4) You can assign up to 8 of your most frequently used phone numbers from your Phonebook list to the number keys (2 to 9), and then dial them easily whenever you want, simply by pressing and holding the associated number key. -
Page 65: My Name Card (Menu 2.5)
Phonebook Speed dialling To quickly dial the numbers assigned to the 2 to 9 keys, press and hold the appropriate key in Idle mode. My name card (Menu 2.5) In this menu, you can create a name card for yourself. After creating a name card, you can send it to other people via several different routes. -
Page 66: Own Number (Menu 2.6)
Phonebook Own number (Menu 2.6) You can: • assign a name to each of your own phone numbers registered on your SIM card. • delete the names and numbers. Any changes made here do not in any way affect the actual subscriber numbers on your SIM card. Management (Menu 2.7) In this menu, you can:... - Page 67 Phonebook Copy all to phone (Menu 2.7.2) You can copy all of the contacts stored on the SIM card to the phone’s memory. Delete all (Menu 2.7.3) You can delete all of the contacts from your phone’s memory, your SIM card, or both. 1.
-
Page 68: Service Number (Menu 2.8)
Phonebook Service number (Menu 2.8) You can view the list of Service Dialling Numbers (SDN) assigned by your service provider. These numbers include emergency numbers, directory enquiries, and voice mail numbers. Note: This menu is available only when your SIM card supports Service Dialling Numbers. -
Page 69: Applications
Applications In this menu, you can: • enjoy various Java games. • play music files using your phone as an MP3 player. • record a voice memo. • set your time zone and check world time. • set an alarm so that the phone alerts you at a specific time. - Page 70 Applications Playing a game 1. From the game list, select a game and press the key. 2. Press the left soft key. For some games, you can press any key. 3. Select New Game or Start and press the key. 4.
-
Page 71: Mp3 Player (Menu 3.2)
Applications Settings (Menu 3.1.2) In this menu, you can select a connection profile for accessing Java services. Note: To change the properties of a connection profile, see page 166. Memory status (Menu 3.1.3) In this menu, you can view the amount of memory available and memory currently in use for Java games and the number of games you have downloaded. - Page 72 Applications Creating the play list 1. On the MP3 player screen, press the Options soft key. 2. Select Add list and press the Select soft key. 3. Select Add all to add all music files to the play list and press the Select soft key. Skip to step 5. Select Add a file to add a music file and press the Select soft key.
- Page 73 Applications Function adjusts the volume level. changes the equalizer mode. changes the skin colour. turns the shuffle mode on or off. turns the 3D sound on or off. changes the repeat mode. Note: Closing the phone doesn’t interrupt playback. To control the MP3 player with the phone closed, see page 75.
- Page 74 Applications Settings: allows you to customise the default settings for the Media player. • Repeat mode: allows you to select a repeat mode. • Shuffle: allows you to turn the shuffle mode on or off. • Visualization: allows you to select a music genre for the equalizer.
-
Page 75: Voice Recorder (Menu 3.3)
Applications Playing music with the phone closed You can enjoy music with the phone closed. Use the following keys to control the MP3 player: Function launches or close the Media player when held down. starts playing music and pause playback. returns to the beginning of the file or the previous file. - Page 76 Applications 3. When you have finished, press the Down key to stop and save the memo. If the recording time expires, the phone will automatically stop and save the memo. Using voice memo options After recording a voice memo, you can access the following options by pressing the Options soft key: Play: plays back your voice memo.
- Page 77 Applications Settings: allows you to change the default settings for recording a voice memo. To change settings, press the Left or Right key. The following options are available: • Recording time: allows you to select a maximum recording time. • Equalize value: allows you to change the equalizer image on the Voice recorder screen.
-
Page 78: World Time (Menu 3.4)
Applications World time (Menu 3.4) This menu allows you to find out what time it is in another part of the world and set your local time zone. Viewing world time Press the Left or Right key to scroll through the world map. -
Page 79: Alarm (Menu 3.5)
Applications Alarm (Menu 3.5) This menu allows you to set an alarm to ring at a specific time. Setting an alarm 1. Choose a type of alarm, Morning call, Alarm1, or Alarm2 and press the Select soft key. 2. Select On in the Alarm field by pressing the Left or Right key and press the Down key. -
Page 80: Pim Sync (Menu 3.6)
Applications Activating the autopower alarm You can set your alarms to ring at the specified time, even if the phone is off. On the Alarm screen, scroll to Autopower and press the Select soft key. If the time for an alarm comes when the phone is off, the phone automatically switches on and rings the alarm. - Page 81 Applications • Normal Sync: the phone and PC/remote server exchange only newly added, changed, or deleted data. • Recovery Sync: the phone sends all of its data to the PC and the PC sends only data that the phone does not contain. •...
-
Page 82: Calculator (Menu 3.7)
Applications Edit sync profile: allows you to change the properties of the currently selected profile. Delete: allows you to delete the currently selected profile or all profiles. Calculator (Menu 3.7) With this feature, you can use the phone as a calculator. -
Page 83: Converter (Menu 3.8)
Applications Converter (Menu 3.8) Using this menu, you can do currency and other conversions. To use the converter: 1. Select the convertor type you want and press the Select soft key. 2. Select the original unit by pressing the Left or Right key and press the Down key. -
Page 84: Timer (Menu 3.9)
Applications Timer (Menu 3.9) In this menu, you can set a period of time for the phone to count down. The phone will alert you with an alarm when the specified period of time has expired. To set the timer: 1. -
Page 85: Stopwatch (Menu 3.0)
Applications Stopwatch (Menu 3.0) The stopwatch can be used to measure elapsed time. Example: Running or swimming races The precision of the stopwatch is one one-hundredth of a second. The maximum measurement time is 10 hours. To use the stopwatch: 1. -
Page 86: Browser
Browser Your phone is equipped with a WAP (Wireless Application Protocol) browser to allow you to access and navigate the Wireless Web using your phone. Home (Menu 4.1) Selecting this menu connects the phone to the network and loads the homepage of the Wireless Web service provider. - Page 87 Browser Entering text in the WAP browser When you are prompted to enter text, the currently active text input mode is indicated on the screen. For further details about how to enter characters, see page 33. Selecting and using browser menu options Various menu options are available when you are using the WAP browser to navigate the Wireless...
-
Page 88: Favorite (Menu 4.2)
Browser Show URL: displays the URL address of the Web page to which you are currently connected. It also enables you to set the current site as the startup home page. About...: provides you with information about your version of the WAP browser. Favorite (Menu 4.2) This menu allows you to store the URL addresses of... -
Page 89: Http
Browser http:// (Menu 4.3) This menu allows you to manually enter the URL address of a website that you wish to access. For further details about how to enter characters, see page 33. After entering the URL address you want to access, press the Enter soft key to go to the site. -
Page 90: Messages
Messages Using the Messages menu, you can use various message formats. The following types of message services are available: • Short Message Service (SMS): allows you to send and receive short text messages to and from other GSM mobile phones. In addition, your phone supports the Enhanced Messaging Service (EMS), which enables you to include simple pictures, melodies, and animated images in your... -
Page 91: Create New Message (Menu 5.1)
Messages Create new message (Menu 5.1) Using this menu, you can create and send an SMS MMS, or e-mail message. Text message (Menu 5.1.1) In this menu, you can write and send SMS messages. Creating a simple text message 1. Create your message. You can create a message using standard Alphabet characters or special Unicode characters, depending on the setting in the... - Page 92 Messages Send only sends the message. The message is then deleted after sending. You can save the message in the Drafts folder to send it later by selecting Save to drafts. Note: For further details about other options, see page 92. 4.
- Page 93 Messages Text style: allows you to format the text. The text attributes can combined. Language select: allows you to select a language to be used in T9 input mode. Input method: allows you to change the text input mode. Creating a long text message When you write a text message, the phone automatically splits it into several messages if your message exceeds the maximum number of...
- Page 94 Messages 4. Add a photo or video to the message by using the following options: • Add image: allows you to add one of the images stored in the phone’s memory or take and add a new photo. For details about the Camera feature, see page 133.
- Page 95 Messages Note: You will be billed for each phone number or e-mail address. 13.When you are finished, press the Options soft key. 14.Select Send and press the Select soft key. Using MMS content options While creating an MMS message, if you want to change any of added items, press the Up or Down key to highlight a field and press the Options soft key.
- Page 96 Messages Input method: allows you to change the text input mode. Add page: allows you to add more pages. You can move to each page by pressing the Left or Right key on the message screen. Delete page: allows you to delete the added page. Edit (page??): allows you to change the duration of page display or to move the page forward.
- Page 97 Messages 3. Enter the subject of your e-mail and press the key. For further details about entering characters, see page 33. 4. Select Done and press the key. 5. Press the Down key to move to the Message field and press the key.
- Page 98 Messages 12.Select Send only or Save and send and press the Select soft key. Send only sends the e-mail. The e-mail is then deleted after sending. Save and send first saves a copy of e-mail and then sends the e-mail. You can read it in the Outbox folder.
-
Page 99: My Messages (Menu 5.2)
Messages The following options are available: Add: allows you to add a subject, e-mail text, and media files. Edit: allows you to edit the subject of your e-mail or e-mail text. View: shows the attached file. Send: allows you to send the e-mail. Save to: saves the e-mail in the Drafts folder or one of folders you have created. - Page 100 Messages Viewing a message at the time of its receipt When a message has been received, the phone alerts you by: • Displaying a message icon and text notification. • Sounding a message tone, vibrating, or lighting, depending on the message alert setting. To read a message immediately, press the View soft key.
- Page 101 Messages Alternatively, you can access the following options by pressing the Options soft key: • View: opens a message. • Retrieve: retrieves an MMS message from the server. • Delete: deletes a message or all messages. • Move to my folder: move a message to one of folders you have created.
- Page 102 Messages • Cut address: extracts URL, e-mail addresses, or phone numbers from the message. • Cut media/Attach: extracts media items from the message to save them to your phone’s memory. • Protection: locks the message to keep it from being deleted. MMS messages •...
- Page 103 Messages Delivery report message • Delete: deletes the message. • Cut address: extracts URL, e-mail addresses, or phone numbers from the message text. • Protection: locks the message to keep it from being deleted. WAP push message • Go to URL: connects to the URL specified in the message.
- Page 104 Messages Press the Options soft key to access the following options: Edit: allows you to change and send the message. Delete: deletes a message or all messages. Move to my folder: move a message to one of folders you have created. Sort by: changes the sort order of the message.
- Page 105 Messages • Move to my folder: move a message to one of folders you have created. • Sort by: changes the sort order of the message. • Protection: locks a message to keep it from being deleted. • Properties: shows you information of an MMS message.
- Page 106 Messages Sent (Menu 5.2.4) This message folder is used to store messages that the phone has sent successfully. Using message options While reading a message, you can ac.cess the following options by pressing the Options soft key: Forward: allows you to forward the message to other destinations.
- Page 107 Messages Retrieving an e-mail 1. Press the Yes soft key when Check e-mail highlights to retrieve e-mail headers from the server. Note: You can set the phone to retrieve headers only or whole e-mails including headers and bodies in the Retrieve option. For details, see page 114.
- Page 108 Messages Using e-mail options Note: While you are retrieving e-mails from the e-mail server, some options are not available. While viewing an e-mail message, press the Options soft key to access the following options: Retrieve: allows you to retrieve the entire e-mail of the header.
-
Page 109: Templates (Menu 5.3)
Messages Creating a folder When you access the My folder menu, the phone prompts you to add a folder. 1. Press the OK soft key to confirm. 2. Enter the folder name and press the OK soft key. Using folder options After creating folders, you can access the following options by pressing the Options soft key from the folder list:... -
Page 110: Delete All (Menu 5.4)
Messages Using template options On the text template list, press the Options soft key to access the following options: Edit: allows you to change an existing text template. Send via: allows you to send a new message using the template. Delete: allows you to delete the template. -
Page 111: Settings (Menu 5.5)
Messages Settings (Menu 5.5) You can set up various options for using messaging services. Text messages (Menu 5.5.5) In this menu, you can set up default SMS message information. Common settings: provides you with the following options: • Reply path: allows the recipient of your message to send you a reply through your message centre, if your network supports this service. - Page 112 Messages Profile settings: allows you to set up the following properties in a profile. • Service centre: allows you to store or change the number of your SMS centre. You must obtain this number from your service provider. • Default destination: allows you to enter the default destination.
- Page 113 Messages • Delivery after: allows you to select a time delay before messages are sent. Receive settings: allows you to change the default settings for receiving a multimedia message. • Anonymous reject: the phone rejects messages from anonymous senders. • Adverts allowed: the phone accepts advertisement messages.
- Page 114 Messages • Read confirm: your phone sends a request for a reply along with your e-mail to the recipient. • Priority: you can select the priority level of your e-mail. • Include signature: attaches your name, phone number, a simple memo, or tag line as a signature to your e-mail.
- Page 115 Messages Block list: allows you to set up a filter list to rejects e-mails from the specified addresses or associated the specified subject. Email account: allows you to set up e-mail accounts and select an account to be used. • Current account: allows you to select one of the accounts.
- Page 116 Messages APOP login: (For POP3) when this option is checked, you can connect to the server by using the APOP login scheme. Include attachments: (For IMAP4) when this option is checked, you can receive attachments with e-mails from the server. Max retrieve E-mail: (For IMAP4) set the number of headers you will retrieve from the server.
-
Page 117: Memory Status (Menu 5.8)
Messages Channel list: allows you to indicate the channels from which you wish to receive CB messages. Please contact your service provider for further details. • Select: allows you to enable or disable channels. • Add channel: allows you to add new channels. •... -
Page 118: File Manager
File manager File manager allows you to access and manage the media files in your phone’s memory. Images (Menu 6.1) In this menu, you can view the photos you have taken and images downloaded from a web server or received in messages. Viewing an image 1. - Page 119 File manager Edit: allows you to edit the image by using the following options: • Emotions: allows you to add an emotion to the image. After selecting an emotion, you can move the emotion by pressing the Navigation keys. • Frames: allows you to apply a decorative frame to the image.
-
Page 120: Videos (Menu 6.2)
File manager Videos (Menu 6.2) In this menu, you can view the videos you have recorded or downloaded from the wireless web or received in messages. Playing a video clip 1. Select a video folder and press the Select soft key. -
Page 121: Music (Menu 6.3)
File manager Send via: allows you to send the video clip using the messaging feature or the Bluetooth feature. Delete: allows you to delete the selected video clip or all video clips. Rename: allows you to change the name of the video clip. - Page 122 File manager You can use the following keys while playing a file: Function pauses or resume playback. Left returns to the previous file. Right skips to the next file. Down stops playback. opens the play list. adjusts the volume level. changes the equalizer mode.
-
Page 123: Sounds (Menu 6.4)
File manager Rename: allows you to change the file name. Share for bluetooth: ?? Protection: locks the music file to keep it from being deleted. Properties: shows you information of the music file. Sounds (Menu 6.4) In this menu, you can access sound files you have recorded, downloaded from the wireless web, or received in messages. - Page 124 File manager Press the switch to Record Up key. mode stop Down key. Using Sound clip options Press the Options soft key to access the following options: Play: plays the voice memo. Send via: allows you to send the sound clip by using the messaging feature or the Bluetooth feature.
-
Page 125: Other Files (Menu 6.5)
File manager Other files (Menu 6.5) ????? Using file options Press the Options soft key to access the following options: Send via: allows you to send the file by using the messaging feature or the Bluetooth feature. Delete: allows you to delete the selected file or all files. -
Page 126: Organiser
Organiser The Organiser feature enables you to: • keep track of your schedule, anniversaries, and tasks and make a memo. • view missed alarm events. Scheduling a new event You can schedule up to 400 events for the calendar. More than one event per day can be scheduled. Entering a new schedule event 1. - Page 127 Organiser • End time: enter the ending time. • AM/PM: select AM or PM. This option is only available when the time format is set to 12- hour. • Location: enter information about the event location. • Alarm: press the key to set an alarm to remind you of the event.
- Page 128 Organiser • Alarm: press the key to set an alarm to remind you of the event • Before: set when the alarm will alert you before the day arrives; enter the number you want and select a unit. • Ringtone: enter the time when the alarm sounds.
-
Page 129: Consulting The Calendar
Organiser 4. Enter information you want or select the settings you want in the following field: • To do: enter information about the task. • Start date: enter the starting date. • Due date: enter the ending date. • Select priority: select a priority level. 5. -
Page 130: Viewing The Calendar In Different Views
Organiser When you access a day for which an event already exists on the calendar, a list of the events you have created displays in Day view. Scroll to an event and press the key to view its details. Using the calendar options The following options are available when you press the Options soft key: View mode: allows you to change the view mode of... - Page 131 Organiser Day view In Day view, the calendar shows the list of events for a day. The following icons may be shown depending on the event’s status. • : Alarm set for the event • : Recurring event • : Task of high priority •...
-
Page 132: Viewing Missed Alarm Events
Organiser • Green: Memos • Red: Tasks The pink-coloured cell indicates that there are schedule events for that time. Select any cell in the day you want to view and press the key. The Day view of that day displays. Viewing missed alarm events When you are unable to acknowledge an alarm for an event you have set, the phone displays a... -
Page 133: Camera
Camera Using the camera module embedded in your phone, you can take photos of people or events while on the move. You can also record videos using the phone as a camcorder. CAUTION: • Do not take photos of people without their permission. - Page 134 Camera 3. Press the key or the Camera key to take the photo. The photo automatically saves in the Photos folder. Note: Hold the phone still for 1 or 2 seconds after pressing the camera shutter key. It may take some time to process the image data. 4.
- Page 135 Camera • Mosaic shot: allows you to take several stills and save them in one frame. Select the number of still images the camera will take. The images will be saved in one frame, consisting of the multiple stills taken. Effects: allows you to change the colour tone of the photo.
- Page 136 Camera Using the keypad in Capture mode You can use the following keys to customise your camera settings when you are in Capture mode. Function Left/ adjusts the brightness of the image. Right zooms in or out. Down flips the image vertically. shows the mirror image.
- Page 137 Camera Using photo options After saving a photo, press the Options soft key to access the following options: Take another: returns to Capture mode. Send via: allows you to send the photo by using the messaging feature or the Bluetooth feature. Set as: allows you to set the photo as your wallpaper or as a caller ID image for an entry in Phonebook.
-
Page 138: Record Video (Menu 8.2)
Camera Record video (Menu 8.2) You can record a video of what is currently displayed on the camera screen and save it as a .3gp file. Recording a Video 1. When the camera turns on, adjust the image by aiming the camera at the subject. When you press the left soft key, you can use the camera options. - Page 139 Camera Using camera options in Record mode Press the Options soft key in Record mode to Access the following options for recording a video clip: Effects: allows you to change the colour tone or apply a special effect to the video clip. Flash: turn the flash on or off.
- Page 140 Camera Camcorder short cuts: shows you the functions of the keys you can use in Record mode. Using the keypad in Record mode You can use the following keys to customise your camera settings when you are in Record mode: Function zooms in or out.
- Page 141 Camera Using video options When you press the Options soft key after saving a video clip, the following options are available: Record another: returns to Record mode. Send via: allows you to send the video clip by using the messaging feature or the Bluetooth feature. Delete: allows you to delete the video clip.
-
Page 142: Go To Photos (Menu 8.3)
Camera Go to Photos (Menu 8.3) When you access this menu, a list of photos you have taken displays. Viewing a photo Scroll through the list using the Up or Down key. To view the selected photo, press the key. To go back to the photo list, press the Back soft key. -
Page 143: Go To Video Clips (Menu 8.4)
Camera Slide show: set all photos to automatically display one after another as a slide show. You can select a time interval between photos. Share for bluetooth: ?? Protection: locks the photo to keep it from being deleted. Properties: shows information of the photo. Go to Video clips (Menu 8.4) When you access this menu, a list of the videos you... - Page 144 Camera Using video clip options Press the Options soft key to access the following options: Play: plays the video clip. Send: allows you to send the video clip by using the messaging feature or the Bluetooth feature. Delete: allows you to delete the video clip or all video clips.
-
Page 145: Settings
Settings In this menu, you can customise your phone’s various settings, such as: • time and date setting • phone settings • display settings • sound settings • network services • Bluetooth settings • security settings • connection settings You can also reset the settings to their default values. -
Page 146: Phone Settings (Menu 9.2)
Settings Time format: allows you to select a time format, 12 hours or 24 hours. Set date: allows you to enter the current date using the number keys. Starting day of calendar: allows you to set which day of the week the calendar starts with. Phone settings (Menu 9.2) Many different features of your phone can be... - Page 147 Settings Short cut (Menu 9.2.3) The Navigation keys can be used as shortcut keys. In Idle mode, they allow you to access specific menus directly. To assign a shortcut to a key: 1. Press the key you want to use as a shortcut key and press the key.
-
Page 148: Display Settings (Menu 9.3)
Settings Anykey answer: when this option is enabled, you can answer an incoming call by pressing any key, except the key or the Reject soft key. To reject the call, press the key or the Reject soft key. When this option is set to Off, you must press the key or the Accept soft key to answer a call. - Page 149 Settings Skin (Menu 9.3.3) In this menu, you can select a skin colour pattern for Menu mode. Select one of 4 patterns. LCD brightness (Menu 9.3.4) You can adjust the brightness of the display to see it better in different lighting conditions. Back light (Menu 9.3.5) In this menu, you can select a length of time the...
-
Page 150: Sound Settings (Menu 9.4)
Settings Sound settings (Menu 9.4) You can customise various sound settings. Note: If the phone is in Quiet mode (see page 32), a confirmation message appears. Press the Yes soft key to listen to a sound when you change a sound setting. - Page 151 Settings Message tone (Menu 9.4.3) This menu allows you to set up the ringers for SMS, MMS, e-mail, and CB messages. For each message, the following options are available: Tone: allows you to use one of several message tones. Alert type: allows you to specify how you are informed of any incoming messages.
- Page 152 Settings Quiet mode (Menu 9.4.6) In this menu, you can select an alert type for incoming calls or messages when the phone is in Quiet mode. The following options are available: Vibration: the phone vibrates in Quiet mode. Mute: the phone mutes all sound settings in Quiet mode.
-
Page 153: Network Services (Menu 9.5)
Settings Network services (Menu 9.5) These menu functions access network services. Please contact your service provider to check their availability and then subscribe to them, if you wish. Call diverting (Menu 9.5.1) This network service enables incoming calls to be rerouted to a number that you specify. - Page 154 Settings 3. Press the Activate soft key. 4. Enter the number to which the calls are to be diverted and press the OK soft key. To enter an international code, press the 0 key until the + sign displays. 5. If you selected No reply in step 1, select the length of time the network delays before diverting a call and press the Select soft key.
- Page 155 Settings 3. Press the Options soft key and select Remove. 4. Press the Select soft key. Call barring (Menu 9.5.2) The call barring network service allows you to restrict your calls. Activating call barring options 1. Select a call barring option and press the Select soft key.
- Page 156 Settings 4. Enter the call barring password supplied by your service provider and press the OK soft key. The phone sends your settings to the network and the network’s acknowledgement displays. Changing the barring password 1. Select Change barring password and press the Select soft key.
- Page 157 Settings Call waiting (Menu 9.5.3) This network service informs you when someone is trying to reach you during another call. You can specify individual call waiting options for voice calls and/or data calls. To set your call waiting options: 1. Select the type of calls, voice or data, to which you want to apply the call waiting option and then press the Select soft key.
- Page 158 Settings To automatically or manually select the network to be used when roaming: 1. Select the appropriate option and press the Select soft key. If you select Automatic, you are connected to the first available network when roaming. If you select Manual, go to step 2. 2.
- Page 159 Settings Voice mail (Menu 9.5.6) This menu allows you to access your voice mail box, if your network supports this service. The following options are available: Connect to voice server: allows you to connect to your voice mail server and listen to your voice mails. Before using the voicemail feature, you must enter the voice mail server number obtained from your service provider.
- Page 160 Settings Add a new CUG index as advised by your service provider, or delete a group. Press the scroll through Up or Down key. existing CUG indexes add a new CUG index Options soft key select Add and enter the index. delete a CUG index Options soft key and select Delete.
-
Page 161: Bluetooth (Menu 9.6)
Settings Band selection (Menu 9.5.8) For the phone to make and receive phone calls, it must register with an available network. Your phone can handle any of the following types of networks: • GSM 1900 • Combined GSM 900/1800 The country where you purchased your phone determines the default band that it uses. - Page 162 Settings Since Bluetooth devices communicate using radio waves, your phone and the other Bluetooth device do not need to be in line of sight to each other. The 2 devices only need to be within a maximum of 10 meters of each other, although the connection can be subjected to interference from obstructions, such as walls or other electronic devices.
- Page 163 Settings Searching for and pairing a Bluetooth device 1. Select My devices from the Bluetooth setting options and press the Select soft key. 2. Press the Select soft key when Search new device highlights. If you have searched for devices before, the phone displays the More devices option along with the devices you have searched for previously.
-
Page 164: Security (Menu 9.7)
Settings Using device options When you press the Options soft key on the device list, you can access the following options: Browse files: allows you to search for data from other devices and take data directly to your phone. Rename: allows you to change the name of the paired device. - Page 165 Settings Change PIN (Menu 9.7.2) This feature allows you to change your current PIN to a new one, provided that the PIN Check feature is enabled. Phone lock (Menu 9.7.3) When the Phone Lock feature is enabled, the phone is locked and you must enter a 4- to 8-digit phone password each time the phone is switched on.
-
Page 166: Connect Settings (Menu 9.8)
Settings SIM lock (Menu 9.7.6) When the SIM Lock feature is enabled, your phone only works with the current SIM. You must enter the SIM lock code to use a different SIM card. To unlock the SIM card, you must enter the SIM lock code. - Page 167 Settings Changing a profile For each profile, the following options available: Profile name: enter a name that you wish to assign to the profile. Home URL: enter the address of the WAP homepage of your service provider. Proxy: activate or deactivate the proxy server. When you checked this option, the IP address and Port options are activated.
-
Page 168: Reset Settings (Menu 9.9)
Settings Using profile options From the profile list, press the Options soft key to access the following options: Edit: allows you to change properties of a profile. Delete: allows you to delete a profile. Add new connection: allows you to add a new profile. -
Page 169: Solving Problems
Solving problems If you are experiencing problems with your phone, perform the following simple checks, before contacting a service professional. This may save you the time and expense of an unnecessary service call. When you switch your phone on, the following messages may appear: Insert SIM card •... - Page 170 Solving problems “No Service,” “Network Failure” or “Not Done” displays • The network connection has been lost. You may be in a weak signal area (in a tunnel or surrounded by buildings). Move and try again. • You are trying to access an option for which you have not taken out a subscription with your service provider.
- Page 171 If the above guidelines do not help you to solve the problem, take note of: • the model and serial numbers of your phone • your warranty details • a clear description of the problem Then contact your local dealer or Samsung after- sales service.
-
Page 172: Access Codes
Access codes There are several access codes that are used by your phone and its SIM card. These codes help you protect the phone against unauthorised use. When requested for any of the codes explained below, enter the appropriate code (displayed as asterisks) and press the OK soft key. -
Page 173: Pin
Access codes The Personal Identification Number or PIN (4 to 8 digits) protects your SIM card against unauthorised use. It is usually supplied with the SIM card. If you enter an incorrect PIN three times in succession, the code is disabled and cannot be used until you re-enable it by entering the PUK (see below). -
Page 174: Pin2
Access codes PIN2 The PIN2 (4 to 8 digits), supplied with some SIM cards, is required to access specific functions, such as setting the maximum cost of a call. These functions are available if supported by your SIM card. If you enter an incorrect PIN2 three times in succession, the code is disabled and you cannot access the functions until you re-enable it by entering the PUK2. -
Page 175: Barring Password
Access codes Barring password A 4-digit barring password is required when you use the Call Barring function. You can obtain the password from your service provider when you subscribe to this function. You can change this password in the Call barring menu (Menu 9.5.2). -
Page 176: Health And Safety Information
Health and safety information SAR certification information Your wireless phone is a radio transmitter and receiver. It is designed and manufactured not to exceed the emission limits for exposure to radio frequency (RF) energy set by the Federal Communications Commission (FCC) of the U.S. Government. - Page 177 Health and safety information SAR tests are conducted using standard operating positions specified by the FCC with the phone transmitting at its highest certified power level in all tested frequency bands. Although the SAR is determined at the highest certified power level, the actual SAR level of the phone while operating can be well below the maximum value.
-
Page 178: For Body Operation
Health and safety information For body operation To maintain compliance with FCC RF exposure require- ments, use only belt-clips, holsters or similar accessories that maintain a 1.5 cm. separation distance between the user's body and the back of the phone, including the antenna. -
Page 179: Precautions When Using Batteries
• If left unused, a fully charged battery will discharge itself over time. • Use only Samsung-approved batteries and recharge your battery only with Samsung- approved chargers. When a charger is not in use, disconnect it from the power source. -
Page 180: Road Safety
Health and safety information • Do not short-circuit the battery. Accidental short- circuiting can occur when a metallic object (coin, clip or pen) causes a direct connection between the + and – terminals of the battery (metal strips on the battery), for example when you carry a spare battery in a pocket or bag. - Page 181 Health and safety information 4. Let the person you are speaking with know you are driving; if necessary, suspend the call in heavy traffic or hazardous weather conditions. Rain, sleet, snow, ice and even heavy traffic can be hazardous. 5. Do not take notes or look up phone numbers while driving.
-
Page 182: Operating Environment
Health and safety information posing no serious hazard, a broken traffic signal, a minor traffic accident where no one appears injured, or a vehicle you know to be stolen, call roadside assistance or any other special non-emergency wireless number. Operating environment Remember to follow any special regulations in force in any area and always switch your phone off whenever it is forbidden to use it, or when it may... -
Page 183: Electronic Devices
Health and safety information Electronic devices Most modern electronic equipment is shielded from radio frequency (RF) signals. However, certain electronic equipment may not be shielded against the RF signals from your wireless phone. Consult the manufacturer to discuss alternatives. Pacemakers Pacemaker manufacturers recommend that a minimum distance of 15 cm (6 inches) be maintained between a wireless phone and a... - Page 184 Health and safety information Other medical devices If you use any other personal medical devices, consult the manufacturer of your device to determine if it is adequately shielded from external RF energy. Your physician may be able to assist you in obtaining this information.
-
Page 185: Potentially Explosive Environments
Health and safety information Potentially explosive environments Switch your phone off when in any area with a potentially explosive atmosphere and obey all signs and instructions. Sparks in such areas could cause an explosion or fire resulting in bodily injury or even death. - Page 186 Health and safety information be possible on all wireless phone networks or when certain network services and/or phone features are in use. Check with local service providers. To make an emergency call: 1. If the phone is not on, switch it on. 2.
-
Page 187: Other Important Safety Information
Health and safety information Other important safety information • Only qualified personnel should service the phone or install the phone in a vehicle. Faulty installation or service may be dangerous and may invalidate any warranty applicable to the device. • Check regularly that all wireless phone equipment in your vehicle is mounted and operating properly. -
Page 188: Care And Maintenance
Health and safety information Care and maintenance Your phone is a product of superior design and craftsmanship and should be treated with care. The suggestions below will help you fulfill any warranty obligations and allow you to enjoy this product for many years •... -
Page 189: Acknowledging Special Precautions And The Fcc And Industry Canada N187Otice
Health and safety information • Do not paint the phone. Paint can clog the device’s moving parts and prevent proper operation. • Do not put the phone in or on heating devices, such as a microwave oven, a stove or a radiator. The phone may explode when overheated. - Page 190 Health and safety information Information to User This equipment has been tested and found to comply with the limits for a Class B digital device, pursuant to part 15 of the FCC Rules. These limits are designed to provide reasonable protection against harmful interference in a residential installation.
- Page 191 Appendix A: CERTIFICATION INFORMATION (SAR) Appendix A: CERTIFICATION INFORMATION (SAR) THIS MODEL PHONE MEETS THE GOVERNMENT’S REQUIREMENTS FOR EXPOSURE TO RADIO WAVES. Your wireless phone is a radio transmitter and receiver. It is designed and manufactured not to exceed the emission limits for exposure to radio frequency(RF) energy set by the Federal Communications Commission of the U.S.
- Page 192 Appendix A: CERTIFICATION INFORMATION (SAR) that it does not exceed the limit established by the government-adopted requirement for safe exposure. The tests are performed in positions and locations(e.g., at the ear and worn on the body) as required by the FCC for each model. The highest SAR values for this model phone as reported to the FCC are Head: 1.48W/Kg, Body- worn: 0.546W/Kg.
- Page 193 Appendix B: Guide to Safe and Responsible Wireless Appendix B: Guide to Safe and Responsible Wireless Phone Use Cellular Telecommunications & Internet Association “Safety is the most important call you will ever make.” A Guide to Safe and Responsible Wireless Phone Use TENS OF MILLIONS OF PEOPLE IN THE U.S.
- Page 194 Appendix B: Guide to Safe and Responsible Wireless users everywhere to make safety their first priority when behind the wheel of a car. Wireless telecommunications is keeping us in touch, simplifying our lives, protecting us in emergencies and providing opportunities to help others in need. When it comes to the use of wireless phones, safety is your most important call.
- Page 195 Appendix B: Guide to Safe and Responsible Wireless your first responsibility is to pay attention to the road. 5. Do not take notes or look up phone numbers while driving. If you are reading an address book or business card, or writing a “to do” list while driving a car, you are not watching where you are going.
- Page 196 Appendix B: Guide to Safe and Responsible Wireless 9. Use your wireless phone to help others in emergencies. Your wireless phone provides you a perfect opportunity to be a “Good Samaritan” in your community. If you see an auto accident, crime in progress or other serious emergency where lives are in danger, call 9-1-1 or other local emergency number, as you would want others to...
-
Page 197: Appendix C
Appendix C: Consumer Update on Wireless Phones Appendix C: Consumer Update on Wireless Phones U.S. Food and Drug Administration 1. What kinds of phones are the subject of this update? The term wireless phone refers here to hand-held wireless phones with built-in antennas, often called cell, mobile, or PCS phones. - Page 198 Appendix C: Consumer Update on Wireless Phones level RF that does not produce heating effects causes no known adverse health effects. Many studies of low level RF exposures have not found any biological effects. Some studies have suggested that some biological effects may occur, but such findings have not been confirmed by additional research.
- Page 199 Appendix C: Consumer Update on Wireless Phones Cooperate in providing users of wireless phones with the best possible information on possible effects of wireless phone use on human health FDA belongs to an interagency working group of the federal agencies that have responsibility for different aspects of RF safety to ensure coordinated efforts at the federal level.
- Page 200 Appendix C: Consumer Update on Wireless Phones 4. What is FDA doing to find out more about the possible health effects of wireless phone RF? FDA is working with the U.S. National Toxicology Program and with groups of investigators around the world to ensure that high priority animal studies are conducted to address important questions about the effects of exposure to radio frequency...
- Page 201 Appendix C: Consumer Update on Wireless Phones steps to minimize your exposure to radio frequency energy (RF). Since time is a key factor in how much exposure a person receives, reducing the amount of time spent using a wireless phone will reduce RF exposure.
- Page 202 Appendix C: Consumer Update on Wireless Phones that no evidence exists that using a wireless phone causes brain tumors or other ill effects. Their recommendation to limit wireless phone use by children was strictly precautionary; it was not based on scientific evidence that any health hazard exists. 7.
- Page 203 Appendix C: Consumer Update on Wireless Phones may interfere with proper operation of the phone. The phone may be forced to boost its power to compensate, leading to an increase in RF absorption. In February 2002, the Federal trade Commission (FTC) charged two companies that sold devices that claimed to protect wireless phone users from radiation with making false and unsubstantiated claims.
- Page 204 Appendix C: Consumer Update on Wireless Phones FDA continues to monitor the use of wireless phones for possible interactions with other medical devices. Should harmful interference be found to occur, FDA will conduct testing to assess the interference and work to resolve the problem. 10.What are the results of the research done already? The research done thus far has produced conflicting...
- Page 205 Appendix C: Consumer Update on Wireless Phones none of the studies can answer questions about long-term exposures, since the average period of phone use in these studies was around three years. 11.What research is needed to decide whether RF exposure from wireless phones poses a health risk? A combination of laboratory studies and epidemiological studies of people actually using...
- Page 206 Appendix C: Consumer Update on Wireless Phones Environmental Protection Agency (EPA): http://www.epa.gov/radiation/ Occupational Safety and Health Administration’s (OSHA): http://www.osha-slc.gov/SLTC/ radiofrequencyradiation/index.html National Institute for Occupational Safety and Health (NIOSH): http://www.cdc.gov/niosh/emfpg.html World health Organization (WHO): http://www.who.int/peh-emf/ International Commission on Non-Ionizing Radiation Protection: http://www.icnirp.de National Radiation Protection Board (UK): http://www.nrpb.org.uk...
-
Page 207: Standard Limited Warrant
Limited Warranty does not cover any battery if (i) the battery has been charged by a battery charger not specified or approved by SAMSUNG for charging the battery, (ii) any of the seals on the battery are broken or show evidence of tampering, or (iii) the battery has been used in equipment other than the SAMSUNG phone for which it is specified. - Page 208 All replaced parts, components, boards and equipment shall become the property of SAMSUNG. If SAMSUNG determines that any Product is not covered by this Limited Warranty, Purchaser must pay all parts, shipping, and labor charges for the repair or return of such Product.
- Page 209 Limited Warranty, or make additional warranties binding on SAMSUNG. Accordingly, additional statements such as dealer advertising or presentation, whether oral or written, do not constitute warranties by SAMSUNG and should not be relied upon. Samsung Telecommunications America, L.P.
-
Page 210: Glossary
Glossary To help you understand the main technical terms and abbreviations used in this booklet, and to take full advantage of the features of your mobile phone, here are a few definitions: Active folder Ability to answer a call simply by opening the phone. - Page 211 Glossary EMS (Enhanced Message Service) An adaptation of the Short Message Service (SMS) that allows you to send and receive ring tones and the service provider’s logo, as well as combinations of simple media to and from EMS-compliant handsets. Because EMS is based on SMS, it can use SMS centres the same way that SMS does.
- Page 212 Glossary Java Programming language generating applications that can run on all hardware platforms, whether small, medium or large, without modification. It has been promoted for and geared heavily to the Web, both for public Web sites and Intranets. When a Java program runs from a Web page, it is called a Java applet.
- Page 213 Glossary PIN (Personal Identification Number) Security code that protects the phone against unauthorised use. The PIN is supplied by the service provider with the SIM card. It may be a four to eight-digit number and can be changed, as required. Proxy server A proxy server resides between a Web client, such as a web browser, and a real Web server and acts...
- Page 214 Glossary SDN (Service Dialling Numbers) Telephone numbers supplied by your network provider and giving access to special services, such as voice mail, directory inquiries, customer support and emergency services. SIM (Subscriber Identification Module) Card containing a chip with all the information required to operate the phone (network and memory information, as well as the subscriber’s personal data).
- Page 215 Glossary Tri band Ability to handle any of the following types of network; GSM 900, GSM 1800, combined GSM 900/ 1800 and GSM 1900 MHz bands, for greater call success and wider roaming. Your phone automatically searches for the last network used.
- Page 216 Glossary Voice mail Computerised answering service that automatically answers your calls when you are not available, plays a greeting (optionally in your own voice) and records a message.
- Page 217 Glossary...
-
Page 218: Index
Index Calls answering • 30 Access codes • 172 barring • 155 Alarm • 79 diverting • 153 Alphabet mode, text input • holding • 39 making • 24 Anniversary redialling • 25 creating • 127 rejecting • 30 Answering transferring to call •... - Page 219 Index Keypad tones selecting • 150 Earpiece volume • 29 sending • 43 E-mail messages Keys creating/sending • 96 description • 11 reading • 106 location • 10 setting • 113 Emergency calls • 183 EMS (Enhanced Message Service) • 90 Language, select •...
- Page 220 Index Muting managing • 66 all sounds • 32 options • 59 key tones • 43 speed-dialling • 64 microphone • 43 storing • 60 My name card • 65 Photos deleting • 142 taking • 133 viewing • 142 Names changing •...
- Page 221 Index Safety Videos information • 176 deleting • 142 precautions • 7 recording • 138 Schedule Voice clarity, microphone • creating • 126 Sent messages Voice memos text • 104 deleting • 76 Short cut • 147 playing • 77 SIM card recording •...
- Page 222 Index...
- Page 225 Declaration of Conformity (R&TTE)
Need help?
Do you have a question about the SGH-E880 and is the answer not in the manual?
Questions and answers