Advertisement
Quick Links
Rain Collector Heater
Installation Manual
The Rain Collector Heater may be
used to protect the Rain Collector's
internal components from freezing
and/or to measure the moisture
content of snowfall. When the
heater is on, it is capable of
melting snow at a rate of 1/4''
(6 mm) of liquid precipitation per
hour. It may not be able to keep up
with larger rates of snowfall.
The rain collector heater warms
only the inside of the rain collector
and the cone itself.
Please note that we have made every attempt to design and manufacture a
safe product, but Davis Instruments assumes no liability for any injury or
damage caused directly or indirectly by the installation or use of this
product.
Note:
Although the nominal heater voltage is not hazardous, a short in the wall
transformer could cause hazardous voltage to appear on the heater
wires. For safety, you should always turn the heater's power unit to the
"OFF" position before removing the rain collector's cone. We also
recommend that you unplug the wall transformer before removing the
rain collector's cone.
This instruction manual is designed to take you step-by-step through the
process required to install and use your rain collector heater. Please take the
time to read through this manual before beginning the process.
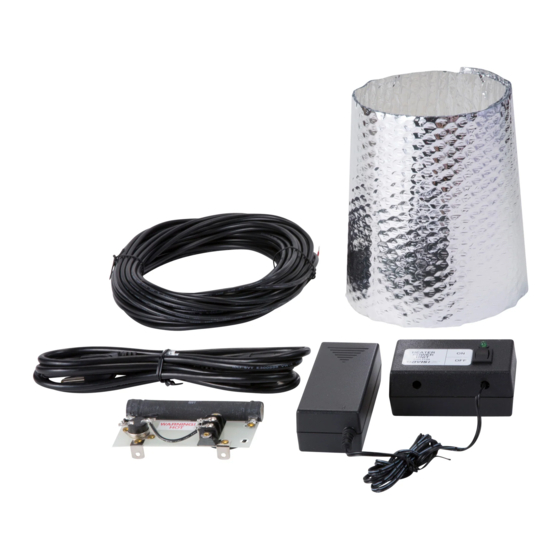
Components
The rain collector heater includes the following components. Please make
sure you have all listed components before continuing.
•
Heater Assembly — Includes heater element, thermostat, and terminal
block for power cable.
•
Wall Transformer with Power Unit
•
Insulation Blanket
•
50' (15 meter) Heater Cable
1
Advertisement

Related Manuals for Davis Instruments 7720

Summary of Contents for Davis Instruments 7720
- Page 1 Please note that we have made every attempt to design and manufacture a safe product, but Davis Instruments assumes no liability for any injury or damage caused directly or indirectly by the installation or use of this product.
-
Page 2: Tools And Materials Needed For Installation
Components The Installation Hardware Kit includes: • Three Cable Ties • Two #6-32 x 3/4” Screws • Two #6-32 Hex Nuts • Two #6-32 Split Lock Washers • Two #4 x 3/8'' Self-tapping Screws Heater Cable Heater Assembly 50' (15 meter) Cable Ties (3) Insulation Blanket #4 x 3/8"... - Page 3 Installing the Rain Collector Heater Choosing Cable for the Rain Collector Heater The rain collector heater comes with a 50-foot (15 m) length of 22 gauge cable. You may use 22 gauge, two-twisted pair wire for cable lengths up to 120 feet (36 m).
- Page 4 Installing the Rain Collector Heater Earlier versions of the rain collector did not come with built-in holes for the rain collector heater. If your rain collector does not have built-in holes you need to drill them yourself following the instructions below. Otherwise, skip to step 5.
- Page 5 Installing the Rain Collector Heater 5. Loosen the screw heads on the terminal block. You will eventually secure the heater cable wires underneath these screw heads. Terminal Block Terminal Block Screw Heads Rain collector heater terminal block...
- Page 6 Installing the Rain Collector Heater 6. Secure the heater assembly to the rain collector. For stand-alone rain collectors (#7852), secure the heater assembly to the rain collector base using the #6-32 x 3/4” (19 mm) screws, a lock washer, and a hex nut, as shown below. Securing the heater in a stand-alone rain collector Note: Stand-alone rain collectors are used with all Weather Wizard III, Weather...
- Page 7 Installing the Rain Collector Heater For Vantage Pro2 rain collectors, secure the heater assembly to the rain collector base using two #4 x 3/8 self-tapping screws, as shown below. #4 x 3/8" Self-tapping Screws Heater Assembly Knock-out Hole for Heater Cable Securing the heater in an Vantage Pro2 rain collector 7.
- Page 8 Installing the Rain Collector Heater 10.Bend each bare wire into a U-shape and secure each one under a screw head on the terminal block as shown below. It does not matter which wire goes to each screw as long as only one wire goes to each screw.
- Page 9 Installing the Rain Collector Heater 11.Secure the cable to the heater assembly by running a cable tie over the cable and through the hole as shown. You can cut off excess cable tie. Cable Tie Securing cable to heater 12.To provide strain relief for the cable, place a cable tie around the cable just above the hole through which this...
-
Page 10: Running The Cables
Powering the Heater Powering the Heater Running the Cables Run the heater cable from the rain collector to the location at which you plan to plug in the wall transformer/power unit. To prevent fraying or cutting of the cable, secure it so that it does not whip about in the wind. Use cable clips or weather resistant cable ties to secure the cable underneath the eaves of your house/building, or in a location similarly shielded from rain. - Page 11 Using the Rain Collector Heater 6. To provide strain relief for the cable, place a cable tie around the cable just inside the hole through which this cable is running as shown below. You may need to cut off the excess cable tie in order to close the power unit.
- Page 12 Rain Collector Heater Installation Manual Rev. F Manual (8/20/10) This product complies with the essential protection requirements of the EC EMC Directive 2004/108/EC. Davis Instruments Quality Management System is ISO 9001 certified. © Davis Instruments Corp. 2010. All rights reserved. ®...
Need help?
Do you have a question about the 7720 and is the answer not in the manual?
Questions and answers