Table of Contents
Advertisement
Available languages
Available languages
Quick Links
Advertisement
Chapters
Table of Contents

Related Manuals for Bigben TD120


Summary of Contents for Bigben TD120
- Page 1 PLATINE TOURNE-DISQUE Rev0 FR...
-
Page 2: Table Of Contents
TABLE DES MATIÈRES Consignes de sécurité importantes pour les appareils audio – À lire en rement ....... 1 Préc ............................3 Avant toute u lisa on........................4 Comment remplacer le saphir de la pla ne tourne-disque (l'aiguille) ........... 5 Présenta ............................. - Page 3 9. Transport – Cet appareil doit être déplacé avec précautions pour éviter tout dommage ou blessure. 10. Ventilation – Les fentes et évents du boîtier sont destinés à la ventilation pour permettre un fonctionnement fiable de l'appareil et pour le protéger des surchauffes. Ces orifices ne doivent être ni bouchés ni couverts.
-
Page 4: Préc
e. Si le produit est tombé ou est endommagé d'une manière ou d'une autre, et s'il présente un changement important de son fonctionnement indique la nécessité d'une réparation. 20. Pièces de remplacement – Lorsque des pièces de remplacement sont nécessaires, vérifier que le technicien d'entretien a utilisé... - Page 5 Précautions relatives à la sécurité MISE EN GARDE : Pour réduire le risque de feu ou de choc électrique, ne pas exposer cet appareil à la pluie ou à l'humidité. ATTENTION : L'utilisation de commandes, l'exécution de procédures ou de réglages autres que ceux qui sont décrits dans le présent document peuvent vous exposer à...
-
Page 6: Présenta
Comment remplacer le saphir de la pla tourne-disque (l'aiguille) Retrait du saphir usagé 1. Placer un tournevis à l'extrémité du saphir et pousser vers le bas dans le sens « A ». 2. Re rer le saphir en le rant vers l'avant et vers le bas. Installa d'un nouveau saphir 1. -
Page 7: Commande D'éclairage
RTIE I :Fon rincipales ligne 1. To ourner la mol le e de volum me dans le se ens an rair re pour baiss er le volume sonore de l'app pareil. Un déc clic se fait ent tendre. 2. Br rancher les fi... - Page 8 1. Allumer l'appareil. 2. Appuyer sur le bouton ON pour allumer la bande de LED la luminosité. couleurs. Remarque : permet de régler que la luminosité. régler que la vitesse de changement de couleurs. AVANT L'UTILISATION La télécommande permet de commander l'éclairage à LED à distance. Pour ce faire, diriger la télécommande vers la façade de l'appareil.
-
Page 9: Audacity Pour Windows
RTIE II.Log giciel Aud acity Le C D joint con e ent les logicie els suivants : (1)a udacity-src-2 .0.2--------- le e code source (2)A Audacity_for_ _MAC---------P Pour Macinto (3)A Audacity_for_ _WIN---------Po our Windows Le lo ogiciel est com avec c Windows 9 8, 2000, ME, XP, VISTA, 7 e e t le Macinto o sh. - Page 10 Inst tallation du logiciel Aud dacity 1. Sé électionner to out d'abord la a langue d'in stallation, pu uis cliquer sur r OK pour con ntinuer. 2. L' assistant d'in nstallation d'A Audacity s'aff fiche alors. Cl iquer sur Suiv vant pour ins staller le logic ciel.
- Page 11 4. Cl l iquer sur le b b outon Installer pour dém marrer l'install l ation.
- Page 12 5. Cl l iquer sur Suivant pour continuer.
- Page 13 6. Cl liquer sur Ter rminer pour t terminer l'inst tallation. 7. Il est maintena ant possible d d'ouvrir le log giciel Audacity y pour enreg istrer des fich hiers. MARQUE : Un e fois Audaci ty installé, il est inutile de e le réinstaller r lors de chaq que utilisation...
- Page 14 2. Cl liquer sur le b bouton ( ) pour lancer r la lecture ; 3. Cl liquer sur le b bouton ( ) pour arrête er l'enregistre ement ; 4. Cl liquer sur le b bouton ( ) pour passe r au début du u morceau ;...
- Page 15 3- Lancer l'enregistrement et appuyer sur le bouton d'enregistrement (le bouton rouge). L'enregistrement s'affiche en bleu. 4- Cliquer sur le bouton d'arrêt (le bouton jaune) pour arrêter l'enregistrement ;...
- Page 16 5- Pour enregistrer le fichier, dérouler le menu Fichier, puis cliquer sur l'option « Exporter... Fichiers MP3 ». 7- Il est possible, par exemple d'enregistrer votre fichier dans le dossier Musique.
- Page 17 8- Cliquez sur Enregistrer.Le fichier MP3 est conservé dans le menu Fichier - Fichiers récents. 9- Il est également possible de modifier les paramètres. 10- Le bouton Options permet de définir vos préférences.
-
Page 18: Guide De Dépannage
UIDE DE E DÉPAN NNAGE En c cas de problè ème avec ce t appareil, ve euillez consu ulter le guide e suivant ava ant d'en réfé rer à votr e détaillant. CUN SON : • Si le logiciel n'é émet aucun s son, retourne er dans les pr... - Page 19 mme illustré c ci-dessous. S Si le son enr registré est faible ou dis stordu, ajust er la réglett te du micr rophone. UVAISE QUAL LITÉ SONORE • Vé érifier que le saphir soit b ien fixé au br ras de lecture e.
- Page 20 Problème Cause Solution L'appareil ne se met L'appareil est Brancher l'appareil à pas en marche quand il débranché. l'alimentation en C.A. est mis sous tension. Le volume est baissé au Régler volume minimum. sonore. Aucun son ne sort des haut-parleurs. Le sélecteur d'entrée Resélectionner ne correspond pas à...
-
Page 21: Caractéris Techniques
Caractéris echniques on AMPLIFICATEUR Puissance de …………………………….. 0,8W + 0,8W Plage de fréquences……………………………………… 0 à 20 000 Hz PHONOGRAPHE Moteur……………………………………………………….… Moteur asservi en CC Système d'entraînement……………………………………………… Entraînement par courroie Vitesses……………………………………………..… 33-1/3 t/m, 45 t/m and 78 t/m Distorsion et pleurage…………………………………… Moins de 0,25 % (WTD) Rapport S/B……………………………………………..…... - Page 22 Fabriqué en Chine...
- Page 23 TURNTABLE Rev0 EN...
- Page 24 CONTENT IMPORTANT SAFETY INSTRUCTIONS FOR AUDIO PRODUCTS - READ THROUGH ......1 PRECAUTIONS ........................... 3 BEFORE USE ............................4 HOW TO REPLACE THE TURNTABLE STYLUS (NEEDLE) ..............4 LAYOUTS ............................5 PART I: MAIN FUNCTION ........................5 LINE OUT ............................5 PHONOGRAPH ...........................
- Page 25 6. Attachments - Do not use attachments not recommended by the product manufacturer as they may cause hazards. 7. Water and Moisture - Do not use this product near water-for example, near a bath tub, wash bowl, kitchen sink, or laundry tub, in a wet basement, or near a swimming pool, etc. 8.
- Page 26 c. If the product has been exposed to rain or water. d. If the product does not operate normally by following the opera ng inst Adjust only those controls that are covered by the opera ng inst as an improper adjustment of other controls may result in damage and will o en require extensive work by a qualified technician to restore the product to its normal opera on.
-
Page 27: Before Use
The exclama on point within an equilateral triangle is intended to alert user to the presence of important opera ng and maintenance (servicing) inst in the literature accompanying the appliance. (See markings on the back of the unit.) Safety caution: The normal function of the product may be disturbed by strong Electro-Magnetic Interference. -
Page 28: Layouts
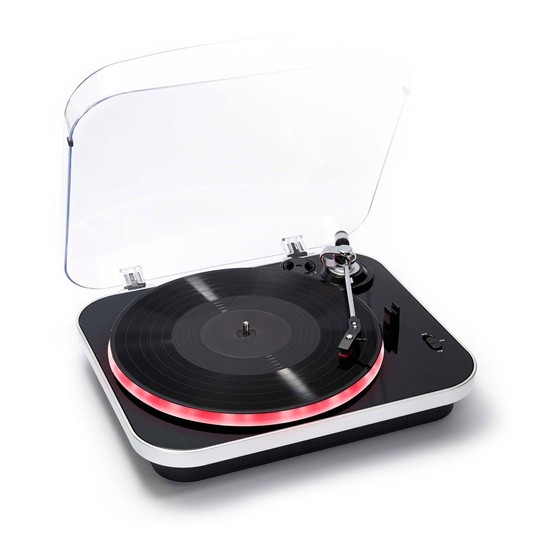
Layouts 1. 45 RPM ADAPTOR 2. TONE ARM CONTROL INDICATOR 3. DECORATION (NOT FOR ADJUSTMENT TO THE TONE ARM) 4. TONE ARM 5. TONE ARM REST 6. SPEED SELECTOR 7. STYLUS 8. NEEDLE COVER 9. TURNTABLE 10. ATMOSPHERE LIGHT 11. BUILT-IN SPEAKERS 12. -
Page 29: Lightning Control
4. Remove the white plas needle cover. Keep the needle cover in a safe and accessible place for future use. 5. Select the speed according to the record you are playing. and move tone arm to turntable, TONE ARM CONTROL INDICATOR will light up. Place tone arm on the edge of the record and the record starts playing. -
Page 30: Part Ii: Audacity Software
TO ACTIVATE THE REMOTE CONTROL: Now the remote control is ready to use. BATTERY REPLACEMENT: If the distance required between the remote control unit and main unit TO REPLACE WITH A NEW BATTERY: on the right. 2. Observing the correct polarity and put a 3Vdc lithium 3. - Page 31 2. There are five folders in the Audacity disk. Select Audacity_for_WIN for Windows system, and select Audacity_for_MAC for Macintosh system. 3. Double click the Audacity_for_WIN for Windows system, and double click the audacity-win-2.0.2 to install the audacity software. Installing the Audacity Software 1.
- Page 32 2. The Audacity Setup Wizard will appear. Click on Next to install the software. 3. Continue to click on the Next buttons.
- Page 33 4. Click on the Install button to start installation.
-
Page 34: Configuring Audacity For Microsoft Windows
5. Click on Next to continue. 6. Click on Finish to complete installation. 7. You can now open the Audacity software and start recording your files. NOTE: Once you set up Audacity, you do not need to re-set it with each use. (For additional information, visit the Audacity website at http://audacity.sourceforge.net) Configuring Audacity for Microsoft Windows Audacity Interface... - Page 35 Audacity Control Buttons the attribute controls button at the top of the screen to go to beginning, Pause, Play, Stop and Record etc. Use the File, Edit, View, Transport, Tracks, Generate, Effect and Analyze menus to Save, Export, and edit the music. 1.
- Page 36 HOW TO USE AUDACITY 1-Launch AUDACITY. your turntable place your record want encode. 3- Launch the record and push Record button (red one).
- Page 37 You can see the recording in blue. 4- Push Stop to stop the recording (yellow button). 5- To record your file, go into Files and then click on ‘Export as MP3’.
- Page 38 7- For example, you can record your file into Music. 8- Click on record. Your MP3 file is kept into your menu.
- Page 39 9- You can also change the settings you prefer. 10- The options menu opens to set your preferences.
-
Page 40: Troubleshooting Guide
TROUBLESHOOTING GUIDE If you experience any problems with your unit, kindly consult the following guide prior to calling your dealer. NO SOUND: • If you are not getting any sound into the software application, go back to the preferences as shown above and make sure that you have selected the USB Audio Controller for the recording device in the devices. - Page 41 Problem Cause Solution Power does not come Connect the unit to the on when the unit is Unit is unplugged. AC power supply. switch on. The volume is turned Adjust the volume. down (to MIN). No sound comes out of the speakers.
- Page 42 Specifica on AMPLIFIER se on Output Power……………………………………………..… 0.8W + 0.8W Frequency Response……………………………………… 60 TO 20,000 Hz PHONOGRAPH Motor……………………………………………………….…… DC servo motor Drive system…………………………………………………. Belt drive Speeds………………………………………………………….. 33-1/3 rpm, 45 rpm and 78 rpm Wow & Flu er………………………………………………. Less than 0.25% (WTD) S/N ra ……………………………..
- Page 43 Made in China...
- Page 45 TOCADISCOS Rev0 SP...
- Page 46 ÍNDICE Instrucciones importantes de seguridad para productos de sonido - leer atentamente ....1 Precauciones ............................. 3 Antes de su u lización ........................4 Cómo sus tuir la aguja del tocadiscos ..................... 5 Ubicación de los dis ntos elementos ....................5 PARTE I:Funcionamiento general .....................
- Page 47 colocarse sobre una cama, sofá, alfombra o superficie similar. Tampoco debe ubicarse en una instalación empotrada, como una librería o un estante a menos que ofrezca una ventilación adecuada o se respeten las instrucciones del fabricante. 11. Fuentes de alimentación: este producto sólo se debe utilizar con el tipo de fuente de alimentación que figura en la etiqueta.
-
Page 48: Precauciones
electrocución u otros riesgos. 21. Revisión de seguridad: una vez concluido el mantenimiento o la reparación, pídale al técnico de mantenimiento que realice comprobaciones de seguridad para determinar si el producto se encuentra en condiciones de funcionamiento adecuadas. Calor: no instale el equipo cerca de ninguna fuente de calor, como radiadores, rejillas de calefacción, estufas u otros aparatos (incluyendo los amplificadores) que puedan producir calor. -
Page 49: Antes De Su U Lización
Precauciones de seguridad ADVERTENCIA: Para reducir el riesgo de incendio o de descarga eléctrica, no deje expuesto el equipo a la lluvia o la humedad. PRECAUCIÓN: El uso de controles, ajustes u otros procedimientos diferentes a los aquí especificados podría provocar la exposición a una radiación peligrosa. PRECAUCIÓN ¡NO ABRIR: RIESGO DE DESCARGA ELÉCTRICA! Para reducir el riesgo de descarga eléctrica, no retire la cubierta ni la parte trasera. -
Page 50: Cómo Sus Tuir La Aguja Del Tocadiscos
Cómo sus tuir la aguja del tocadiscos Desmontaje de la aguja vieja 1. Ponga un destornillador en la punta de la aguja y empuje hacia abajo en dirección hacia «A». 2. Re re la aguja rando de ella hacia adelante y hacia abajo. Colocación de una nueva aguja 1. -
Page 51: Salida De Línea
RTE I:Func cionamien nto genera ida de líne 1. G ire el control de VOLUMEN N en sentido antihorario p para quitarle el volumen a al equipo. Se escu uchará un «cl ic». 2. U na los conect tores RCA de salida de líne ea a los conec ctores de ent... - Page 52 1. Encienda el equipo. 3. Pulse el botón Monocromo para seleccionar la luz que desee que permanezca encendida. También puede pulsar el botón Intensidad+/- para ajustar la intensidad luminosa. 4. Pulse el botón de selección de EFECTOS que desee como modo de iluminación. También puede pulsar el botón Velocidad+/- para ajustar la velocidad de cambio de color.
-
Page 53: Instalación De Audacity Y Conexión Usb
RTE II:Soft tware Aud dacity El CD D suministrad do incluye el siguiente soft tware: (1) A Audacity-src-2 2.0.2--------- P Para códigos f fuente (2) A Audacity_for_ _MAC---------P Para Macinto (3) A Audacity_for_ _WIN---------P Para Window El software es compatible con Windows 98, 2000, ME, XP, VISTA, 7 y Macintosh. NOTA:Audacity no es compatible con la última versión de MAC OS9. - Page 54 Inst talación del software A Audacity 1. S eleccione el idioma de c configuración n primero y, a continuac ción, haga cl lic en «OK» para cont tinuar. 2. Se e abrirá el As sistente de C Configuración n de Audacity y.
- Page 55 4. Ha a ga clic en el botón «Insta a lar» para inic ciar la instala ción.
- Page 56 5. Ha aga clic en «S Siguiente» pa ara continuar. 6. Ha aga clic en «F Finalizar» par ra completar la instalación n.
- Page 57 7. Ah hora puede a abrir el softwa are Audacity y comenzar a a grabar sus a archivos. TA: una vez ha aya configura ado Audacity, ya no tendrá á que volver a a hacerlo cad da vez que lo use.
- Page 58 5. Ha aga clic en el botón ( ) para ir al fin nal; 6. Ha aga clic en el botón ( ) para grabar 7. Aj juste el volum men de salida 8. Aj juste el volum men de entra CÓM MO UTILIZA AR AUDACIT...
- Page 59 3- Reproduzca el disco y haga clic en el botón Grabar (rojo). 4- Podrá ver el proceso de grabación en azul. 5- Haga clic en el botón Detener (amarillo).
- Page 60 6- Para grabar su archivo, vaya a «Archivo» y haga clic en «Exportar», eligiendo el formato Archivos MP3. 7- Por ejemplo, puede grabar su archivo en la carpeta «Mi Música».
- Page 61 8- Haga clic en «Aceptar».Su archivo MP3 quedará guardado en su menú. 9- También tiene posibilidad de cambiar los parámetros que prefiera. 10- El menú de opciones se abre para que pueda establecer sus preferencias.
-
Page 62: Guía De Resolución De Problemas
UÍA DE R RESOLU CIÓN D DE PROB BLEMAS En c aso de tener algún proble ema con el eq quipo, consu lte la siguient te guía antes s de contacta r con el ve endedor. NO H HAY SONIDO •... - Page 63 volu men, a la de erecha del to odo, tal y com mo se muestr ra abajo. Si v ve que el son nido de graba ación está bajo o se en cuentra disto orsionado, aju uste el contro ol deslizante d del micrófono LA CALIDAD D DEL SONIDO:...
- Page 64 Problema Causa Solución No hay alimentación Conecte el equipo al El equipo está cuando el equipo está suministro eléctrico desenchufado encendido (CA) El volumen está bajo (al Ajuste del volumen MIN) No sale sonido por los altavoces El selector de entrada Vuelva a seleccionar la no corresponde a la fuente...
- Page 65 AMPLIFICADOR Potencia de salida ………………………………………… 0,8 W + 0,8 W Respuesta de frecuencia ……………………….……… 60-20.000 Hz TOCADISCOS Motor …………………………………………………………… Servomotor de CC Sistema de transmisión …………………………..……. Transmisión por correa Velocidades ………………………………………………….. 33-1/3 rpm, 45 rpm y 78 rpm Ululación y vibración ……………………………………. Inferiores a 0,25% (ponderado) Relación señal-ruido ……………………………………..
- Page 66 • Llévelos a un punto de recogida para este material, ya que algunas piezas de estos aparatos pueden ser dañinos para la salud o el medio ambiente. Importado por BIGBEN INTERACTIVE SA Fabricado en China 396, Rue de la Voyette...
- Page 67 GIRADISCHI Rev0 IT...
- Page 68 SOMMARIO Importan istruzioni sulla sicurezza dei prodo audio – Leggere a entamente ......2 Precauzioni ............................3 Operazioni preliminari all’u lizzo ....................4 Sos tuzione della pun del giradischi ..................5 Descrizione dei componen e dei comandi ..................5 PARTE I –Funzionalità principale ...................... 6 Collegamento uscita “Line Out”...
- Page 69 Importanti istruzioni sulla sicurezza dei prodotti audio – Leggere attentamente Quando si utilizzano apparecchi elettrici, è necessario attenersi sempre alle precauzioni di base. Prestare particolare attenzione alle seguenti raccomandazioni: 1. Leggere le istruzioni: leggere tutte le istruzioni di sicurezza e d’uso prima di mettere in funzione il prodotto.
-
Page 70: Precauzioni
elettriche ad alta tensione o di altri circuiti elettrici adibiti a illuminazione o ad alimentazione né in luoghi in cui potrebbero cadere ed entrare in contatto con tali linee o circuiti elettrici. Durante le fasi di installazione di antenne esterne, è estremamente necessario assicurarsi di non toccare tali linee o circuiti elettrici, in quanto qualsiasi contatto potrebbe risultare letale. - Page 71 qualificato e cessare l’utilizzo del prodotto. Precauzioni per la sicurezza AVVERTENZA Per ridurre il rischio di incendi o scosse elettriche, non esporre questo apparecchio alla pioggia o all’umidità. ATTENZIONE L’utilizzo di comandi, regolazioni, prestazioni o procedimenti diversi da quelli specificati può...
-
Page 72: Sos Tuzione Della Pun Del Giradischi
prodo o per un periodo di tempo prolungato (per esempio, in caso di vacanze). 8. Conservare il presente manuale di istruzioni in un luogo sicuro per qualsiasi riferimento futuro. Sos tuzione della pun na del giradischi Rimozione della pun usata 1. -
Page 73: Parte I -Funzionalità Principale
PARTE I –Funzionalità principale Collegamento uscita “Line Out” 1. Ruotare la manopola di controllo del VOLUME in senso an rario per disa vare il volume dell’unità. L’arresto della manopola è segnalato da uno sca o. 2. Collegare gli spino di uscita RCA “Line Out” alle prese degli ingressi ausiliari (“Aux”) dell’amplificatore in uso. - Page 74 - Quando si seleziona il LED monocolore, il tasto luminosità/velocità serve solo per regolare la luminosità. dissolvenza del colore. OPERAZIONI PRELIMINARI ALL’UTILIZZO telecomando, puntarlo verso il pannello anteriore dell’unità. • Anche se il telecomando è in grado di funzionare entro la portata del funzionamento, il telecomando stesso.
- Page 75 dacity per r Window 1. In nserire nel le e ore del PC C in uso il CD D contenente e il ware Audacity for rnito in dotaz zione l’unità. Aprir e “Esplora Ris sorse”, cercar re il compute er e fare dopp pio clic sull’un nità...
- Page 76 2. V Verrà visualiz zata la proce edura di inst tallazione gu uidata del so oftware Auda a city. Fare clic su “Ava anti” per insta allare il softw ware. 3. Fa are clic su “Av vanti” nelle sc chermate suc ccessive.
- Page 77 4. Fa are clic sul pu u lsante “Installa” per avvia are l’installazi i one del softw ware.
- Page 78 5. Fa are clic su “Av vanti” per pro oseguire. 6. Fa are clic su “Fi ne” per term inare l’install lazione. 7. Sa arà quindi po ssibile aprire il software A Audacity e ini ziare la regist trazione dei f file.
- Page 79 Puls anti di contro ollo di Audaci Util izzare i puls santi di contr rollo visualizz zati nella par rte superiore e della scherm mata per pas ssare all’in nizio del bran no, attivare l a pausa, la r riproduzione, l’arresto, la registrazione e, ecc.
- Page 80 UTILIZZO DI AUDACITY 1- Avviare AUDACITY. 2- Accendere il giradischi e collocare sul piatto il disco che si intende codificare.
- Page 81 3- Avviare la riproduzione del disco e premere il pulsante “Registra” (pulsante rosso). La registrazione dei canali eseguita viene visualizzata con una traccia sonora di colore blu.
- Page 82 4- Premere il pulsante “Ferma” (pulsante giallo) per interrompere la registrazione. 5- Per eseguire la registrazione del file, accedere al menu “File” e fare quindi clic sull’opzione “Esporta come MP3”.
- Page 83 7- Ad esempio, è possibile salvare il file nella cartella “Musica”. 8- Fare clic su “Registra”.Il file MP3 viene mantenuto all’interno del menu. 9- È inoltre possibile modificare le impostazioni desiderate.
- Page 84 Per impost tare le pre ferenze, ac ccedere all’o opzione “P Preferenze.. .” presente e nel nu “Modific ca”. SOLUZIO ONE DE I PROBL LEMI lora si verific cassero dei pr roblemi con l’unità, consu ultare la guid a alla risoluz ione riportat a qui di se...
- Page 85 Verif ficare che il c cursore relat ivo al microfo ono sia posiz zionato al ma assimo volum me (tutto spo stato sulla a destra com me illustrato nell’immagin ne qui sotto) ). Se l’audio da registrar e risulta bas sso o disto orto, regolare...
- Page 86 Problema Causa Soluzione Nessuna alimentazione L’unità non è collegata Collegare l’unità quando si accende alla rete elettrica. all’alimentazione CA. l’unità. volume è stato Regolare il volume. disattivato (livello MIN). altoparlanti L’ingresso selezionato riproducono alcun Selezionare mediante il selettore suono. nuovamente non corrisponde alla sorgente ingresso...
-
Page 87: Specifiche Tecniche
Specifiche tecniche AMPLIFICATORE Potenza in uscita………………………………………..… 0,8 W + 0,8 W Risposta in frequenza…………………………………… da 60 a 20.000 Hz GIRADISCHI Motore…………………………………………………….…… servomotore DC Sistema di trasmissione…………………………………. trazione a cinghia Velocità……………………………………………………….. 33-1/3 giri/min, 45 giri/min e 78 giri/min Wow e Flu er………………………………………………. inferiore allo 0,25% (WTD) Rapporto segnale/rumore…………………………….. - Page 88 Depositare gli apparecchi presso un apposito punto di raccolta. • Alcuni componenti contenuti in questi apparecchi possono essere pericolosi per la salute e per l’ambiente. Importato da BIGBEN INTERACTIVE SA 396, Rue de la Voyette CRT2 - FRETIN Prodotto in Cina...
- Page 89 GIRA-DISCOS Rev0 PT...
- Page 90 ÍNDICE Instruções de segurança importantes para produtos áudio - Ler todo o documento ....1 Precauções ............................3 Antes da ização ........................... 4 Como subs a agulha do gira-discos ..................4 Pinos de guia (dentro) ........................4 Layout ...............................4 PARTE I:Função principal ........................5 Saída..............................5 Gramofone ............................5 Controlo de luz ..........................5...
- Page 91 9. Transporte - Este produto deve ser transportado com cuidado para evitar danos ou lesões. 10. Ventilação - Todas as ranhuras e aberturas presentes na estrutura foram disponibilizadas para a ventilação para garantir uma operação fiável do produto e para o proteger de sobreaquecimento.
-
Page 92: Precauções
técnico de reparação utilizou as peças de substituição especificadas pelo fabricante ou com as mesmas características do que a peça original. As substituições não autorizadas podem resultar em incêndio, choque elétrico ou outros perigos. 21. Verificação de segurança - Após a manutenção ou reparação do produto, peça ao técnico para executar as verificações de segurança para determinar se o produto está... -
Page 93: Antes Da Ização
Antes da zação 1. Escolha o local da instalação da unidade com atenção. Evite a colocação do aparelho sob luz direta do sol ou perto de uma fonte de calor. Evite também locais sujeitos a vibrações ou pó, frio ou humidade em excesso. Mantenha o aparelho longe de fontes que zumbam, como transformadores ou motores. -
Page 94: Saída
13. CONTROLO VOLUME 14. CABO DE SAÍDA RCA 15. ENTRADA USB 16. CABO DE ALIMENTAÇÃO CA 17. CAPA ANTIPÓ RTE I:Funç ção princi Saíd 1. Ro ode o botão V VOLUME no s contr rário aos pont teiros dos rel lógios para de esligar o volu da u... - Page 95 1. Ligar a unidade. 2. Prima o botão LIGAR para acender a faixa LED. 3. Prima o botão de unicolor para selecionar uma luz permanente. E pode premir o botão aumentar ou diminuir a luminosidade para a ajustar. 4. Prima o botão de seleção de efeitos para selecionar o modo de luminosidade. E pode premir o botão de aumentar ou diminuir a velocidade para ajustar a velocidade de conversão de cor.
-
Page 96: Instalação Do Audacity E Ligação Usb
RTE II:Soft tware Aud dacity O CD D incluso incl ui o seguinte ware: (1)a udacity-src-2 .0.2--------- Pa ara códigos fo onte (2)A Audacity_for_ _MAC---------P Para Macintos (3)A Audacity_for_ _WIN---------Pa ara Windows O so o ware é com mpa vel com Window 98, 2000, ME, XP P, VISTA, 7 e M... - Page 97 Inst talação do s software Au udacity 1. Se elecione prim meiro a língua de configura ação e clique em OK para continuar. 2. É aberto o Ass istente de co nfiguração do o Audacity. C Clique em Seg guinte para in n stalar o softw ware. 3.
- Page 98 4. Cl l ique no botã ã o Instalar para iniciar a in stalação.
- Page 99 5. Cl l ique em Segu u inte para co o ntinuar.
- Page 100 6. Cl lique em Con ncluir para fin alizar a insta lação. 7. Ag gora pode ab brir o softwar e Audacity e começar a gr ravar os fiche eiros. TA: Assim que e configurar o o Audacity, nã ão precisa de o reconfigur rar antes de c cada utilizaçã...
- Page 101 3. Cl lique no botã ão ( ) para a parar a grav vação; 4. Cl lique no botã ão ( ) para a saltar para o início; 5. Cl lique no botã ão ( ) para a saltar para o fim;...
- Page 102 3- Inicie o disco e prima o botão Gravar (vermelho). Pode ver a gravação a azul. 4- Prima o botão Stop para parar a gravação (botão amarelo).
- Page 103 5- Para gravar o ficheiro, em Ficheiro clique em Exportar como MP3. 7- Por exemplo, pode gravar o ficheiro como Música.
- Page 104 8- Clique em Gravar.O ficheiro MP3 é guardado no menu. 9- Também pode mudar as definições desejadas. 10- No menu de opções pode alterar as suas preferências.
-
Page 105: Guia De Resolução De Problemas
UIA DE R RESOLU ÇÃO DE E PROBL LEMAS Caso o tenha probl lemas com a unidade, con nsulte o segui inte guia ante es de contact tar o forneced dor. FALT TA DE SOM: • Ca aso não tenha a som na apli cação de soft tware, volte... - Page 106 MÁ QUALIDADE DE SOM: • Ve eja se a agulh a está fixa no o braço. A ag ulha deve est tar conectada a ao braço se empre que ut tilizar o gir ra-discos. • Ce ertifique-se d e que as entr radas RCA est tão ligadas a uma fonte e...
-
Page 107: Especificações
Especificações Secção do AMPLIFICADOR ç a o ã saída………………………………… 0.8W + 0.8W frequência……………………………… 60 A 20 000 Hz Secção FONÓGRAFO Motor……………………………………………………….…… Motor servo CC controlo…………………………………… Transmissão por correias Velocidades…………………………………………………… 33-1/3 rpm, 45 rpm e 78 rpm ç a o ã velocidade………………………………... - Page 108 • Entregue-os no ponto de recolha. • Algumas partes deste aparelho podem ser perigosas para a saúde e para o ambiente. Importado pela BIGBEN INTERACTIVE SA Fabricado na China 396, Rue de la Voyette CRT2 - FRETIN CS 90414 59814 LESQUIN Cedex - França...
- Page 109 PLATTENSPIELER Rev0 DE...
- Page 110 INHALT Wich ge Sicherheitsanweisungen für Audio-Produkte - bi e sorgfä lesen ......1 Vorsichtsmaßnahmen ........................3 Vor der Benutzung ..........................4 Austausch der Nadel ........................5 Layouts .............................. 5 TEIL I:Haup ........................6 Line ..............................6 Betrieb des Pla enspielers ......................6 Fernbedienung zur Beleuchtungssteuerung ...................
- Page 111 werden. 9. Transport - Dieses Gerät muss mit äußerster Vorsicht bewegt werden, um Beschädigungen bzw. Verletzungen zu vermeiden. 10. Lüftung - Schlitze und Öffnungen im Gehäuse dienen zu Lüftungszwecken. Hiermit wird ein zuverlässiger Betrieb es Gerätes gewährleistet und das Gerät wird vor Überhitzung geschützt. Diese Öffnungen dürfen nicht versperrt oder bedeckt werden, etwa wenn das Gerät auf ein Bett, ein Sofa, einen Teppich oder eine ähnliche Oberfläche gestellt wird.
-
Page 112: Vorsichtsmaßnahmen
erfordert. e. das Gerät auf den Boden gefallen ist oder in sonstiger Weise beschädigt wurde und das Gerät erhebliche Leistungseinbußen aufweist, die auf einen Reparaturbedarf schließen lassen 20. Ersatzteile - Wenn Ersatzteile erforderlich sind, vergewissern Sie sich, dass Aderservicetechnikerdie vom Hersteller angegebenen Ersatzteile bzw. Ersatzteile mit gleichwertigen Eigenschaften wie die Originalteile verwendet. -
Page 113: Vor Der Benutzung
WARNUNG: Zur Vermeidung von Brand- oder Stromstoßgefahr sollte das Gerät von Regen und Feuchtigkeit ferngehalten werden. ACHTUNG: Änderungen Reglern, Einstellungen Verfahren, dieser Bedienungsanleitung nicht beschrieben sind, können zu schädlicher Strahlung führen. VORSICHT STROMSTOSSGEFAHR - NICHT ÖFFNEN Zur Reduzierung einer Stromstoßgefahr darf das Gehäuse nicht geöffnet werden. Im Inneren des Gerätes befinden sich keine Teile, die von Endnutzern repariert werden können. -
Page 114: Austausch Der Nadel
Austausch der Nadel En ernen der alten Nadel 1. Setzen Sie einen Schraubenzieher auf die Spitze der Nadel und drücken Sie die Nadel in Richtung “A” nach unten. 2. En ernen Sie die Nadel, indem Sie sie nach vorne und anschließend nach unten ziehen. -
Page 115: Teil I:haup
L I:Hauptf Line 1. D rehen Sie den n VOLUME-Re egler gegen d den Uhrzeige rsinn, um das s Gerät leiser r zu stellen bz stum mm zu schalte en. In der Nu llstellung ist e ein Klickgeräu usch zu hören 2. - Page 116 1. Schalten Sie die Fernbedienung ein. 4. Wählen Sie mit der EFFECTS-Taste einen der verfügbaren Beleuchtungseffekte. Sie können nun mit den BRIGHTNESS/SPEED-Tasten können Sie die Übergangszeit beim Farbwechsel einstellen. Hinweis: - Wenn Sie die einfarbige LED wählen, wird mit den BRIGHTNESS/SPEED-Tasten nur die Helligkeit eingestellt.
-
Page 117: Audacity Für Windows
L II:Audac city-Softw ware Die m mitgelieferte CD enthält fo olgende Softw ware: (1) A Audacity-src-2 2.0.2--------- Q Quellcodes (2)Audacity_for_MAC---------Für Macintosh (3)Audacity_for_WIN---------Für Windows Die Software ist kompatibel mit Windows 98, 2000, ME, XP, VISTA, 7 und Macintosh. HINWEIS:Audacity unterstützt nicht das neueste Upgrade von MAC OS9. Wegen der unterschiedlichen Betriebssysteme sieht die Benutzeroberfläche bei Ihnen möglicherweise anders als abgebildet aus. - Page 118 Inst tallation der r Audacity S Software 1. W Wählen Sie zun nächst die Be enutzersprach he, bevor Sie den Vorgang g mit OK forts setzen. 2. D Das Setup-Fe enster von A Audacity ersc cheint. Klicke en Sie auf Weiter, um die Softwar re zu insta...
- Page 119 4. Kl l icken Sie auf f Installieren, um die Insta llation zu star rten.
- Page 120 5. Kl l icken Sie zur Fortsetzung auf Weiter.
- Page 121 6. Kl licken Sie auf f Fertigstellen n zum Abschlu uss der Instal lation. 7. S Sie können nun Audaci ity auf Ihre m Compute er starten u und mit der r Aufnahme udio-Dateien beginnen. HINW WEIS: Audac city bleibt a auf Ihrem R Rechner.
- Page 122 spei chern, zu exp portieren und d zu bearbeite 1. Kl licken Sie auf ), um di e Aufnahme zu unterbrec chen. 2. Kl licken Sie auf ), um di e Wiedergab e zu starten. 3. Kl licken Sie auf ), um di e Aufnahme zu stoppen.
- Page 123 3) Starten Sie die Aufnahme, indem Sie auf Aufnahme klicken (rote Schaltfläche). Sie können nun in blau sehen, wie die Aufnahme verläuft. 4) Klicken Sie auf Stopp, um die Aufnahme zu stoppen (gelbe Schaltfläche).
- Page 124 5) Zur Aufnahme der Datei wählen Sie im Menü Datei die Option "Exportieren". 7) Sie können nun Ihr Musikstück als Audiodatei abspeichern.
- Page 125 8) Klicken Sie auf Aufnahme.Ihre MP3-Datei wird in Ihrem Menü gehalten. 9) Sie können auch die Einstellungen nach eigenen Vorstellungen angleichen. 10) Im Menü Einstellungen können Sie Ihre Vorzugseinstellungen angeben.
- Page 126 LFE ZUR R PROBL LEMLÖS SUNG nn Sie Proble eme mit Ihre m Gerät hab ben, lesen Sie e bitte zunäc chst folgende e Hinweise d urch, bevo or Sie Ihren H Händler anruf fen. KEIN N TON • We enn kein Ton in die Softwa are übertrage...
- Page 127 ildung). Wen nn die Aufna ahme zu leise e oder verze errt klingt, än ndern Sie di e Einstellung g des Mikr rofonreglers. LECHTE KLAN NGQUALITÄT: • Pr üfen Sie, ob die Nadel or rdnungsgemä äß am Tonarm m eingerastet t ist.
- Page 128 Problem Ursache Lösung Gerät lässt sich nicht Das Gerät ist nicht an Schließen Sie das Gerät einschalten (kein die Steckdose an die Stromversorgung Strom). angeschlossen Die Lautstärke ist zu Stellen gering (MIN-Stellung). Lautstärke ein Kein Lautsprechern Eingangswahlfunktion Stellen ist nicht auf die richtige Tonquelle richtig ein.
-
Page 129: Technische Daten
Technische Daten VERSTÄRKERTEIL Ausgangsleistung……………………………..…………. 0.8W + 0.8W Frequenzbereich ………………………………………… 60 BIS 20.000 Hz PHONO-TEIL Motor……………………………………………………….…… Gleichstrom-Servomotor: Antriebssystem……………………………………………… Riemenantrieb Geschwindigkeiten………………………………………… 33-1/3 U/Min., 45 U/Min. und 78 U/Min. Gleichlaufschwankungen ......... Weniger als 0,25% (WTD) Signal-Rausch-Verhältnis………………………………. Mehr als 35dB Tonabnehmer……………………………………………….. Keramischer Stereo-Tonabnehmer Nadel……………………………………………………………. 402-M208-165 Ausgangsleistung………………………………………….. - Page 130 • Bringen Sie sie zu einer entsprechenden Sammelstelle. • Einige Komponenten in diesen Geräten können gesundheits- und umweltschädlich sein. Importiert von BIGBEN INTERACTIVE SA 396, Rue de la Voyette CRT2 - FRETIN CS 90414 Made in China 59814 LESQUIN Cedex - Frankreich...
- Page 131 DRAAITAFEL Rev0 NL...
- Page 132 INHOUD Belangrijke veiligheidsinstruc voor audioproducten: gelieve door te lezen ......1 Voorzorgsmaatregelen ........................3 Vóór gebruik ............................. 4 De naald van de draaitafel vervangen ..................... 5 Indeling ............................. 5 DEEL I:Hoofdf ........................6 Line Out ............................. 6 Platenspeler ............................6 Lichtbediening ..........................
- Page 133 10. Ventilatie - De sleuven en openingen in de kast zijn voor de ventilatie, garanderen een betrouwbare werking van het product en beschermen het product tegen oververhitting. Deze openingen mogen niet worden geblokkeerd of bedekt. U mag de openingen nooit blokkeren door het product op een bed, bank, tapijt of gelijksoortig oppervlak te zetten.
-
Page 134: Voorzorgsmaatregelen
de monteur de onderdelen heeft gebruikt die door de fabrikant zijn opgegeven, of in ieder geval dezelfde kenmerken hebben als het originele onderdeel. Niet-toegestane vervangende onderdelen kunnen leiden tot brand, elektrische schok of andere gevaren. 21. Veiligheidscontrole - Na onderhoud of reparatie aan dit product vraagt u de monteur om veiligheidscontroles uit te voeren, om te bepalen of het product op de juiste manier werkt. -
Page 135: Vóór Gebruik
Veiligheidsmaatregelen WAARSCHUWING: Om de kans op brand of elektrische schokken te verkleinen, dient u deze apparatuur niet bloot te stellen aan regen of vocht. WAARSCHUWING: Het gebruik van bedienings het aanbrengen van wijzigingen of het uitvoeren van procedures die niet in dit document zijn gespecificeerd, kan leiden tot blootstelling aan gevaarlijke straling. -
Page 136: De Naald Van De Draaitafel Vervangen
7. Om dit product volledig uit te schakelen, haalt u het netsnoer uit het stopcontact. Haal de stekker uit het stopcontact als u van plan bent om de eenheid lange niet te gebruiken, zoals een vakan e. 8. Bewaar de handleiding op een veilige plek ter referen e. De naald van de draaitafel vervangen De oude naald verwijderen 1. -
Page 137: Line Out
EL I:Hoofd dfunc es Line e Out 1. D raai de VOLU ME-knop teg gen de klok in n om het volu ume van de ee enheid omlaa ag te draaien hoor rt uiteindelijk k een “klikken nd” geluid. 2. Sl uit de RCA lin ne out-aanslu gen aan o... - Page 138 1. Schakel de eenheid in. 2. Druk op de ON-knop om de LED-strip in te schakelen. up- of down-knop drukken om de helderheid in te stellen. down-knop drukken om de kleurconversiesnelheid in te stellen. 5. Druk op de OFF-knop om de LED-strip uit te schakelen. Opmerking: - Als u een eenkleurige LED selecteert, kunt u met de Brightness/Speed-knop alleen de helderheid instellen.
-
Page 139: Deel Ii:de Ware Audacity
DEE EL II:De so o ware Audacity Op de meegeleverde cd-schijf vindt u de volgende software: (1) audacity-src-2.0.2--------- Voor broncodes (2) Audacity_for_MAC--------- Voor Macintosh (3) Audacity_for_WIN--------- Voor Windows De software is compatible met Windows 98, 2000, ME, XP, Vista, 7 en Macintosh. OPMERKING:Audacity biedt geen ondersteuning voor de nieuwste upgrade Mac OS9. - Page 140 De s software Au udacity inst alleren 1. Se electeer de in nstallatietaal en klik op OK K om door te gaan. 2. De e set-upwizar rd van Audac city verschijnt t. Klik op Volg gende om de software te i i nstalleren. 3.
- Page 141 4. Kl l ik op de knop p Installeren om de install latie te starte e n.
- Page 142 5. Kl l ik op Volgend d e om door t t e gaan.
- Page 143 6. Kl lik op Voltooi en om de ins stallatie te vo ltooien. 7. U kunt nu de s oftware Auda acity openen n om uw besta anden te gaa n opnemen. MERKING: Zo odra u Audac city heeft gec configureerd , hoeft u de software ni...
- Page 144 dacity confi gureren vo or Microsof ft Windows Inte rface van Aud dacity Bedi ieningsknopp pen van Auda acity bruik de re egelknoppen n boven in n het sche rm om naa ar het beg gin te gaan n, te uzeren, af t te spelen, t te stoppen,...
- Page 145 GEBRUIK AUDACITY 1- Start AUDACITY. 2- Zet de draaitafel aan en leg de plaat erop die u wilt coderen.
- Page 146 3- Start de plaat en druk op de (rode) Record-knop. 4- U ziet de opname in het blauw. 5- Druk op Stop (gele knop) om de opname te stoppen.
- Page 147 6- Om uw bestand op te slaan, gaat u naar Bestanden en klikt u op ‘Exporteren’. 7- U kunt uw bestand bijvoorbeeld in Mijn muziek zetten.
- Page 148 8- Klik op Opnemen.U vindt het mp3-bestand in het menu. 9- U kunt ook diverse instellingen verrichten. 10- Het optiemenu wordt geopend. Hier kunt u uw voorkeuren instellen.
- Page 149 ROBLEM MEN OPL LOSSEN Raad dpleeg bij pro oblemen met t de eenheid de volgende gids alvorens s de dealer te e bellen. N GELUID: • Al ls u geen ge eluid in de s softwaretoep assing hoort t, gaat u ter ug naar de voorkeuren zoals...
- Page 150 Probleem Oorzaak Oplossing De voeding doet het De stekker zit niet in Sluit de eenheid aan op niet als de eenheid het stopcontact. de netvoeding. wordt ingeschakeld. Het volume staat laag Pas het volume aan. (op MIN). Er komt geen geluid uit de luidsprekers.
-
Page 151: Specifica Es
Specifica es VERSTERKER Uitgangsvermogen…………………………………..… 0,8 W + 0,8 W Frequen erespons.……………………………………… 60 TOT 20.000 Hz PLATENSPELER Motor……………………………………………………….…… Gelijkstroomservomotor Aandrijfsysteem…………………………………………. Riemaandrijving Snelheden………………………………………………….. 33-1/3 toeren, 45 toeren en 78 toeren Wow & flu er………………………………………………. Minder dan 0,25% (gewogen) S/R-verhouding………………………………………….. Meer dan 35 dB Type naaldkop.……………………………………………….. - Page 152 • Breng ze naar een verzamelpunt. • Sommige onderdelen in deze apparatuur kunnen gevaarlijk zijn voor de gezondheid en het milieu. Geïmporteerd door BIGBEN INTERACTIVE SA 396, Rue de la Voyette CRT2 - FRETIN Made in China CS 90414 59814 LESQUIN Cedex - Frankrijk...
Need help?
Do you have a question about the TD120 and is the answer not in the manual?
Questions and answers