Advertisement
Quick Links
Franklin Electric Co., Inc.
Oklahoma City, OK 73157-2010
www.franklinwater.com
CustomerService@lgpc.com
INTRODUCTION
EN
This instruction sheet provides you with the information required to
safely own and operate your product. Retain these instructions for
future reference.
The product you have purchased is of the highest quality
workmanship and material, and has been engineered to give you
long and reliable service. This product has been carefully tested,
inspected, and packaged to ensure safe delivery and operation.
Please examine your item(s) carefully to ensure that no damage
occurred during shipment. If damage has occurred, please contact
the place of purchase. They will assist you in replacement or repair,
if required.
READ
THESE
INSTRUCTIONS
ATTEMPTING
TO
INSTALL,
YOUR PRODUCT. KNOW THE PRODUCT'S APPLICATION,
LIMITATIONS,
AND
POTENTIAL
YOURSELF AND OTHERS BY OBSERVING ALL SAFETY
INFORMATION.
FAILURE
INSTRUCTIONS COULD RESULT IN PERSONAL INJURY AND/
OR PROPERTY DAMAGE!
SAFETY GUIDELINES
WARNING: Disconnect the pump and all submerged electrical
components before performing any operation in the water. If the
plug or socket is wet, disconnect the breaker before removing the
power cord.
Do not use to pump flammable or explosive fluids such as gasoline,
fuel oil, kerosene, etc. Do not use in explosive atmospheres. Pump
should only be used with liquids compatible with pump component
materials.
Do not handle pump with wet hands or when standing on a wet or
damp surface or in water.
For DC (direct current) versions, when attaching pump leads to
battery terminals, be sure that the area is adequately ventilated to
prevent an explosion or fire from explosive or flammable vapors
that may be present. Consult the battery manufacturer for additional
safety information.
Batteries emit hydrogen gas, which is explosive. Avoid smoking,
sparks, or open flame anywhere in batteries' vicinity.
Explosion from battery can cause blindness. Shield eyes when
working near any battery.
Batteries contain sulfuric acid. In case of contact with eyes, skin
or clothing, flush immediately with large amounts of water and get
medical attention.
Do not add acid or electrolyte to a battery.
Keep out of reach of children.
ELECTRICAL CONNECTIONS
1. Check the pump label for proper voltage required. Do not
connect to voltage other than that shown.
2. For DC (direct current) versions, when using a battery as the
power source, attach the red positive (+) lead wire to the
positive (+) battery terminal, followed by attaching the black
negative (–) lead wire to the ground (–) battery terminal. When
disconnecting the pump, first disconnect the black negative
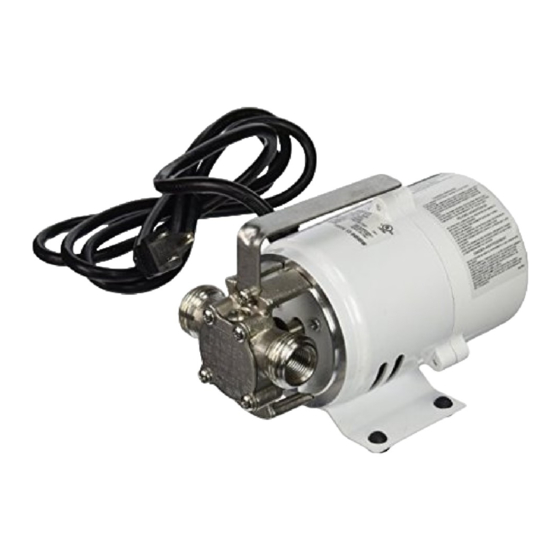
PONY PUMP
REPAIR KIT
CAREFULLY
BEFORE
OPERATE,
OR
SERVICE
HAZARDS.
PROTECT
TO
COMPLY
WITH
WARNING
WARNING
(–) lead wire from the battery ground (–) terminal, and then
disconnect the red positive (+) lead wire from the positive (+)
battery terminal.
3. To operate properly, the DC (direct current) version pump must
be connected to a steady DC power source or a battery in good
condition supplying the proper voltage according to the pump
label. Low voltage power source may cause critical overheating
and premature failures. To avoid this condition, be sure proper
voltage is maintained.
CAUTION: Disconnect the pump from the power source when
making adjustments and repairs. On DC (direct current) versions,
first disconnect the black negative (–) lead wire, and then disconnect
the red positive (+) lead wire.
1. TO REPLACE IMPELLER: Replace impeller when it has become
worn or damaged.
a. Remove 4 volute cover mounting screws (1).
b. Remove volute cover (2) and gasket (3).
c. Slide impeller (4) off motor shaft.
d. Clean the inside of the pump head and the gasket sealing
surface. Make certain that there are no foreign materials that
THESE
would obstruct the impeller's operation.
e. Apply petroleum jelly or similar lubricant to the inside of
the pump head using cotton swab. Do not get lubricant on
gasket sealing surface; this surface must be lubricant-free.
f. Align the flat on the inside of the impeller (4) shaft bore with
the flat on the motor shaft. Push the impeller into place, while
twisting the impeller vanes in a clockwise rotation.
g. Place new gasket (3) onto pump head face, align holes, and
replace cover (2).
h. Tighten cover mounting screws (1) evenly and snugly.
2. TO REPLACE CAM: Replace cam (5) when it has become worn
or damaged.
a. Remove impeller (4) according to step 2.
b. Remove handle mounting screw (not shown) and handle.
c. Remove cam screw (7) and cam screw gasket (6).
d. Gasket sealant is used between cam and pump head, and
will require that the cam be pried from pump head. Be careful
not to damage the cover gasket sealing surface.
e. Clean the gasket sealant from the pump head.
f. Apply gasket sealant to new cam (5) and mating surface of
pump head.
g. Install new cam into pump head. Install new cam screw
gasket (6) and secure new cam with new cam screw (7).
Tighten new cam screw snugly to prevent leakage.
h. Clean any excess gasket sealant from pump head.
i. Reinstall handle and handle mounting screw.
j. Install impeller (4) according to step 2.
3. TO REPLACE SHAFT SEAL: Replace shaft seal (8) when it has
become worn or damaged.
a. Remove pump head mounting screws (not shown) and slide
pump head off of motor shaft. Do not remove slinger washer
(11) from motor shaft.
b. Pry retaining ring (10) from the backside of the pump head.
MAINTENANCE
WARNING
Form 998245 - 06/2013, Rev. 001
1
Advertisement

Related Manuals for Little Giant HRK-360S


Summary of Contents for Little Giant HRK-360S
- Page 1 (–) lead wire from the battery ground (–) terminal, and then disconnect the red positive (+) lead wire from the positive (+) battery terminal. PONY PUMP 3. To operate properly, the DC (direct current) version pump must Franklin Electric Co., Inc. Oklahoma City, OK 73157-2010 REPAIR KIT be connected to a steady DC power source or a battery in good...
- Page 2 c. Remove the felt washer (9) and shaft seal (8) from seal bore in the pump head. d. Install new shaft seal and new felt washer into seal bore in the pump head. e. Press new retaining ring (10) into seal bore in the pump head.
- Page 3 TROUBLESHOOTING PROBLEM PROBABLE CAUSES CORRECTIVE ACTION 1. No power or incorrect voltage 1. Supply correct voltage 2. Brushes worn out 2. Replace defective part Pump will not run 3. Motor has open circuit 3. Replace defective part 4. Motor overheated 4.
- Page 4 For technical assistance, please contact ....1.800.701.7894 www.franklinwater.com CustomerService@lgpc.com...