
Summary of Contents for Zxtech GF-L300PRO
- Page 1 Floodlight Camera User Manual GF-L300PRO Thank you for purchasing our products. This manual addresses the safety guidelines, warranty and operating instructions. Please review this manual thoroughly before operating your device.
-
Page 2: Table Of Contents
Contents Package Contents ............. 1 At a Glance..............2 Setting Up Your Floodlight Camera ......4 Using Your Floodlight Camera........14 Specifications ............23 FAQs ................ 25 Safety and Warranty ..........26... -
Page 3: Package Contents
Package Contents Floodlight Camera User Manual GF-L300PRO Thank you for purchasing our products. This manual addresses the safety guidelines, warranty and operating instructions. Please review this manual thoroughly before operating your device. ① ⑦ Floodlight Camera x 1 Waterproof Rubber Cap x 6 ②... -
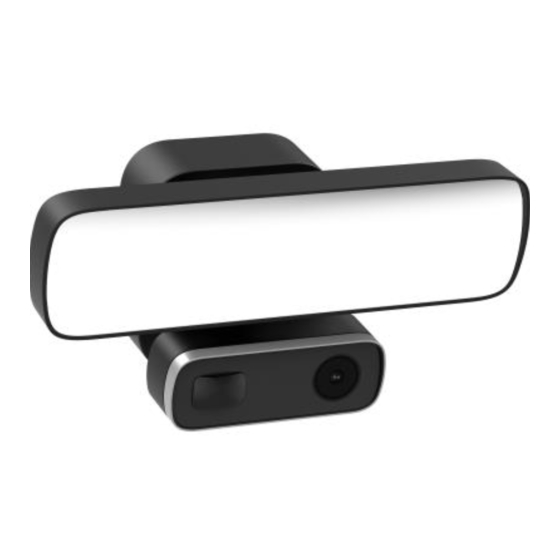
Page 4: At A Glance
At a Glance Floodlight Camera PIR Sensor Lens Light Sensor (Night Vision Mode) Infrared Light... - Page 5 Floodlight Adjustment Knob Base Micro SD Card Slot Micro SD Card Slot Cover Reset Button Camera Lock Collar...
-
Page 6: Setting Up Your Floodlight Camera
Setting Up Your Floodlight Camera Before installation, please check the location where you want to install the floodlight. The installation height will influence the motion sensor’s performance and the viewing angle of the camera. When the motion detector is installed at a distance of 3 meters (9 feet) from the ground, and an angle of 30 degrees to the ground, it can detect human-sized objects at up to 8 meters (26 feet). - Page 7 Parallel to groud 30° 26 feet (8 Meters)
- Page 8 Installation Guide Please note: ● If you are not sure about how to correctly assemble this device, consult with a licensed electrician. The wiring transition shall be strictly in compliance with the local regulations, rules and national electrical codes. ● Do not connect it to a dimmer switch or timer. ●...
- Page 9 Step 2: Remove the mounting bracket 1) Undo the screws with a screwdriver by turning counterclockwise. 2) Remove the mounting bracket. Step 3: Install the waterproof rubber gasket on the mounting bracket Align the four corners of the gasket with the four corners of the mounting bracket and press these four corners to fix the gasket on the bracket.
- Page 10 Step 4: Mark the mounting location Use a pen to mark the screw holes after determining the mounting location. We recommend you use a level to make sure alignment to ground is correct. Step 5: Select a proper place for drilling 1) Drill a hole in the mounting place that does not influence plumbing, electrical cables or other building services.
- Page 11 Step 6: Fix the mounting bracket on the mounting area 1) Push all the wires through the large opening of the bracket carefully. 2) Tighten the screws to fix the bracket on the mounting area. Pay attention to the horizontal position on the top. White (Neutral) Black (Hot) Green (Ground)
- Page 12 Step 7: Connect the power wire 1) Connect the ground wire coming out of your junction box to the yellow wire (ground) with tag. 2) Use a wire nut (included) to connect the white wire (neutral) to the neutral wire coming out of your junction box.
- Page 13 Step 8: Install the floodlight camera onto the bracket 3) Align the mounting posts with the holes on the floodlight camera and press them together. 4) Secure the floodlight by screwing the screws clockwise.
- Page 14 Step 9: Put the waterproof rubber cap on the screw hole...
- Page 15 Step 10: Adjust the angle of the floodlight and camera Loosen or tighten the screw to further adjust the angle of the floodlight and the camera. After adjusting the angle of the camera and floodlight, put the waterproof rubber cap on the screw hole.
-
Page 16: Using Your Floodlight Camera
Step 11: Turn on the power to the floodlight at the fuse box Using Your Floodlight Camera Preparation Please prepare the following stuff before using this floodlight camera. A smartphone or tablet using IOS 12.0 / Android 6.0 or higher (A Mac or Windows PC will not work with this product). - Page 17 2.4G Wi-Fi A Wi-Fi router (2.4GHz) The Green LED Indicator Status Indicator Activity System State The Green LED indicator turns on, and Power On you can hear a voice prompt three times after about 40 seconds. Power off / Wi-Fi is connected The Green LED indicator goes out.
- Page 18 Installing and Taking Out the Micro SD Card Please note: ● To ensure the stable video recording of the Micro SD card, we recommend that you use a Micro SD card (not included) that is Class 10 or above. ● To make sure the device works normally, please format the Micro SD card before using it.
- Page 19 Add a camera to the app Before adding a camera to the app, please check the following points: ● Turn on the DHCP of the router. Your MAC address should be off. DHCP allows the floodlight to automatically connect to the internet. ●...
- Page 20 2) Name the camera and scan the camera’s UID (the QR code on the bottom of the camera, or the tag in the package). AT&T 11:57 AM AT&T 11:57 AM Device Name Scan QR Code Light Scan the QR code on the back housing. What would you like to name the device? BackYard...
- Page 21 AT&T 11:57 AM Input WiFi Password Cancel Test1 WiFi SSID: Please input WiFi password WiFi Password: 3) Enter the correct name Next and password of the Wi-Fi (2. 4GHz). AT&T 11:57 AM Configure Device 4) Put your smartphone or tablet close to the camera within 3 meters (9 feet).
- Page 22 Please note: Turn up the volume of your smartphone or tablet to the maximum when configuring. AT&T 11:57 AM Configure Device 5) Wait for about 60 seconds and the configuration is 100% done (the Green LED indicator turns off when the configuration is Configure complete! successful).
- Page 23 Device Interface AT&T 11:57 AM My Device 2018/01/01 08:30 View Photos and Videos Remote Notification Oneline Settings BackYard Floodlight Switch QR Code Live Video Viewing Interface AT&T 11:57 AM BackYand 2018/01/01 08:30 AUTO Emergency Call Siren (110 dB) Siren Floodlight Switch View Photos and Videos Storage...
- Page 24 AT&T 11:57 AM Return BackYand 2018/01/01 08:30 Ring the bell Full screen Microphone LD/HD Switch Recording Snapshot Snapshot Record Speak Switch display Talk (Sliding switch Storage (Long tap to talk) function) Reset the floodlight camera If you fail to connect the camera to the app or want to replace the Wi-Fi system, you can reset the camera.
-
Page 25: Specifications
Specifications LED Specification Power Consumption Beam Angle 120° Color Temperature 5000 kelvin Illumination 2400 lux Life Time 20,000 hours Camera Specification Pixel 2 Megapixels Minimum Illumination 0.3 lux f=3.6mm, F=2.0, Horizontal angle Lens of view:120° PIR Detection Angle 120° Video Specification Video Compression Type H.264 / MJPEG H.264 Encoding Type... - Page 26 Network Specification Port Protocol ONVIF TCP / IP, HTTP, TCP, ICMP,UDP, Support Protocol ARP, IGMP, SMTP, FTP, DHCP, DNS, DDNS, NTP, UPNP, RTSP Wi-Fi Specification WiFi802.11 b/g/n Wi-Fi connection Wireless Standard @ 2.4GHz only Frequency Range 2.4 GHz ~ 2.4835 GHz Outdoor: 20 meters Transmission Distance Indoor: 10 meters (sensitive to...
-
Page 27: Faqs
FAQs Please refer to the FAQ list in the iObsurv app. AT&T 11:57 AM My Device Open the app, then tap " " AT&T 11:57 AM My Device Feedback Product instructions Tap " FAQ " to enter the FAQ page... -
Page 28: Safety And Warranty
Safety and Warranty Safety Instructions ● Turn the power off before inspection, installation or removal. ● Do not install this product on an unstable platform or bracket to prevent it from falling, which may cause serious equipment damage and personal injury. ●... - Page 29 ● Make all electrical and grounded connections following the National Electrical Code (NEC) and any applicable local code requirements. ● The manufacturer will not be deemed liable or held responsible for any damage caused by faults or manufacturing defects that may be present in any of its products or the misuse or incorrect installation of the device.
Need help?
Do you have a question about the GF-L300PRO and is the answer not in the manual?
Questions and answers