Table of Contents
Advertisement
Available languages
Available languages
Advertisement
Table of Contents

Related Manuals for TaoTronics TT-TF009


Summary of Contents for TaoTronics TT-TF009
- Page 1 尺寸:210*140mm 胶装 封面128g铜版纸,内页80g书纸...
-
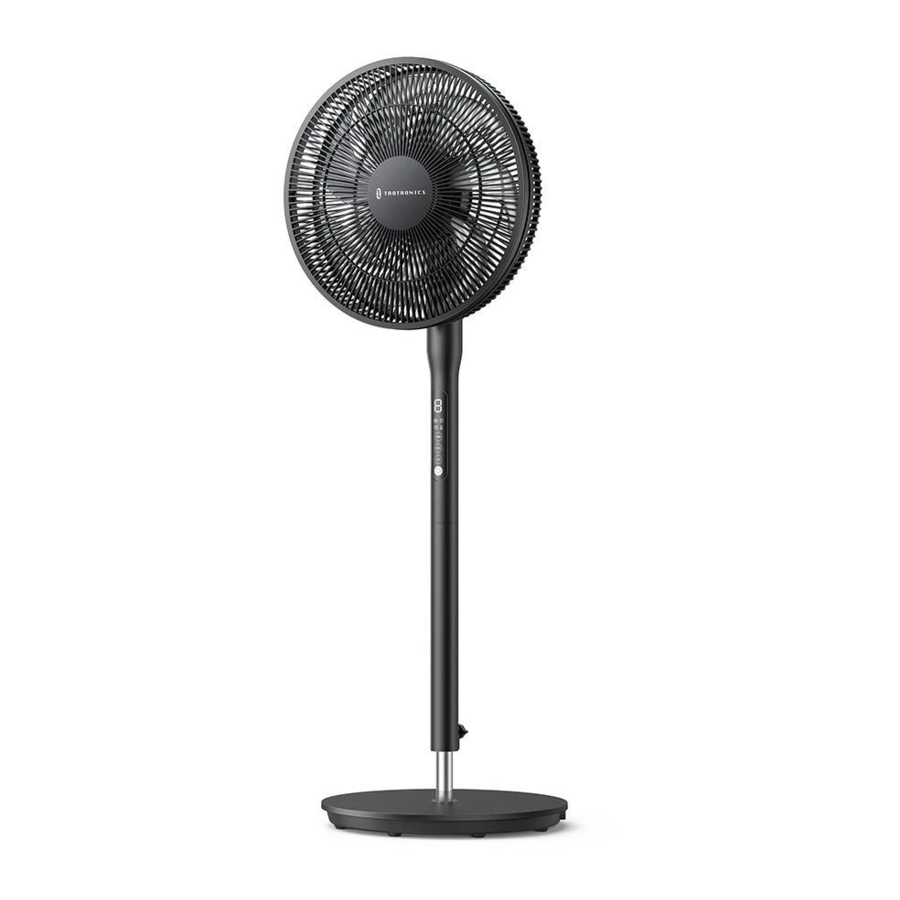
Page 2: Stand Fan
STAND FAN Questions or Concerns? TT-TF009 User Manual support@taotroincs.com... - Page 3 THANK YOU F O R B E I N G O U R C U S T O M E R Your purchase is truly appreciated! We hope you are over-the-moon with our product!
- Page 4 01-14 43-56 English Español 15-28 57-70 Deutsch Italiano 29-42 Français...
-
Page 5: Important Safety Instructions
01/EN IMPORTANT SAFETY INSTRUCTIONS BEFORE USING THIS APPLIANCE READ ALL INSTRUCTIONS AND CAUTIONARY MARKINGS IN YOUR USER MANUAL AND ON THE APPLIANCE. WHEN USING AN ELECTRICAL APPLIANCE, BASIC PRECAUTIONS SHOULD ALWAYS BE FOLLOWED, INCLUDING THE FOLLOWING: DO NOT block or DO NOT insert DO NOT touch or cover air flow to or... -
Page 6: Intended Use
02/EN 03/EN INTENDED USE household purposes as described in RELATED TO USE modify or replace any part any part of your this User Manual. Any other use is not product. All servicing should be performed • Avoid contacting moving parts. Wait until •... -
Page 7: Specifications
Check if • Plug, cord or appliance is damaged. User Manual • Excessive noise, unpleasant odor or Stand Base abnormal heat. Regular Check Stop using, check FAQ and contact Washer TaoTronics Support Team. User Manual Connection Bolt (attached on Pole) -
Page 8: Assembling Your Fan
06/EN 07/EN Assembling Your Fan 1) Position the Rear Grille onto the Head Assembly. Tighten with the Grill Nut clockwise. Unscrew the Grill Nut counterclockwise and set aside. 2) Install the Blade onto the shaft until retaining pin fits into the notch. Lock with the Blade Nut counterclockwise. -
Page 9: Using Your Fan
08/EN 09/EN Using Your Fan Using with Remote Control LED Display Operation and Functions Note: For added convenience, the same control buttons can be found on the remote control. Fan Speed 1-9 Timer 0-8h Power ON/OFF Oscillation Power ON/OFF Oscillation Angle Turn on/Standby mode Turbo Mode: H Auto ON/OFF Timer... -
Page 10: Replacement Of Batteries
10/EN 11/EN Replacement of Batteries Height/Angle Adjustment 1. Press the locking button to remove the battery holder. Tilt Control Hold with both hands and move to the desired angle. 2. Replace the battery with the same type Height Adjustment (CR2025, 3V), making sure the (+) side facing CAUTION: Loosen the Knob on pole and Facing up... -
Page 11: Cleaning And Maintenance
13/EN Cleaning and Maintenance Troubleshooting The following troubleshooting guide addresses the most common problems. If problems persist, feel free to contact our Customer Support at support@taotronics.com. Always make sure the Stand Fan is turned off Washable Parts and unplugged before Excessive noise. -
Page 12: Warranty And Service
-Partially or completely dismantled appliances. -Defects caused by or resulting from damages from shipping or from repairs, service, or alteration to the product or any of its parts that have been performed by a repair person not authorized by TaoTronics. Den Luftstrom zum Während des... -
Page 13: Vorgesehene Verwendung
16/DE 17/DE VORGESEHENE VERWENDUNG Kindern vorgenommen werden, solange des Geräts angegebene Spannung Ihrer • NICHT im Badezimmer verwenden. sie nicht mindestens 8 Jahre alt sind und örtlichen Netzspannung entspricht. • Dieses Gerät sollte nicht von Personen • Verwenden Sie das Produkt niemals ohne beaufsichtigt werden. - Page 14 • es zu übermäßiger Geräuschentwicklung, Ventilatorgeschwindigkeit. unangenehmen Gerüchen oder starker User Manual Hitzeentwicklung kommt. Regelmäßige Standfuß Stellen Sie die Benutzung dann ein, schauen Kontrolle Sie sich das FAQ an und kontaktieren Sie das Unterlegs TaoTronics Support Team. Bedienungsanleitung Verbindungsbolzen (an der Stange befestigt)
- Page 15 20/DE 21/DE Montage Ihres Ventilators 1) Setzen Sie das rückseitige Gitter auf den Ventilatorkopf. Ziehen Sie die Gittermutter im Uhrzeigersinn fest. Schrauben Sie die Gittermutter gegen den Uhrzeigersinn ab und legen Sie sie beiseite. 2) Bringen Sie den Rotor auf dem Schaft an, bis der Haltestift in der Kerbe sitzt.
-
Page 16: Bedienung Und Funktionen
22/DE 23/DE Benutzung Ihres Ventilators Benutzung mit Fernbedienung LED-Display Bedienung und Funktionen Anmerkung: Für zusätzlichen Komfort sind die gleichen Steuertasten auch auf der Fernbedienung vorhanden. Ventilatorgeschwindigkeit 1-9 Timer 0-8h EIN- / AUSSCHALTEN EIN- / AUSSCHALTEN Oszillation Oszillationswinkel Einschalten/Standby-Modus Automatischer Turbomodus: H AN-/AUS-Timer Standbymodus: 0 Ventilator-Geschwindigkeit / Timer +... - Page 17 24/DE 25/DE Batterietausch Höhen-/Winkelverstellung 1. Drücken Sie den Verriegelungsknopf, um die Batteriefachabdeckung zu entfernen. Neigungssteuerung Mit beiden Händen halten und in den gewünschten Winkel bringen. 2. Ersetzen Sie die Batterie mit einer Batterie Höhenverstellung desselben Typs (CR2025, 3V) und achten Sie ACHTUNG: Lösen Sie den Drehknopf Facing up...
-
Page 18: Reinigung Und Pflege
26/DE 27/DE Reinigung und Pflege Problemlösung Die folgende Problemlösung behandelt die häufigsten Probleme. Sollte das Problem bestehen bleiben, kontaktieren Sie gerne unseren Kundenservice unter support@taotronics.com. Hinweis: Achten Sie stets darauf, Abwaschbare Teile dass der Standventilator vor Übermäßiger Lärm. dem Säubern ausgeschaltet •... -
Page 19: Garantie Und Service
AVANT D'UTILISER CET APPAREIL, LISEZ TOUTES LES INSTRUCTIONS ET LES AVERTISSEMENTS FIGURANT DANS VOTRE MANUEL D'UTILISATION ET Vielen Dank, dass Sie sich für einen TaoTronics Standventilator SUR L'APPAREIL.LORS DE L'UTILISATION D'UN APPAREIL ÉLECTRIQUE, DES entschieden haben. Dieses Produkt beinhaltet eine TaoTronics PRÉCAUTIONS DE BASE DOIVENT TOUJOURS ÊTRE PRISES, NOTAMMENT... -
Page 20: Utilisation Prévue
30/FR 31/FR UTILISATION PRÉVUE • Utilisez l'appareil uniquement à des fins endommagé de quelque manière que • Ne placez pas de vêtements ou de rideaux domestiques telles que décrites dans le ce soit. sur le produit car ils pourraient être aspirés par •... -
Page 21: Spécifications
Pour éviter tout risque d'incendie, ne faites JAMAIS passer le cordon sous des Écrou à lames Écrou de grille Assemblage de la tête Modèle TT-TF009 meubles ou des appareils électroménagers. Entrée 220-240V~ 50Hz • Débranchez toujours l'appareil avant de le Pile de la télécommande CR2025, 3V nettoyer, d'effectuer des réparations ou des... - Page 22 34/FR 35/FR Assembler votre ventilateur 1) Positionnez la grille arrière sur l'assemblage de tête. Serrez avec l'écrou de la grille dans le sens des Dévissez l'écrou de grille dans le sens inverse aiguilles d'une montre. des aiguilles d'une montre et mettez-le de côté. 2) Installez l’hélice sur l'arbre jusqu'à...
-
Page 23: Utilisation Avec La Télécommande
36/FR 37/FR Utiliser votre ventilateur Utilisation avec la télécommande Affichage LED Utilisation et fonctionnalités Note: Pour plus de commodité, les mêmes boutons de commande se trouvent sur la télécommande. Vitesse de l'hélice 1-9 Minuterie 0-8h Mise sous/hors tension Angle d'oscillation Oscillation Mise sous/hors tension Mode turbo: H... -
Page 24: Remplacement Des Piles
38/FR 39/FR Remplacement des piles Ajustement de la hauteur et de l'angle 1. Appuyez sur le bouton de verrouillage pour retirer le porte-piles. Contrôle de l'inclinaison Tenez-le avec les deux mains et déplacez-le dans l'angle souhaité. 2. Remplacez la pile par une pile du même type Ajustement de la hauteur (CR2025, 3V), en veillant à... -
Page 25: Nettoyage Et Entretien
41/FR Nettoyage et entretien Dépannage Le guide de dépannage suivant aborde les problèmes les plus courants. Si les problèmes persistent, n'hésitez pas à contacter notre service clientèle à l'adresse support@taotronics.com. Note : Veillez toujours à ce que Pièces lavables le ventilateur vertical soit Bruit excessif. -
Page 26: Garantie Et Service
DE SEGURIDAD Merci d'avoir choisi ce Ventilateur Vertical TaoTronics. Ce produit est couvert par la garantie produit et main-d'œuvre de TaoTronics ANTES DE UTILIZAR ESTE APARATO, LEA TODAS LAS INSTRUCCIONES E pendant 12 mois à compter de la date d'achat initiale. -
Page 27: Uso Previsto
44/ES 45/ES USO PREVISTO sean mayores de 8 años y o enchufe dañado o si el producto no seguridad o con un protector de estén supervisados. funciona bien, se cae o se daña de alguna seguridad dañado. • Este artefacto no está diseñado para que manera. -
Page 28: Especificaciones
• Ruido excesivo, olor desagradable o calor User Manual LEA Y GUARDE ESTAS anormal. Regularmente Base Deje de usarlo, consulte las preguntas frecuentes y comuníquese con el equipo de Arandela INSTRUCCIONES soporte de TaoTronics. Manual de usuario Perno de conexión (adjunto al pedestal) - Page 29 48/ES 49/ES Arme su ventilador 1) Posicione la Rejilla frontal con el ensamble de la cabeza del ventilador. Ajusta con la tuerca de la Rejilla. Desatornille la tuerca de la Rejilla en el sentido contrario a las manecillas del reloj. 2) Instale las aspas en el eje hasta que el pasador de retención encaje en la muesca.
-
Page 30: Usando El Control Remoto
50/ES 51/ES Usando su ventiladorn Usando el Control Remoto Display LED Funciones y Operación Nota: Para mayor comodidad, se pueden encontrar los mismos botones de operación en el Control Remoto. Velocidad del ventilador 1-9 Temporizador 0-8h Interruptor encendido y apagado Interruptor encendiddo / Oscilación Ángulo de Oscilación... -
Page 31: Reemplazo De Baterías
52/ES 53/ES Reemplazo de Baterías Ajuste de altura / ángulo 1. Presione el botón de bloqueo para quitar el CAUTION: soporte de la batería. • Replace with new batteries of the same type Control de inclinación when replacement is required. Sostenga con ambas manos y muévase al •... -
Page 32: Limpieza Y Mantenimiento
Limpieza y mantenimiento Solución de problemas La siguiente guía de resolución de problemas aborda los problemas más comunes. Si los problemas persisten, no dude en ponerse en contacto con nuestro servicio de atención al cliente en support@taotronics.com. Nota: Siempre asegúrese de... -
Page 33: Garantía Y Servicio
QUANDO SI UTILIZZA UN DISPOSITIVO ELETTRICO, DEVONO SEMPRE ESSERE producto está cubierto por la garantía de mano de obra y producto de TaoTronics durante 12 meses a partir de la fecha de SEGUITE PRECAUZIONI DI SICUREZZA DI BASE, TRA LE QUALI: su compra original. -
Page 34: Utilizzo Previsto
58/IT 59/IT UTILIZZO PREVISTO • Utilizzare il dispositivo soltanto per l’utilizzo danneggiato in qualsiasi modo. perché potrebbero incastrarsi nel casalingo previsto come descritto in questo ventilatore durante il funzionamento e • Questo dispositivo non è destinato all’uso • Per ridurre il rischio di incendio o di shock Manuale Utente. -
Page 35: Nella Confezione
• Si verifica rumore eccessivo, odori sgradevoli o surriscaldamento anomalo. User Manual READ AND SAVE Regular Check Base di appoggio Smettere immediatamente di utilizzare, controllare le domande frequenti e contattare THESE INSTRUCTIONS l’Assistenza di TaoTronics. Rondella Manuale utente Vite di connessione (collegata al tubo) - Page 36 62/IT 63/IT Montaggio del Ventilatore 1) Posizionare la Griglia Posteriore sull’assieme della Testa. Avvitare con il Svitare il Dado Griglia in senso antiorario e Dado Griglia in senso orario. mettere da parte. 2) Installare la Ventola sull’albero fino a far combaciare la tacca con lo spinotto di fissaggio.
- Page 37 64/IT 65/IT Utilizzo del Ventilatore Utilizzo con Telecomando Display LED Operazioni e Funzioni Nota: Per maggiore comodità, gli stessi pulsanti di controllo si trovano anche sul telecomando. Velocità della Ventola 1-9 Timer 0-8 ore Accensione/Spegnimento Oscillazione Accensione/Spegnimento Angolo di oscillazione Accensione/Modalità...
-
Page 38: Sostituzione Delle Batterie
66/IT 67/IT Sostituzione delle Batterie Regolazione dell’altezza e dell’angolo 1. Premere il pulsante di blocco per rimuovere il porta batterie. Regolazione dell’altezza Allentare la Manopola sul tubo e fissure all’altezza desiderata. 2. Sostituire la batteria con una dello stesso tipo Controllo angolazione (CR2025, 3V), assicurandosi che il lato (+) sia ATTENZIONE:... -
Page 39: Pulizia E Manutenzione
Pulizia e Manutenzione Guida alla Risoluzione dei Problemi La seguente guida alla risoluzione dei problemi affronta i problemi più comuni. Se il problema persiste, si prega di contattare il nostro Servizio Clienti all’indirizzo support@taotronics.com. Note: Assicurarsi sempre che il Parti Lavabili... -
Page 40: Garanzia E Assistenza
Garanzia e Assistenza Information requirements for comfort fans. Information to identify the model(s) to which the information relates to [fill in as necessary]: Value Grazie per aver scelto il Ventilatore a Colonna di TaoTronics. Description Symbol Unit Questo prodotto è coperto dalla garanzia di TaoTronics sul... -
Page 41: Weee Compliance
WEEE Compliance Correct Disposal of This Product (Waste Electrical & Electronic Equipment) (Applicable in countries with separate collection systems) support@taotronics.com This marking on the product, accessories or literature indicates that the product and its electronic accessories should not be www.taotronics.com disposed of with other household waste at the end of their working life.
Need help?
Do you have a question about the TT-TF009 and is the answer not in the manual?
Questions and answers
What plug to use for the fan TT-TF009