
Related Manuals for Immersion RC EzOSD


Summary of Contents for Immersion RC EzOSD
- Page 1 EzOSD Manual Overview & Operating Instructions Preliminary. April 2009 ImmersionRC | EzOSD Manual...
-
Page 2: Table Of Contents
Show Flight Debriefing .......................... 6 OSD Display Layout ........................... 8 Alarms ............................... 9 Units ................................ 10 Flight ................................11 Telemetry, and Tracking Antenna ....................... 11 Upgrading Firmware ..........................12 Diagnostics, Q/A ............................12 Thank You… ..............................16 ImmersionRC | EzOSD Manual... -
Page 3: Overview
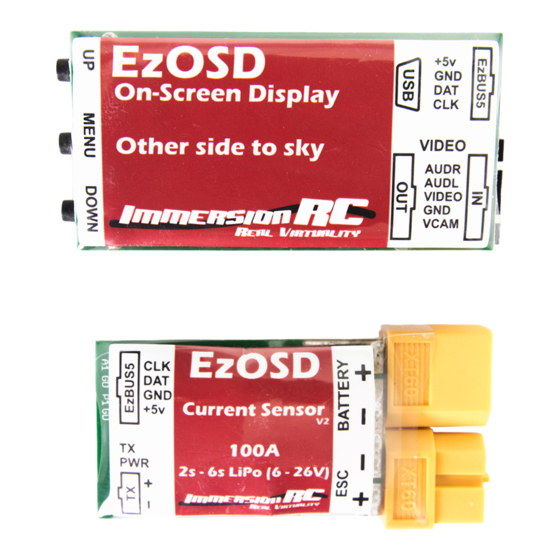
Tracking system. Installation The easiest way to install the EzOSD is when using ImmersionRC cameras and video transmitters. In this case, standard connectors are used, which are all compatible with those present on the EzOSD. All of them are keyed, can’t be inserted backwards, or ‘on the wrong pins’ (as is the case with many other OSDs currently on the market). -
Page 4: Installation Using An Immersionrc Camera And Transmitter
OSD will automatically disappear. 3) The telemetry downlink from the EzOSD uses the AUDR (Right channel of a stereo audio pair) signal. In the case of using ImmersionRC A/V transmitters, which transmit high-bandwidth stereo audio, the standard cabling will connect this signal correctly. -
Page 5: Installation Without Using The Sensor Board
Gnd pin of the EzBUS. Video Standard When provided with a standard composite video input, in either the PAL, or the NTSC format, the EzOSD will automatically switch to match the input format. When powered up (usually for the first time), without a video input signal connected, the EzOSD will default to PAL mode. -
Page 6: Show Flight Debriefing
Show Flight Debriefing Pressing the UP button, will show a summary of the last flight. Usually this is shown automatically after each flight, but if accidentally closed, the UP button will show it again. ImmersionRC | EzOSD Manual... - Page 7 Note: the conditions for the debrief to appear after a flight are speed < 5km/h, and distance from launch < 100m. Figure 3: Debriefing Display ImmersionRC | EzOSD Manual...
-
Page 8: Osd Display Layout
OSD Display Layout Distance Direction to Altitude, Above (Ground) to Pilot Launch Point Ground Speed Pilot Startup Climb/Sink Satellite Count indicator Battery Voltage Current Consumption Consumed (counts up from Zero) ImmersionRC | EzOSD Manual... -
Page 9: Alarms
Alarms The EzOSD is equipped with 4 settings which define alarms. When an alarm triggers, the relevant on- screen readout will flash, to draw the pilot’s attention. Figure 4: Alarms The 4 alarms supported by the EzOSD are: 1. Low Battery Defaults to ‘Auto’... -
Page 10: Units
Units In order to accommodate our fellow pilots from lands where the metric system has not yet arrived, the EzOSD supports selectable units. Units for Altitude, Distance, and Speed are all independently definable. ImmersionRC | EzOSD Manual... -
Page 11: Flight
Flight The section of this manual which covers the use of the EzOSD is intentionally very short. 1. Bring Equipment to the field 2. Power up FPV equipment, and wait for ‘Acquiring Satellites’ to disappear (6 satellites required to fly) 3. -
Page 12: Upgrading Firmware
ImmersionRC website. Upgrading Firmware The EzOSD is equipped with a built-in USB port, with a standard connector, commonly found on most portable USB equipment (technical name is a mini-B). Upgrading firmware requires no additional hardware, programmers, or returns to the factory. All that is required is a standard USB cable, and a utility which may be freely downloaded from the ImmersionRC website. - Page 13 If pulled straight off, the foam will pull the metal screen from the body of the GPS, and destroy it. Either slide a sharp blade (carefully) between the gps, and the foam, or use a twisting motion to remove Note that damaged caused by removing the GPS is not covered under warranty! ImmersionRC | EzOSD Manual...
- Page 14 12v Camera, 12v A/V Transmitter Cabling Dual-Battery Motor Battery Current Sensor supplies +5v power to OSD 12v Camera 12v A/V Tx (Lawmate, etc.) Camera and Tx powered by separate 11.1v battery Camera/Video Battery 3s LiPo (11.1v) ImmersionRC | EzOSD Manual...
- Page 15 ImmersionRC | EzOSD Manual...
-
Page 16: Thank You
Please don’t hesitate to feed back any comments/suggestions/complaints to us, we do listen, and any feedback will help in perfecting our products in the future. Now, what are you waiting for, Go Fly! ImmersionRC | EzOSD Manual...
Need help?
Do you have a question about the EzOSD and is the answer not in the manual?
Questions and answers