Table of Contents
Advertisement
Quick Links
USER INSTALLATION AND OPERATION GUIDE
INDEX
General and specifications ................................2-3
Safety and caution ................................................4
Tool and accessory requirements.............................. 5
Assembly instructions......................................6-7
Leak testing the connections ..............................8
Choosing a location for the heater...........................9
Operating the heater ..........................................10
Storage and maintenance.....................................10
Troubleshooting.....................................................11
CAREFULLY READ THIS GUIDE AND ALL SAFETY INFORMATION
PATIO INFRARED HEATER
THIS APPLIANCE IS CERTIFIED FOR OUTDOOR USE ONLY
TRADEX SUPPLY LTD.
MADE IN CHINA FOR TRADEX SUPPLY LTD. CALGARY,
ALBERTA, CANADA
info@branderbbq.com
ITEM NO.: TR6029 NG (SS - NG) ITEM NO.:
TR6026 NG (BLACK -NG)
1
Advertisement
Table of Contents

Summary of Contents for Brander TR6029 NG
-
Page 1: Table Of Contents
Operating the heater ..........10 Storage and maintenance........10 Troubleshooting.............11 CAREFULLY READ THIS GUIDE AND ALL SAFETY INFORMATION ITEM NO.: TR6029 NG (SS - NG) ITEM NO.: TR6026 NG (BLACK -NG) TRADEX SUPPLY LTD. MADE IN CHINA FOR TRADEX SUPPLY LTD. CALGARY, ALBERTA, CANADA info@branderbbq.com... -
Page 2: General And Specifications
WARNING & SAFETY RULES PLEASE READ THE FOLLOWING SAFETY RULES PRIOR TO OPERATION OF THE HEATER For Your Safety If you smell gas: 1. Shut off gas supply to the appliance. 2. Extinguish any open flame. 3. If odour continues, immediately call your gas supplier or your fire department. - Page 3 This appliance is an infrared transportable heater. The burner is controlled and adjusted by the gas control knob. Gas supply is controlled by the gas supply source. The burner is made of stainless steel. Heat diffusion is assisted by the reflector above. Technical Specifications: Operating pressure: 7.0"...
-
Page 4: Safety And Caution
CAUTION -DO NOT operate the heater in an explosive environment. Keep this appliance away from areas where gas is stored, or other vapours and flammable liquids are present. -Before use, verify that no part of this heater is damaged and inspect gas hose. -Never use the heater without the reflector installed. -
Page 5: Tool And Accessory Requirements
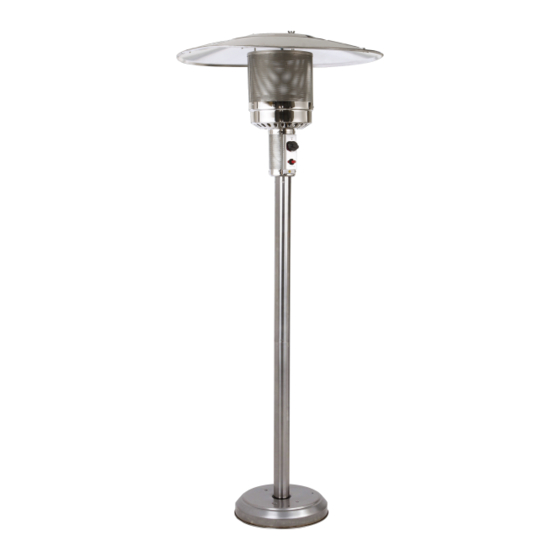
PARTS LIST 1. Base 2. Safety label 3. Weighted box 4. Pole 5. Gas control 6. Match access opening 7. Burner assembly 8. Reflector 9. Wheels (see page 9) figure 1 TOOLS AND EQUIPMENT REQUIRED 10 and 13 mm keys Adjustable wrench Philips screwdriver,medium blade Leak test solution:mix 50/50 water and soap... -
Page 6: Assembly Instructions
ADDENDUM TO BRANDER PATIO HEATERS - TR6026NG, TR6029NG Thank you for your purchase of the Brander Patio Heater. Prior to assembling this patio heater, please read through these additional in-depth instructions. This will improve the stability of your patio heater. - Page 7 ASSEMBLY INSTRUCTIONS A. Disassemble the base . Unscrew 4pcs M8 bolts and 4pcs M8x55 bolts from weighted box and base (Figure 2). Do not remove bottom black plate (please see page 6, Figure (i & ii) to identify black plate). This plate will act as a washer for the nuts and will assist in increasing the stability of the pole.
-
Page 8: Leak Testing The Connections
E. Fasten heater head (with hose now attached and leak- tested) to the top of pole. . Tighten securely using 4 pcs M6X10 (Figure 6). Do not remove any bolts. Figure 6 **MANDATORY LEAK TEST REQUIRED** Refer to page 4, see header: “LEAK TESTING THE CONNECTIONS“... -
Page 9: Choosing A Location For The Heater
H. Installing Wheels (1) SCREW____________8 Pieces (2) NUT_______________2 Pieces (3) WHEEL ____________2 Pieces (4) BRACKET__________2 Pieces (5) BOLT______________2 Pieces (6) BASE ____________ 1 Pieces (7) NUT_______________8 Pieces Figure 9 I. Choosing A Location For The Heater Caution When objects are left under a heater in operation, they will be subject to radiant heat and this could result in damage. -
Page 10: Operating The Heater
Operating The Heater 1. Ensure control knob on heater is in the OFF position. 2. Open valve for fuel supply. 3. Turn control knob to position. Press igniter button multiple times to light burner. When burner is lit, continue to press and hold down control knob for 30 seconds. This engages the thermocouple. -
Page 11: Troubleshooting
Trouble Shooting: Problem Possible Cause Solution Blockage in orifice Clean or replace orifice Burner may take 1-8 minutes to light Air in gas line after natural gas has been connected. Thermocouple has Clean thermocouple tip. carbon build-up on it Use match to light the burner. Obtain Igniter fails new lighter and replace.
Need help?
Do you have a question about the TR6029 NG and is the answer not in the manual?
Questions and answers