
Subscribe to Our Youtube Channel
Related Manuals for RADIXON WiNRADiO EXCALIBUR PRO WR-G33DDC


Summary of Contents for RADIXON WiNRADiO EXCALIBUR PRO WR-G33DDC
- Page 1 WiNRADiO ® by RADIXON ® WR-G33DDC EXCALIBUR PRO Software-Defined HF Receiver User’s Guide Ver. 1.61...
- Page 2 Radixon Group Pty. Ltd. 45 - 47 Islington Street, Collingwood, Victoria 3066 Australia © 2021 Radixon, Melbourne, Australia All rights reserved. No part of this book may be reproduced or transmitted in any form or by any means without the written permission of the publisher.
- Page 3 WiNRADiO G33DDC User’s Manual FCC Notice The WiNRADiO WR-G33DDC receiver has been tested and found to comply with the limits for a Class B digital device, pursuant to Part 15 of the FCC Rules. These limits are designed to provide reasonable protection against harmful interference in a residential installation.
-
Page 4: Table Of Contents
WiNRADiO G33DDC HF Receiver Table of Contents Table of Contents ..................4 Introduction....................6 The Hardware ....................7 Installation..................... 8 Minimum System Requirements ..............8 Software and Hardware Installation ............9 Setting up the Sound Card ............... 12 Connecting the Antenna ................14 Getting Started ................... - Page 5 WiNRADiO G33DDC User’s Manual Spectrum Scopes ..................68 Zoom Spectrum ..................69 Save Spectrum ..................69 Resolution Bandwidth ................69 Spectrum Averaging ................. 70 Waterfall Spectrum ................... 70 Spectrum Markers ..................72 Baseline Level ..................74 Audio Spectrum ..................75 Recording Functions .................
-
Page 6: Introduction
WiNRADiO G33DDC HF Receiver Introduction Welcome to the WR-G33DDC receiver, the Excalibur Pro. This receiver is an advanced version of its predecessor, the award-winning WR-G31DDC receiver, the Excalibur. Like many WiNRADiO receivers in the past, this advanced software-defined receiver breaks many new grounds. Some of its features, such as the real-time 50 MHz wide spectrum analyzer, three simultaneously operating demodulators, the capability to record 4 MHz wide RF spectrum, wide dynamic range, “brick wall”... -
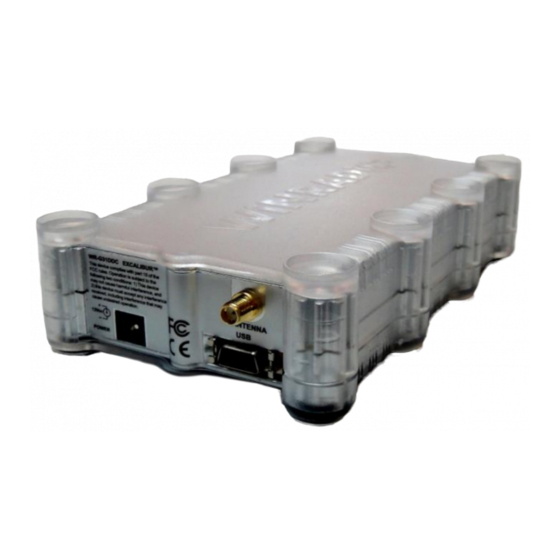
Page 7: The Hardware
WiNRADiO G33DDC User’s Manual The Hardware The WiNRADiO Excalibur Pro hardware is contained in a shielded metal box, encapsulated with transparent plastic. The front of the enclosure contains a power switch and an indicator LED. The LED also serves for diagnostic purposes and installation trouble-shooting (see Appendix C –... -
Page 8: Installation
WiNRADiO G33DDC HF Receiver Installation The WiNRADiO Excalibur Pro receiver package contains the following items: WiNRADiO G33DDC receiver AC/DC adapter with power cord USB interface cable Application software and this User’s Guide on a CD ROM ... -
Page 9: Software And Hardware Installation
WiNRADiO G33DDC User’s Manual Software and Hardware Installation 1. Leave the receiver disconnected from the PC and insert the installation CD ROM. The installer should start automatically. If the installation program does not start automatically, choose the Run command from the Windows Start menu and type D:\INSTALL (if the CD ROM is the D: drive on your PC). - Page 10 WiNRADiO G33DDC HF Receiver Select “Install the software automatically” and click on Next. Click on Finish to complete the installation.
- Page 11 WiNRADiO G33DDC User’s Manual 6. After all the files have been installed to your hard disk, run the WiNRADiO G33DDC application by clicking on the new icon that has been installed on your desktop. 7. Finally, connect your antenna to the antenna connector (SMA-type) at the rear of the receiver.
-
Page 12: Setting Up The Sound Card
WiNRADiO G33DDC HF Receiver Setting up the Sound Card As the digitally down-converted signal from the receiver is transferred over the USB interface to the PC, no external connection to the PC sound card input is necessary. The sound card is only used for the demodulated audio output. On Windows 7, the audio volume can be adjusted using the WR-G33DDC volume slider inside the Applications section and the master volume inside the Device section. - Page 13 WiNRADiO G33DDC User’s Manual On Windows XP simply adjust the Wave mixer: To get started, make sure the volume is set approximately as shown above. If you find that the maximum volume as set on the receiver application panel is not sufficient, you may then wish to increase the sound card volume later.
-
Page 14: Connecting The Antenna
WiNRADiO G33DDC HF Receiver Connecting the Antenna As the old saying goes, “a good antenna is the best amplifier”. No matter how good a radio receiver is, the performance limit of a radio receiving system is always determined by the first element of the receiving chain –... - Page 15 WiNRADiO G33DDC User’s Manual A "good" ground for a shortwave receiver is one that provides a low impedance path to ground for radio signals in the frequency range of interest. A metal cold water pipe located in close proximity to a possible ground connection point could provide good results.
-
Page 16: Getting Started
WiNRADiO G33DDC HF Receiver Getting Started The following quick-start introduction is intended to make it possible for you to enjoy your new receiver as quickly as possible. Detailed operation is described in the subsequent chapters. We do hope you will return to these chapters as the WiNRADiO Excalibur Pro receiver has many unique and innovative features the usage of which may not be immediately obvious and which would be a shame to miss. - Page 17 WiNRADiO G33DDC User’s Manual Using the keyboard, type in the frequency of one your local AM stations: For example, for 774 kHz, type in 7 7 4, then k for kHz, then press Enter. The typed-in frequency will appear on the digital frequency display. When you start the receiver the first time, the AM mode is selected by default.
-
Page 18: Achieving Best Selectivity
WiNRADiO G33DDC HF Receiver Place the mouse cursor onto the upper half of the tuning knob, at which point you will see the cursor change to a curved double ended arrow. Hold down the right or left mouse buttons to increase or decrease the frequency, and the knob will rotate clockwise or anti-clockwise, respectively. -
Page 19: Avoiding Front-End Overload
WiNRADiO G33DDC User’s Manual This function also makes it possible to observe the CPU load, which will depend on this setting. It may not be advisable to select a value resulting in more than say 30% CPU load as the computer may then become sluggish. Should the computer become sluggish or even “freeze”... -
Page 20: Inside The Excalibur Pro
WiNRADiO G33DDC HF Receiver Should you encounter interference-related problems with your receiver, effective remedies do exist; please peruse Appendix D – Dealing with Interference. Inside the Excalibur Pro Let’s have a look at what’s inside this receiver and how it relates to the graphical user interface of the control application. - Page 21 WiNRADiO G33DDC User’s Manual The DDC may be a new concept for newcomers to software-defined radio, so it perhaps deserves a little more explanation: In conventional superheterodyne receivers, the incoming signal is first converted to a fixed intermediate frequency (IF) by mixing it with a variable frequency signal produced by an internal local oscillator, and then further processed by amplification, filtration and demodulation.
- Page 22 WiNRADiO G33DDC HF Receiver Anywhere within the DDC spectrum, you can place three independent demodulators (“virtual receivers”), each of them capable of independently demodulating signals of different modulation types and different bandwidths. These signals can be also separately recorded and then played back. Effectively, the WiNRADiO Excalibur Pro includes three receivers in one.
- Page 23 WiNRADiO G33DDC User’s Manual The grey areas inside both the demodulator and DDC spectrum relate to the currently selected demodulator filter bandwidth. This bandwidth represents the selectivity bandwidth of the entire receiver and, for the best signal-to-noise ratio of the received signal, you might wish to adjust this bandwidth to very closely embrace the visible spectrum of the received signal.
-
Page 24: Resizing The Application Window
WiNRADiO G33DDC HF Receiver Resizing the Application Window The WiNRADiO Excalibur Pro application is fully resizable, which means you can drag its edges, corners and some internal boundaries to maximize the available screen space. The application panel also supports being resized over two or more monitors: You can literally surround yourself with a complete panorama of long, medium and short waves. - Page 25 WiNRADiO G33DDC User’s Manual To illustrate this, let’s try, for example, the DEM BW (demodulator filter bandwidth) control located above the Demodulator spectrum: Clicking on the arrow button opens a drop-down menu showing a list of values to select from, as you would expect. This drop-down will be also displayed if you simply hover above the displayed value.
-
Page 26: Tuning The Excalibur Pro
WiNRADiO G33DDC HF Receiver Tuning the Excalibur Pro Manual Frequency Entry To change frequency, simply type the new frequency into the keyboard. As soon as you press a number or decimal point, the frequency display will activate, waiting for a frequency to be typed. You can also click on the display to type in a new frequency in a highlighted field, or after clicking on the display, it is possible to use the mouse wheel to increment/decrement a particular digit, depending on the current cursor position. - Page 27 WiNRADiO G33DDC User’s Manual Release the Shift key to exit this mode. Under the main frequency display there is a Band description window: This window shows the band allocation of the currently tuned frequency. While the displayed band descriptions are specific to the North American standard band allocation, they are based on international treaties and therefore are generally applicable worldwide with minor differences, and can be easily edited by the user.
-
Page 28: Tuning Knob
WiNRADiO G33DDC HF Receiver Tuning Knob The Tuning knob makes it possible to adjust the frequency in fixed 1 kHz, 100 Hz, 10 Hz or 1 Hz steps. To use the tuning knob, position the mouse cursor over the knob (the cursor will turn into a curved double ended arrow) and click using either the left or right mouse button. -
Page 29: Multiple Receiver Operation
WiNRADiO G33DDC User’s Manual Multiple Receiver Operation With the WiNRADiO Excalibur Pro you can tune to three stations at once, listening to one (or all of them mixed together) and recording the others. The only condition is that these stations frequencies all fit inside the DDC bandwidth. -
Page 30: Point-And-Click Tuning
WiNRADiO G33DDC HF Receiver Any such attempt will be ignored and the recording button above the DDC spectrum will flash to indicate the reason why this operation failed. If tuning to a new frequency causes a receiver to be disabled, this disabled receiver’s audio will be muted, and the tuned frequency shown in the corresponding receiver tab will turn red to indicate that this receiver is currently non-active. - Page 31 WiNRADiO G33DDC User’s Manual scopes represent the demodulator filter passband. You can move the passbands by dragging the grey areas and this will result in a change of the tuned frequency. As with point-and-click tuning, there are again some differences in behavior depending on which particular spectrum window the highlighted passband is being dragged in.
-
Page 32: If Shift And Passband Tuning
WiNRADiO G33DDC HF Receiver the DDC spectrum is currently being recorded or if one or more of the receivers is locked or recording audio. In such case the lock or recording indicators will flash to report this condition. In both the DDC and demodulator spectrum scopes, the highlighted areas represent the demodulator filter bandwidth: For narrow DDC bandwidths, the grey area will appear similar in width for both spectrum scopes, but with larger DDC bandwidths it will become much... - Page 33 WiNRADiO G33DDC User’s Manual In a DDC-based receiver, “IF Shift” is in fact a misnomer because there is no “intermediate frequency”, but as this is a time-honored and commonly used term for this function, we will still use it here for convenience. IF shift makes it possible to tune the receiver by positioning the demodulator filter precisely over the spectrum of the received signal, while keeping the DDC passband located exactly where it is.
-
Page 34: Frequency Stepping
WiNRADiO G33DDC HF Receiver When the demodulator passband is being dragged using the right mouse button, a red PBT indicator will appear next to the cursor to indicate you are in the PBT mode: To revert to the IF shift mode, simply use the left mouse button again. Frequency Stepping To make the chapter on tuning complete, we need to fast forward a bit: There is one more tuning facility located on the right under the Tuning tab (all the... -
Page 35: Frequency Display Offset
WiNRADiO G33DDC User’s Manual Frequency Display Offset It is possible to connect the Excalibur Pro to a down-converter to receive frequencies that are normally beyond the Excalibur Pro’s frequency range. When this is done, it is convenient to see the actual received frequency rather than having to manually transpose the displayed frequency to the down- converter’s input signal. -
Page 36: Receiver Selection
WiNRADiO G33DDC HF Receiver Receiver Selection Clicking on one of the Receiver tabs located above the main frequency display selects that particular virtual receiver. The other two receivers continue operating provided their frequencies fit within the current DDC bandwidth. The tuned frequency of each receiver is displayed inside their associated tabs. If the frequency of one of the other receivers does not fit into the current DDC bandwidth, that receiver becomes disabled and the frequency in the tab turns red to indicate the disabled condition. -
Page 37: Mode Selection
WiNRADiO G33DDC User’s Manual By clicking on the receiver tabs, you can quickly alternate between receivers in a similar way in which you would use the VCO function in a conventional receiver, but with the additional benefit of being able to change complete receiver settings including demodulation mode, bandwidth, notch filter, audio filter, etc. -
Page 38: Ams Mode
WiNRADiO G33DDC HF Receiver AMS Mode The AMS mode is used to improve reception quality of amplitude-modulated signals, especially those affected by selective fading which occurs over a large distance. When the AMS mode is selected, special controls appear under the tuning tab, making it possible to select one (or both) of the signal’s sidebands to achieve optimum reception: In the AMS mode, there is a certain "capture range", a frequency range within... -
Page 39: Isb And Dsb Modes
WiNRADiO G33DDC User’s Manual ISB and DSB Modes ISB (independent sideband) is quite similar to the AMS mode and makes it possible to receive independent information in the two sidebands of an AM- modulated signal with suppressed, or partially suppressed, carrier. The desired audio output can be selected between the lower and upper side bands using two selector USB and LSB buttons accessible under the Tuning tab:... - Page 40 WiNRADiO G33DDC HF Receiver After acquiring the license, when the DRM mode is selected, the contents of the audio tab change to accommodate the special requirements of this mode: There is a text display that shows a continuously running “ticker” text which is usually transmitted by the station along with the audio, and which typically contains the station ID and program information associated with the broadcast.
-
Page 41: Fsk Mode
WiNRADiO G33DDC User’s Manual DRM broadcaster schedule information is available at www.drm-dx.de and also at www.drm.org/index.php?p=broadcast_schedule. FSK Mode The FSK (Frequency Shift Keying) mode performs in a similar manner to the CW mode, in that all of the parameters associated with CW are also available with FSK, but each with its own independent setting. -
Page 42: Function Tabs
WiNRADiO G33DDC HF Receiver Note that as there are three receivers in the Excalibur Pro, each receiver can have its mode set independently. The current mode setting for each receiver will be remembered upon the program exit. Function Tabs The Function tabs are located under the mode buttons: The function tabs contain numerous essential and ancillary functions dedicated to various aspects of the receiver’s operation. - Page 43 WiNRADiO G33DDC User’s Manual Passband tuning makes it possible to finely adjust the demodulator filter position in the AMS, LSB, USB and CW modes without a whistle effect due to a misaligned BFO, making it possible to avoid interference and finely tune the receiver for optimum reception.
- Page 44 WiNRADiO G33DDC HF Receiver Continuous adjustment of the demodulator filter bandwidth makes it possible to adjust the bandwidth to exactly fit the actual spectrum of the received signal, and to obtain the best signal-to-noise ratio and minimize interference from adjacent channels. For USB/LSB modes, dragging one edge of the shaded area adjusts the tuning position, dragging the other adjusts the filter bandwidth.
- Page 45 WiNRADiO G33DDC User’s Manual The 5, 9 and 10 kHz step sizes are factory defaults. However, the step sizes for each of the three buttons can be defined under Options | Tuning step size top menu bar. Spectrum Centering The Center button , next to the stepping controls, centers the demodulator passband.
-
Page 46: Audio Tab
WiNRADiO G33DDC HF Receiver UDM Mode Selection If the UDM mode is selected, the AMS band selection controls are replaced with the Mode selector for the user-defined mode: The UDM mode can utilize the AM, USB, LSB, CW or FM modes. Audio Tab The Audio tab contains functions specific to the parameters of the output sound, for example volume and audio filtering. - Page 47 WiNRADiO G33DDC User’s Manual The audio filter passband is shown as a shaded area inside the Audio spectrum, accessible by pressing the Audio button: The filter can be also adjusted graphically, by dragging either edge of the audio filter passband: Clicking the RF button while the audio spectrum is displayed will return the spectrum scope to the default spectrum mode.
- Page 48 WiNRADiO G33DDC HF Receiver Volume Control The Volume control is also located under the audio tab. The volume can range from 0 (no sound) to 31 (full volume). To enter a value directly, click on the display and type in the new volume level. The volume can be also increased or decreased by selecting the desired value from the drop-down list.
- Page 49 WiNRADiO G33DDC User’s Manual Enabling the mixer button for a particular receiver will connect its audio output to the mixer. The mixer is stereo and using the Left and Right buttons, you have a choice of sending a receiver’s audio to the left or right audio channel, or both.
- Page 50 WiNRADiO G33DDC HF Receiver Virtual Sound Card The Excalibur Pro receiver is equipped with an interface to the WiNRADiO Digital Bridge™ Virtual Sound Card. The Virtual Sound Card (VSC) is a software option designed to transfer digitized audio signal streams from WiNRADiO receivers directly to other applications.
-
Page 51: Memory Tab
WiNRADiO G33DDC User’s Manual To use the VSC for audio output, select the required demodulation mode and engage the VSC Audio button. This will connect the receiver’s demodulator to the VSC stream. The demodulated audio will be affected by all the various settings normally available for the demodulation, such as bandwidth, audio filter, etc. - Page 52 WiNRADiO G33DDC HF Receiver Storing a Frequency into Memory With each frequency, you can store several additional attributes: mode, callsign, description, bandwidth, squelch parameters, audio filter parameters and a hotkey. To store a frequency into memory, the receiver must first be tuned to that frequency.
- Page 53 WiNRADiO G33DDC User’s Manual Below is the Frequency you are storing and the demodulator Bandwidth. The Mode buttons make it possible to store the demodulation mode. The Squelch settings can be also stored optionally. If enabled using the Enabled button, the specified squelch settings will be applied automatically when the frequency is recalled.
- Page 54 WiNRADiO G33DDC HF Receiver To select a frequency, double-click on an item in the list on the right, and the frequency will be tuned. Then close the window. Editing Memory To change the settings for a particular frequency, click on the Edit button, or select Edit from the right-click menu: A window will open showing the current settings.
- Page 55 WiNRADiO G33DDC User’s Manual Deleting a Frequency To remove a frequency, click on the Recall button first. Select the frequency you wish to delete, and click on the Delete button at bottom right (alternatively, select Delete from the right-click menu). You will be asked to confirm that you wish to delete this frequency from memory.
- Page 56 WiNRADiO G33DDC HF Receiver All these folders and subfolders are user-definable and can be nested indefinitely, i.e. a subfolder can contain another subfolder, etc. These folders and subfolders represent memory Groups. You can group frequencies together using your own arbitrary criteria. To create a new group, use the New group button at bottom left.
- Page 57 WiNRADiO G33DDC User’s Manual Saving User Memory File You can have more than one user memory file; the number of such files is limited only by the capacity of your hard drive. You can save a user memory file under an arbitrary name, and then load it back, making it possible to have different memory files for different situations.
- Page 58 WiNRADiO G33DDC HF Receiver You can select between the User memory and the HFCC or EIBI lists using the associated buttons located under the memory tab: The HFCC and EIBI lists are kept as simple text files (HFCC.TXT and EIBI.TXT) in the My Documents/Winradio/G33DDC folder. Both HFCC and EIBI lists are updated from time to time to reflect the ever- changing nature of shortwave broadcasting.
-
Page 59: Notch
WiNRADiO G33DDC User’s Manual Firstly, the table can display all stations associated with a frequency (as selected in the example above) or only the ‘on-air’ stations, i.e. those that are noted as being active at a particular time. Secondly, the search criteria can be adjusted to display stations within a specific frequency range. - Page 60 WiNRADiO G33DDC HF Receiver Another way of changing the notch filter parameters is by dragging the stopband of the filter (a blue shaded area) with the mouse. The stopband width can be adjusted by dragging the edges, while the centre frequency can be changed by dragging the centre line, which makes it possible to conveniently position the filter stopband over the interfering signal.
-
Page 61: Squelch
WiNRADiO G33DDC User’s Manual This results in significantly reduced interference and a much more pleasing sound. Squelch The Squelch tab contains squelch-related controls: The squelch control can be used to automatically mute the receiver when no signal is being received. Without a signal, all you will usually hear is noise, so squelch is provided to cut out the noise until a useful signal is received, making the receiver more comfortable to use. -
Page 62: Gain
WiNRADiO G33DDC HF Receiver To adjust the level squelch control, first tune to an unoccupied frequency that produces only noise. Increase the squelch until the receiver is muted. You will see the red-colored segment of the S-meter growing until it gets higher than the current S-meter value. - Page 63 WiNRADiO G33DDC User’s Manual The Automatic Gain Control (AGC) acts upon the digitally down-converted and filtered demodulator passband, in order to keep the signal coming to the demodulator at a constant level. This is in fact functionally similar to AGC typically implemented in conventional receivers, which also works on the IF signal prior to demodulation.
- Page 64 WiNRADiO G33DDC HF Receiver The higher the AGC reference level, the stronger will be the signal at the input of the demodulator. If this level is too high and the input signal too strong, distortion may appear. On the other hand, decreasing the AGC reference level will generally result in lower audio levels.
-
Page 65: Noise Blanker
WiNRADiO G33DDC User’s Manual Useful notes about AGC to remember: 1. In AM, AMS, LSB, USB, ISB, DSB and CW modes, the gain setting affects loudness. If the receiver volume appears too low (and yet the volume control is all the way up), make sure that AGC is enabled 2. -
Page 66: Pause
WiNRADiO G33DDC HF Receiver ADC are compared to a threshold value, and, if greater, then these samples are zeroed. The Short Time DDC Averaging method is preferable and will yield improvement in most cases of atmospheric or man-made interference. It is activated by pressing the Enable DDC Averaging button located under the Noise Blanker tab. - Page 67 WiNRADiO G33DDC User’s Manual Pressing the Pause button activates this function. The audio will be muted and the demodulator spectrum will show a flat line. The DDC signal stream will be saved into the buffer instead of going through the usual demodulation process. In this state, the Current delay display will show the increasing amount of saved signal in terms of the time delay, while the Pause time display will show the time when the pausing started.
-
Page 68: Spectrum Scopes
WiNRADiO G33DDC HF Receiver During playback of the paused signal, the S-meter, the demodulator spectrum and all demodulator controls will relate to the currently played back (buffered) signal. However, the wideband and DDC spectrum displays, and the main frequency read-out, will all relate to the currently received signal. Spectrum Scopes We have already touched on the spectrum scopes in some of the preceding paragraphs, but there is much more to the WiNRADiO Excalibur Pro spectrum... -
Page 69: Zoom Spectrum
WiNRADiO G33DDC User’s Manual Zoom Spectrum Each spectrum scope includes Zoom buttons , located at top right of their respective windows: Use the two zoom buttons to zoom in and out of the spectrum – this is a useful feature for observing frequency peaks in close detail, for example where stations are very close to one another. -
Page 70: Spectrum Averaging
WiNRADiO G33DDC HF Receiver achievable accuracy of the various point-and-click operations inside the displayed spectra will be limited by the width of the displayed spectrum (remember that the width of any of the spectrum scope windows is adjustable and can be extended over two or more monitors) and the respective RBW limit of the particular spectrum scope. - Page 71 WiNRADiO G33DDC User’s Manual To invoke the palette menu simply click on the dBm scale at the left side. This will offer various palette menu selections which can be associated with corresponding signal levels: The palette bottom can be understood as an optical baseline. It defines the lowest signal level value which should correspond to the darkest palette colour (i.e.
-
Page 72: Spectrum Markers
WiNRADiO G33DDC HF Receiver Palette bottom set Palette gravity set It is also possible for users to create their own color palettes. For details please see Appendix F: Waterfall Spectrum Palettes. Spectrum Markers This facility exists in the wideband, DDC and audio spectrum scopes, making it possible to mark frequencies of interest, set reference points and calculate differential frequencies. - Page 73 WiNRADiO G33DDC User’s Manual Right-clicking on the spectrum reveals a menu with the following functions: Tune to nearest peak – this will tune the receiver to a peak that is nearest to the cursor. The capture area is 15 pixels either side of the cursor (the actual frequency range will vary depending on the current zoom status).
-
Page 74: Baseline Level
WiNRADiO G33DDC HF Receiver Cancel marker reference – this will remove the marker’s referential status and the differential frequencies will not be displayed for the other markers. Remove marker at xx.xxx MHz – this will remove the indicated marker. Remove marker at xx.xxx MHz – by selecting this function, this marker will be deleted. -
Page 75: Audio Spectrum
WiNRADiO G33DDC User’s Manual Audio Spectrum Pressing the Audio button above the demodulator spectrum will reveal the Audio spectrum scope, showing the real-time spectrum of the demodulated signal. Markers (right click on spectrum) and also available in this display mode. When the Audio filter is enabled (using the Filter button under the Audio tab), its passband will be shown as a gray area superimposed over the audio spectrum. -
Page 76: Recording Functions
WiNRADiO G33DDC HF Receiver Clicking the RF button while the audio spectrum is displayed will return the spectrum scope to the demodulator spectrum mode. Recording Functions At the top of DDC and demodulator spectrum scopes there are special “red triangle” buttons that serve to reveal their respective recording facilities. Pressing this button will reduce the height of the spectrum scope at the bottom and utilize the extra space for the recorder controls. - Page 77 WiNRADiO G33DDC User’s Manual The recording controls of the DDC and demodulator spectrum scopes look almost identical. However, their functions differ: The DDC recorder makes it possible to record the entire DDC bandwidth (up to 4 MHz wide), while the recorder in the demodulator panel serves to record the demodulated audio.
- Page 78 WiNRADiO G33DDC HF Receiver Recording starts when the Recording button is engaged, and stops when the Stop button is pressed. A Pause button is also available, to temporarily pause both the recording and playback. Playback is done by pressing the Play button .
-
Page 79: Attenuator
WiNRADiO G33DDC User’s Manual The split option should be used especially if the hard drive is using FAT32 rather than NTFS partitioning, as FAT32 has a maximum file size of 4 GB. If a recording file is specified which already exists in the destination path, there are three buttons located next to the If file exists condition, which tell the recorder how to deal with this situation: Ask –... -
Page 80: Preamplifier
WiNRADiO G33DDC HF Receiver The attenuator is variable from zero to 21 dB, in 3 dB steps. It can be engaged by pressing the Attenuator button, which will also enable manual selection of the attenuation value. Pressing the Auto button will adjust the attenuator automatically by increasing the attenuation to the point when overload stops. -
Page 81: Mw Filter
WiNRADiO G33DDC User’s Manual When dithering is selected, it reduces the amount of spurious signals caused by the action of the analog-to-digital converter (ADC). These are rather negligible in the Excalibur Pro, but they do exist. This is done at the expense of a slight increase of the noise floor. -
Page 82: S-Meter
WiNRADiO G33DDC HF Receiver Note that the MW filter and RF filter buttons are mutually exclusive (the MW filter actually uses a subset of the RF filter). When the RF filter is engaged, its passband is indicated by a greyed out area visible in the spectrum. -
Page 83: Top Menu Bar
WiNRADiO G33DDC User’s Manual displays the true value of the signal strength at the antenna input, within the available measurement range. If the range is exceeded, either Overrange or Underrange indicators are displayed in the S-meter. Top Menu Bar The top menu bar contains numerous ancillary functions of the Excalibur Pro: File The File menu includes functions associated with file operations. - Page 84 WiNRADiO G33DDC HF Receiver User memory files are of a special format with the extension “.r7m”. Scheduler files have the extension “.r7s”. Spectra are all saved as images, using the standard BMP format. Memory Export and Import The Save user memory as and Load user memory functions can save or load the user memory in the CSV format (comma separated values), making it possible to export frequencies in this commonly used format, as well as import frequencies from third party sources.
-
Page 85: Options
WiNRADiO G33DDC User’s Manual Options The Options menu contains a number of user settings making it possible to customize the receiver’s look and behaviour, adjust its numerous operational parameters, activate various test and measurement displays, calibrate the receiver, as well as restore factory defaults for user-definable parameters. - Page 86 WiNRADiO G33DDC HF Receiver Frequency Range The Excalibur Pro is a shortwave receiver, and normally intended for operation to 30 MHz. Thanks to a high-speed analog-to-digital converter, the Excalibur Pro is able to extend the maximum usable frequency to nearly 50 MHz. The receiver’s sensitivity starts declining at approximately 45 MHz due to the action of the anti-aliasing filter.
- Page 87 WiNRADiO G33DDC User’s Manual If tuning over 30 MHz is not required, then selecting the 30 MHz frequency range is preferable as it makes it possible to utilize the wideband spectrum space more efficiently. Demodulator Filter Length The Demodulator filter length has a direct influence upon the Excalibur Pro’s selectivity.
- Page 88 WiNRADiO G33DDC HF Receiver Should the computer become sluggish or even “freeze” as a result of this adjustment, please reduce the demodulator filter length to a lower value. Note also that the CPU load can be lowered (while keeping selectivity high) by reducing the DDC bandwidth (DDC BW).
- Page 89 WiNRADiO G33DDC User’s Manual Enter the required offset value in the Display offset edit box, click OK, and this value will be added to the displayed frequency. Time The time information displayed in the top menu bar can be either the local time (as provided by the PC) or UTC (Co-ordinated Universal Time).
- Page 90 WiNRADiO G33DDC HF Receiver Note the format in which the date is displayed depends on the locale settings of your computer. You can change this in your Windows control panel under Regional and Language Options. (Exact wording will depend on your Windows version.) Keyboard Shortcuts Keyboard shortcuts make it possible to use keyboard keys instead of the...
- Page 91 WiNRADiO G33DDC User’s Manual This function makes it possible to set sampling rates for both the VSC audio and IF outputs independently, to match the requirements of the target application. The VSC audio data is always 16 bit mono, the IF data is 16 bit stereo (each of the I and Q components uses its own channel).
- Page 92 WiNRADiO G33DDC HF Receiver While the buffering removes drop-outs, on the other hand it introduces a certain delay (latency) to the output audio. The Min. buffer size and Max. buffer size parameters can be adjusted to minimize the latency for a particular computer system. The Min.
- Page 93 WiNRADiO G33DDC User’s Manual You can adjust the Sync. lock range as a compromise value – if it is too small, then you may lose sync in case the transmitter frequency drifts (modern day transmitters have much better frequency stability than those of yesteryear).
- Page 94 WiNRADiO G33DDC HF Receiver Tuning Step Size There are three user-definable values for step sizes under this menu: These define the step size values for the frequency stepping buttons accessible under the Tuning tab: They correspond to the stepping size in kHz. For example, 5 kHz station spacing is typically used on short waves;...
- Page 95 WiNRADiO G33DDC User’s Manual For SINAD and THD, the test frequency is assumed to be 1 kHz. Using the SINAD measurement facility, you can measure the sensitivity of the WiNRADiO Excalibur Pro receiver very easily. All you need is a calibrated signal generator.
- Page 96 WiNRADiO G33DDC HF Receiver Of particular interest to many users will be the CPU load (excessive CPU load may cause sluggish behaviour or freezing of the computer), and Audio latency. Apart from DDC bandwidth, CPU load may be minimized by reducing the Demodulator filter length (thus sacrificing selectivity) and audio latency may be minimized by reducing the Audio buffering (while inviting the possibility of audio drop-outs or distortion).
- Page 97 WiNRADiO G33DDC User’s Manual Such calibration can be done either manually, by entering a correction factor for the reference oscillator directly, or using automatic calibration against a known reference signal. To calibrate to a peak, simply tune the receiver to a known reference frequency (presuming a reasonably strong and steady signal).
- Page 98 WiNRADiO G33DDC HF Receiver Select skin The entire colour scheme of the Excalibur Pro can be changed. If the dark blue of the default “skin” does not suit, there are more to choose from to suit the user’s personal preference. Restore factory defaults If you get lost by too much experimenting, help is always at hand: The Restore factory defaults function resets all the variables to the factory default...
-
Page 99: Memory
WiNRADiO G33DDC User’s Manual Memory The memory functions are described in great detail in the chapter Memory tab (under Function tabs). The top menu bar function Memory contains the following facilities: Show user memory makes it possible to show (and edit) the entire memory structure. -
Page 100: Scheduler
WiNRADiO G33DDC HF Receiver Scheduler The Scheduler is used to schedule automatic audio recording of stations at predefined dates and times: When Show task list is selected, the Task list is shown: You can add new recording tasks by pressing the Add button at bottom left. This opens the Add task window. - Page 101 WiNRADiO G33DDC User’s Manual...
- Page 102 WiNRADiO G33DDC HF Receiver At the top of the window, you can add the task description or name in the Description edit box which will then appear in the task list. The next item to specify is the Frequency for the receiver to be tuned to. The next items are Start time and Start date.
- Page 103 WiNRADiO G33DDC User’s Manual Using the Stop recording controls, you can force a recording to stop if one (or more) of three conditions apply: The recording time exceeds a certain length, the recorded file exceeds a certain size, or the signal becomes squelched for a longer than specified period.
-
Page 104: Logger
WiNRADiO G33DDC HF Receiver Logger The Excalibur Pro receiver is equipped with a simple logging function that makes it possible to log signal strength on up to three frequencies at the same time. These are specified by simply tuning one or more of the three virtual receivers (RX1 to RX3) to the desired frequencies. -
Page 105: Plugins
WiNRADiO G33DDC User’s Manual While the Logger is running, normal operation of the receiver is not possible. Elapsed time is shown in the Logger window and this is also where the logging task can be stopped. Once logging is stopped and the Logger window closed, the receiver operation returns back to normal. -
Page 106: Power Switch
WiNRADiO G33DDC HF Receiver Power Switch The Power switch, located at the bottom-right corner of the application window, controls the receiver power. When it is off, the receiver circuitry will be powered down. When you exit and restart the WiNRADiO application, the power on/off status will be remembered. -
Page 107: Appendix A - Sdr And Ddc Primer
WiNRADiO G33DDC User’s Manual Appendix A – SDR and DDC Primer This note is intended to help “traditional” radio enthusiasts understand the technology differences between old style analog receivers and the new generation of Software Defined Radio (SDR), especially with reference to the WiNRADiO Excalibur Pro. - Page 108 WiNRADiO G33DDC HF Receiver introduction of the world’s first consumer PC-based communications receiver in 1995, the award-winning WR-1000i model – a fully-fledged general- coverage receiver on a PC card. A serial-interfaced (RS-232) external model WR-1000e shortly followed suit. These receivers were little more than software controlled (rather than software defined): Their functionality, especially those critical filtering and demodulation functions, was still very much defined by and dependent on hardware.
- Page 109 WiNRADiO G33DDC User’s Manual DSP-based demodulation provides a receiver with great flexibility, where additional modes can be easily added by a simple software change, while the hardware remains the same. Plus of course, there is a benefit of performance consistency: With the same input, a software routine will always produce the same result, not depending in variations and aging of components such as diodes, resistors and capacitors.
- Page 110 WiNRADiO G33DDC HF Receiver The preceding spectrum display is that of the WiNRADiO G313 receiver, a typical representative of this type of SDR receivers, belonging to a class of receivers also referred to as SDR Tier Two or Software-Reconfigurable Radio. In SDR Tier Two radios, software is used to control and redefine a variety of modulation techniques, spectrum bandwidth, and other essential parameters and functionality of a radio receiver.
- Page 111 WiNRADiO G33DDC User’s Manual The process of reducing real time data and thus the usable bandwidth is known as decimation, and in the Excalibur Pro this first decimation results in a DDC bandwidth of 4 MHz. This 4 MHz bandwidth effectively allows the user to place a 4 MHz wide window anywhere within the ADC bandwidth (up to almost 50 MHz in the Excalibur Pro).
- Page 112 WiNRADiO G33DDC HF Receiver Once the DDC data is efficiently transferred to the PC, it is then possible to process the data by filtering and demodulation. Using the Excalibur Pro software running on a modern PC, it is possible to simultaneously demodulate three signals, providing three virtual receivers.
- Page 113 WiNRADiO G33DDC User’s Manual overloaded, resulting in distortion (much like overloading a speaker with too much audio). As the ADC is effectively ‘wide open’ to any input frequency, even if a user is tuned to 10 MHz, a strong signal in the Medium Wave band can still overload the receiver.
-
Page 114: Appendix B - Troubleshooting
WiNRADiO G33DDC HF Receiver Appendix B – Troubleshooting Problem Solution Check that receiver is turned on using the switch Upon installation, the software says located at the front of the device. The blue LED that the receiver is should flash. not found and ... - Page 115 WiNRADiO G33DDC User’s Manual Make sure that AGC under the Gain tab is enabled I can hear the and set to medium speed. Try to adjust the Gain audio and tune the parameter under the Audio tab (excessive audio gain receiver, but the can cause distortion).
- Page 116 WiNRADiO G33DDC HF Receiver may not provide adequate selectivity) and/or limit the maximum DDC BW you can use (the wider the DDC BW, the greater burden on the CPU resources). For best performance, modern PCs should be used, preferably with dual core or higher. Make sure the Attenuator is disabled, and the RF I can hear the filter either disabled or set to Auto.
-
Page 117: Appendix C - Usb Interface Diagnostics
WiNRADiO G33DDC User’s Manual Appendix C – USB Interface Diagnostics The flashing pattern of the blue LED on the receiver’s front panel has a diagnostics meaning. Normally, when the receiver is powered up and the application running, the blue LED should flash in a dih-dah pattern (i.e. a short flash followed by a long one). -
Page 118: Appendix D - Dealing With Interference
WiNRADiO G33DDC HF Receiver Appendix D – Dealing with Interference Electromagnetic Interference (EMI) is what prevents us from receiving a clear signal, even when the receiver should be sensitive enough to receive it. There are many types of interference you can experience with radio receivers, emanating from both natural and man-made sources. - Page 119 WiNRADiO G33DDC User’s Manual your monitor with a ‘quieter’ one, or you can try to relocate your antenna further away from your computer. While the WiNRADiO Excalibur Pro receiver has been designed to minimize interference-related problems, switched-mode computer power supplies sometimes still present a challenge.
-
Page 120: Appendix E - Demodulator Spectrum Width
WiNRADiO G33DDC HF Receiver Appendix E – Demodulator Spectrum Width The relationship between the selected DDC bandwidth and the demodulator spectrum width is shown in the following table: DDC Bandwidth IF Bandwidth (kHz) (kHz) 1000 1250 1600 2000 2500 3200 4000 The demodulator spectrum width is important to keep in mind when the VSC is used with the “IF”... -
Page 121: Appendix F - Waterfall Spectrum Palettes
WiNRADiO G33DDC User’s Manual Appendix F – Waterfall Spectrum Palettes The Waterfall spectrum uses color palettes, selectable using the Palette control: The color palettes reside in ordinary text files with an extension “.pal”, located in the application installation folder, i.e. typically C:/Program files/WiNRADiO/G33DDC/Defs. -
Page 122: Appendix G - Recording File Formats
WiNRADiO G33DDC HF Receiver Appendix G – Recording File Formats The DDC recorder can record the DDC stream in a standard WAV file format, but saves the files with an extension “.ddc” in order to avoid confusion with audio wave files. The proprietary WiNRADiO RXW file format (extension “.rxw”) is often a better choice, because it also contains additional data such as the current DDC center frequency, date, time and internal compensation data, which makes it possible to simulate original conditions during the... - Page 123 WiNRADiO G33DDC User’s Manual DDC Bandwidth DDC Recording (kHz) Sampling Rate (kHz) 2000 2500 2500 3333.3 3200 4000 4000 5000 (Note: The Nyquist theorem is satisfied because there are two values (I and Q) for each sample (stored as two stereo channels), so the effective sampling rate is twice of that shown.) The Audio recorder can record standard Windows “.wav”...
-
Page 124: Appendix H - Compliance Declarations
WiNRADiO G33DDC HF Receiver Appendix H – Compliance Declarations CE Conformity Radixon Group Pty.Ltd. declares that the WiNRADiO G33DDC Excalibur Pro receiver complies with the following EC standards: EN 55013:2002 + A1:2004 + A2:2006 clause 4.2, 4.3 and 4.6 EN 55020:2007... - Page 125 WiNRADiO G33DDC User’s Manual Safe Disposal 1. When this crossed-out bin symbol is attached to a product it means that the product is covered by the European Community directive 2002/96/EC. 2. All electrical and electronic products should be disposed of separately from municipal waste stream via designated collection facilities appointed by the government or by the local authorities.
- Page 126 WiNRADiO ® C O M M U N I C A T I O N S w w w . w i n r a d i o . c o m...
Need help?
Do you have a question about the WiNRADiO EXCALIBUR PRO WR-G33DDC and is the answer not in the manual?
Questions and answers