Table of Contents
Advertisement
Quick Links
Advertisement
Table of Contents

Related Manuals for ACTi MNR-310


Summary of Contents for ACTi MNR-310
- Page 1 MNR-310 System Administrator’s Manual For Version 3.0.09 2015/01/08...
-
Page 2: About This Manual
Target Audience This manual is intended for System Administrators who are responsible for installing and setting up ACTi MNR-310 surveillance system. The reader is expected to know the fundamentals of IP surveillance system integration and to own the administrative privileges to achieve all the tasks. -
Page 3: Related Documentation
End Users who will be operating the NVR server system. To obtain the instructions on use of the NVR applications such as monitoring and playback, please download the latest ACTi MNR-310 User’s Manual from ACTi Download Center http://www.acti.com/downloadcenter... -
Page 4: Conventions Used In This Manual
MNR-310 System Administrator’s Manual Conventions Used in This Manual The following are typographic conventions used in this manual: Bold indicates keywords, major functions of NVR, or a title of a section/column. Italic is used for a filename or location path. -
Page 5: Legal Notice
Disclaimer The information contained in this document is intended for general information purposes. ACTi Corporation shall not be liable for errors contained herein or for incidental or consequential damages arising from the furnishing, performance, or use of this manual. The information contained herein is subject to change without notice. -
Page 6: Regulatory Compliance Information
MNR-310 System Administrator’s Manual Regulatory Compliance Information Federal Communications Commission Statement This equipment has been tested and found to comply with the limits for a Class A digital device, pursuant to Part 15 of the FCC Rules. These limits are designed to provide reasonable protection against harmful interference in a residential installation. -
Page 7: Table Of Contents
MNR-310 System Administrator’s Manual Table of Contents 1 About This Manual Target Audience ..................2 Content Overview ..................2 Related Documentation ................3 Technical support ..................3 System Integration ................... 3 Conventions Used in This Manual ............4 2 Legal Notice Disclaimer .................... - Page 8 MNR-310 System Administrator’s Manual Enter Windows ..................35 Definitions of LED Indicators ..............36 Turn Off the Unit ..................36 Get the Hard Disks Ready for Recording ..........37 Observe Disk Status ................42 License and Activation ................43 Online Activation ................44 Offline Activation ................
- Page 9 MNR-310 System Administrator’s Manual Login .................... 59 A. Enter Account & Password B. Change UI language C. Remember Account/Password D. Retrieve the Forgotten Password 8 Set up the System Setup Wizard ................... 60 System Settings ................61 Storage ..................61 NVR Main Screen ..................
- Page 10 MNR-310 System Administrator’s Manual Configure Motion Settings ............82 Adjustment Attributes Configure Storage Card Settings ..........84 Configure PTZ Device ..............85 Adjustment Attributes How to Do Live PTZ Operation Set PTZ Preset Points..............89 Set PTZ Preset Tour ..............90 Configure Fisheye Cameras ............
- Page 11 MNR-310 System Administrator’s Manual Domain Users Management ............121 Customize Views .................. 122 Step 1: Create a New View ............123 Step 2: Enter Edit Mode ............. 123 Step 3: Select a Layout .............. 123 Step 4: Add Video Source ............124 Step 5: Add a Map ..............
- Page 12 MNR-310 System Administrator’s Manual Set up Redundancy Server ............155 www.acti.com...
-
Page 13: Overview
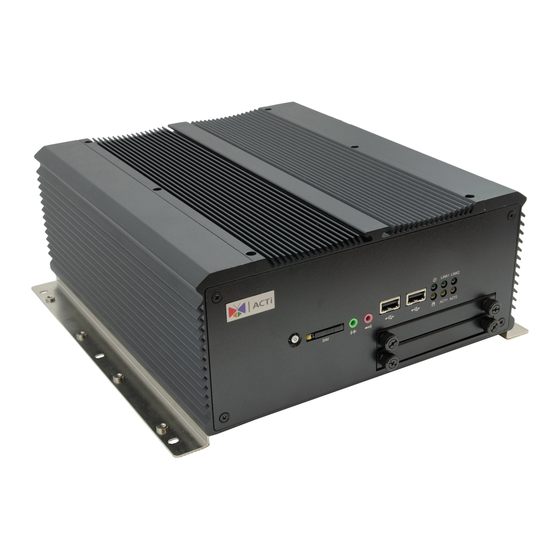
MNR-310 System Administrator’s Manual Overview Product Overview MNR-310 is a compact and reliable multi-channel transportation standalone NVR. It contains a pre-installed Windows operating system, and ACTi NVR 3.0 video management software along with client software. This unit is composed of: Computer... -
Page 14: Server / Client Architecture
MNR-310 System Administrator’s Manual Server / Client Architecture NVR 3.0 is a typical web-based server/client system. In a video surveillance system architecture, the Server serves as a video management service provider, aimed to run 24/7 offering non-stop services for clients. A Client makes requests of monitoring video streams or playback recordings to Server, which can reside on the same computer with server program (as from local) or on another computer (as from remote). -
Page 15: Getting Started
MNR-310 System Administrator’s Manual Getting Started What’s in the Box This product package includes the following items: MNR-310 Unit x 1 Quick Installation Guide x 1 Removable Hard Disk Bays x 2 WiFi Module x 1 (Optional) (Installed on the unit) -
Page 16: At A Glance
MNR-310 System Administrator’s Manual At a Glance Front Panel Description Description Power Switch USB 2.0 Ports Buttons and SIM Card Slot System Status LEDs Line-out Jack Hard Disk Bays ... - Page 17 MNR-310 System Administrator’s Manual Rear Panel Description Description HDMI Port COM1 Port VGA Port DC-out Jack (12V) e-SATA Port DC-in Jack (6V~36V) USB 2.0 Ports Antenna Hole with Cover ...
-
Page 18: Lte Module Installation (Optional)
MNR-310 System Administrator’s Manual 4G/LTE Module Installation (Optional) For your standalone NVR, you may have purchased the additional 4G/LTE module that can provide your NVR with 4G/LTE mobile connectivity. When installing, please make sure your device is turned off, and follow the steps below: Step 1: Remove the MNR’s chassis cover... - Page 19 MNR-310 System Administrator’s Manual Step 4: Insert 4G/LTE module into the slot After locating the slot for 4G/LTE, insert your module into the slot at a 45-degree angle until the gold-plated connector on the edge of the module disappears into the slot:...
- Page 20 MNR-310 System Administrator’s Manual Step 7: Secure antenna jack with the hexagonal ring Secure the antenna jack by placing the hexagonal ring on the antenna jack. Turn clockwise until it is tightly in place: Hexagonal Ring Step 8: Attach the RF cable of the antenna jack onto the module Attach the RF cable of the antenna jack onto the module, as shown below.
-
Page 21: Wifi Module Installation (Optional)
MNR-310 System Administrator’s Manual WiFi Module Installation (Optional) For your standalone NVR, you may have purchased the additional WiFi module that can provide your NVR with WiFi mobile connectivity. When installing, please make sure your device is turned off, and follow the steps below: Step 1: Remove the MNR’s chassis cover... - Page 22 MNR-310 System Administrator’s Manual Step 4: Insert WiFi module into the slot After locating the slot for WiFi, insert your module into the slot at a 45-degree angle until the gold-plated connector on the edge of the module disappears into the slot:...
- Page 23 MNR-310 System Administrator’s Manual Step 7: Secure antenna jack with the hexagonal ring Secure the antenna jack by placing the hexagonal ring on the antenna jack. Turn clockwise until it is tightly in place: Hexagonal Ring Step 8: Attach the RF cable of the antenna jack onto the module Attach the RF cable of the antenna jack onto the module, as shown below.
-
Page 24: Gps Module Installation (Optional)
MNR-310 System Administrator’s Manual GPS Module Installation (Optional) For your standalone NVR, you may have purchased the additional GPS module that can provide your NVR with GPS data. When installing, please make sure your device is turned off, and follow the steps below: Step 1: Remove the MNR’s chassis cover... - Page 25 MNR-310 System Administrator’s Manual Step 4: Secure the module with mounting screws Step 5: Connect the GPS module connector to the GPS connector (J8) on the motherboard Step 6: Insert antenna jacks into the antenna holes Remove one of the antenna hole covers. Place the circular ring on the antenna jack of the RF cable and insert the antenna jack into the antenna hole.
- Page 26 MNR-310 System Administrator’s Manual Step 7: Secure antenna jack with the hexagonal ring Secure the antenna jack by placing the hexagonal ring on the antenna jack. Turn clockwise until it is tightly in place: Hexagonal Ring Step 8: Attach the RF cable of the antenna jack onto the module Attach the RF cable of the antenna jack onto the module, as shown below.
- Page 27 MNR-310 System Administrator’s Manual Step 10: Secure the body of the GPS onto your vehicle Step 10: Secure the chassis cover back onto the body of the MNR www.acti.com...
-
Page 28: Power Ignition Control Module Installation (Optional)
MNR-310 System Administrator’s Manual Power Ignition Control Module Installation (Optional) For your standalone NVR, you may have purchased the additional power ignition control module that can provide your NVR with stable power, as well as ensure that the device is well-shielded against premature failure at the boot or shutdown phase. - Page 29 6 LVDS POWER OUT (+12V / 1A) Step 3: Connect the module’s S3 control port to the MNR 310’s power ignition. Attach and secure the 3-pin block connector provided with your MNR-310 device to the power ignition socket on your MNR:...
- Page 30 MNR-310 System Administrator’s Manual Connect the module’s S3 control port to the MNR 310’s power ignition with the S3-to-Power Ignition Port Cable by referring to the wiring definition and illustration below: 1 SLP_S3 IN (Input) 2 GND 3 Power ON Button (Output) Step 4: Adjust voltage setting to be suitable for your environment.
-
Page 31: Hard Disk Installation
For video recordings, you should install at least ONE certified 2.5-inch SATA hard disk. Be sure to use the hard disk models ACTi has tested to be compatible with MNR-310, and it is strongly recommended that you use hard disks of the same model and capacity. You may find the certified models via http://www.acti.com/hddselector. - Page 32 MNR-310 System Administrator’s Manual Step 2: Mount the Disk Secure the hard disk on the Tray with the four disk screws provided, and make sure the disk connector faces towards the end of the tray. Step 3: Install the Tray ...
-
Page 33: Connect The Devices
MNR-310 System Administrator’s Manual Connect the Devices Follow the procedures to connect the devices. These devices are supposed to be connected in the sequence shown below. Internet Step Description Connect the monitor to MNR. (Local display can support up to 2 different ports at the same time: HDMI + VGA) ... -
Page 34: Start The Unit
MNR-310 System Administrator’s Manual Start the Unit To start the unit, press down the Power Button, the System Power LED Indicator will light up and turn solid yellow. www.acti.com... - Page 35 MNR-310 System Administrator’s Manual Enter Windows After the unit starts, key in “123456” to log in as Administrator to Windows Embedded 7 system. www.acti.com...
- Page 36 MNR-310 System Administrator’s Manual Definitions of LED Indicators System LED Indicators: Indicator LED Status Description System Power Solid The unit is powered on Solid Green 1000Mbps connection detected Solid Orange 100Mbps connection detected Link1 Link2 Off (network cable connected) 10Mbps connection detected...
- Page 37 MNR-310 System Administrator’s Manual Get the Hard Disks Ready for Recording Before the installed hard disks and eSATA storage device can start recording, they must be initialized and recognized by Windows embedded 7 operating system. Besides regarding each hard disk as a single volume, MNR is able to combine multiple hard disks as a one single...
- Page 38 RAID 1 is a solution designed to make mirror copy of from one disk onto one (RAID 1) or more disks for recovery purposes. In case of ACTi Standalone NVR servers, you need to have exactly 2 disks to configure RAID 1. Since the 2...
- Page 39 MNR-310 System Administrator’s Manual Create Volume and Configure Software RAID , in Windows Search Box, input “Computer Management”, 1. Click Window Start and enter this utility. 2. Select “Disk Management”, right-click on a disk title and select “Initialize Disk”. Check all the disks you have installed, choose “GPT”...
- Page 40 MNR-310 System Administrator’s Manual 3. Right-click on a disk title again, select “Convert to Dynamic Disk…”, check all the installed disks and then click “OK”. 4. Right-click on a disk and select the volume type to make a new volume.
- Page 41 MNR-310 System Administrator’s Manual 5. After the volume is created, this drive will be shown on Volume list, and is ready for recording. You may follow the instructions in Storage Management on page 114 to assign certain volumes to do the recording.
- Page 42 MNR-310 System Administrator’s Manual Observe Disk Status It may happen that one of your disks goes into failed status after the NVR system starts recording for a long period. Most times, a disk does not fail suddenly, but goes into failed status because the number of bad sectors on it has exceeded the minimum required level to maintain normal operation.
- Page 43 3. The number of CDP licensed channels (for non-ACTi brand devices) and that of standard licensed channels (for ACTi devices) are counted separately. 4. Any device added through ONVIF (either ACTi or non-ACTi devices) will also need to be licensed. The license type used will solely be based on the brand of the device.
- Page 44 MNR-310 System Administrator’s Manual matching record will be stored on the ACTi license data server. Note Although certain fisheye camera view modes (e.g. Quad mode) display multiple regions in a view, they are still counted as one single channel in terms of licensing.
- Page 45 Offline Activation to activate your license. Online Activation SOP Step 1 : Membership ID in ACTi Member Center is required for activation. Register one for free at http://member.acti.com/ Step 2 : Login to the NVR server, and go to Setup pageSystem tabLicense“Online Registration”.
- Page 46 MNR-310 System Administrator’s Manual Offline Activation SOP Step 1 : Membership ID in ACTi Member Center is required for activation. Register one for free at http://member.acti.com/ Step 2 : Access http://www.acti.com/support/LicenseMgt/NVR3_registration.asp, enter the License Key and the MAC address of the NVR server, and then click “Submit”. An E-mail with activation code file (.lic) will be sent to your registered E-mail account.
- Page 47 MNR-310 System Administrator’s Manual Step 3 : Login to the NVR server from local or via web client. Go to Setup page System tab License “Offline Registration” click “Import” and upload the license file(.lic). Click “Apply” to activate this license.
- Page 48 MNR-310 System Administrator’s Manual System Installation Check List Before Starting Item Task Description Reference Prepare software MNR comes with 16-channel free license that License and license already activated. additional Activation on page channels, please purchase the license from your system supplier and get the license information ready before activation.
- Page 49 MNR-310 System Administrator’s Manual Configure recording By default, each device will start 24/7 Schedule schedule schedule recording as soon as it is added. Recordings on page Set recording schedule for each device. Configure e-mail & FTP Complete the Email or FTP settings and test if...
- Page 50 NVR3 Workstation includes a set of programs that provide the interface between users and the NVR server. In MNR-310, this software is already installed, and will start automatically after you login to Windows. You can also install this software on the remote client computer to access the NVR server via network.
- Page 51 MNR-310 System Administrator’s Manual Local Workstation Client Login Local Workstation Client refers to the user who runs NVR3 Workstation on the NVR server to log in to the NVR system. The login process is described as follows. A. Enter Account & Password...
- Page 52 MNR-310 System Administrator’s Manual E. Retrieve the Forgotten Password The NVR server can send the password of the User’s account to the saved email address. To have users be able to use this service, please make sure (1) the SMTP settings have been configured (refer to How to Setup SMTP Settings for Event Rules on page 108) and (2) a valid email address has previously been saved in Setup page ...
- Page 53 MNR-310 System Administrator’s Manual D. Language Choose a UI language from the dropdown list. E. Remember Login Information and Auto Login To have NVR3 Workstation remember the Account, Password, Initial Page and UI Language, simply check “Remember login info”. Click “Don’t Remember” will clear your input text and reset to default.
- Page 54 MNR-310 System Administrator’s Manual 5. You can export the saved server sites, or import it to another Workstation client computer. Access the NVR server via NVR3 Workstation, go to Setup page System tab Workstation. A. Export current server sites list Click “Browse”...
- Page 55 NVR 3.0 system interface requires the add-on ActiveX Control components, please make sure browser’s security settings allow ActiveX controls to be downloaded and installed. When your browser asks if you allow ACTi Corporation’s add-on components to run, please allow. Log in Failure Troubleshooting Once you confront with problems accessing the NVR server, refer to the possible conditions below and follow the instruction to solve your issues.
- Page 56 MNR-310 System Administrator’s Manual Cause 1: Server is not ready Solution: It may happen when you just started the server computer or the server installation has just finished, please wait a few seconds and connect again. Cause 2: The NVR server is not able to respond to your request through current path because port 80 has been seized by another service running on server computer.
- Page 57 MNR-310 System Administrator’s Manual 4. On Task Manager Process tab, locate the PID number of the service using port 80. The service name is shown under “Image Name” column. Condition 2: Why can’t I install Active X controls after logging in? ActiveX Control components are essential for the NVR server to present user interface.
- Page 58 MNR-310 System Administrator’s Manual To ensure the NVR server is always accessible from your web client regardless of any change in browser’s overall Internet security settings, you may add the NVR server site to Internet Explorer’s trusted sites. Trusted sites are the sites which you consider safe and wish to visit with low security restrictions while maintaining higher security for the rest of the Internet.
- Page 59 MNR-310 System Administrator’s Manual Login A. Enter Account & Password Account (non case-sensitive): Admin (default) Password (case-sensitive): 123456 (default) B. Change UI language To change UI language, select the desired language from “Language” dropdown list. C. Remember Account/Password To have the server remember your Login Account and Password in the future, check “Remember Account/Password”.
- Page 60 Setup Wizard Once you connect to ACTi NVR 3.0 for the first time, Setup Wizard will guide you through the initial setup process. You may click “Previous” or “Next” button located on the lower right at any time. This will skip the current step so that you may come back to it later. All the settings in the Setup Wizard are available in the Setup page.
- Page 61 MNR-310 System Administrator’s Manual System Settings You can adjust the Email & SMTP settings, FTP settings for event rules now or later. For more details about the settings, please refer to How to Setup SMTP Settings for Event Rules on page 108 and How to Setup FTP Settings for Event Rules on page 109.
- Page 62 This is the license management section. On lower right part of screen shows number of channels allowed under your current license. MNR-310 has a license for 16 channels which is already activated. You can click “Next” to next setting if you do not want to add new license for now.
- Page 63 MNR-310 System Administrator’s Manual NVR Main Screen You will enter the live view screen after Setup Wizard. On the right are link buttons to three NVR major functions: (1) Live view, (2) Playback and (3) Setup. You can click the orange button to enter the function page.
- Page 64 Cameras or video encoders are the fundamental building blocks of surveillance systems. To manage cameras from MNR-310, you have to add camera devices into NVR 3.0 system first. In this section, we will guide you through how to add or delete devices on the NVR 3.0 system.
- Page 65 MNR-310 System Administrator’s Manual Devices, and Add Device Manually. - Use Search Devices to auto search ACTi cameras located in the same subnet as your NVR server. - Use Search ONVIF Devices to find devices that support ONVIF in the same subnet as your NVR server.
- Page 66 4. Click “Apply” to add selected devices into NVR system. Important Notice 1. For certain non-ACTi devices, you may need to configure the ONVIF user credentials of the camera by accessing its Web Configuration page and managing the ONVIF Users List.
- Page 67 MNR-310 System Administrator’s Manual Add Devices on WAN or Other Local Area Networks 1. After selecting “Add Device Manually”, the camera settings page will appear as below. The most important settings are (1) Media Type, (2) Protocol, (3) Camera IP, (4) HTTP Port, and (5) User Name &...
- Page 68 MNR-310 System Administrator’s Manual 2. Click “Get Device Settings” to have NVR contact the device and get the live view. Once connected to the device, NVR will get all the device properties such like Brand, Model, Device Serial Number, Firmware Version. If the device supports dual stream, Stream Mode selection field will be revealed, and you may select a different streaming mode and configure relative options.
- Page 69 MNR-310 System Administrator’s Manual HTTP Port Enter the HTTP port for IP cameras/ video servers. Most cameras use the default port number - 80. User Name Enter the user name to access the camera. Password Enter the password to access the camera.
- Page 70 MNR-310 System Administrator’s Manual Device Status To validate if you have successfully added a device to NVR system, simply check the Device List on the left of Setup Devices tab to see if the device name appears in the tree.
- Page 71 MNR-310 System Administrator’s Manual Add Non-ACTi Cameras In this section, we will guide you through how to add devices of other brands to NVR 3.0 system. After the required CDP license is activated, please: 1. Use the utility provided by camera the manufacturer to confirm the camera properties: (1) Protocol, (2) IP Address, (3) HTTP Port, and (4) User Name &...
- Page 72 MNR-310 System Administrator’s Manual If the device you wish to add supports ONVIF, you can select “ONVIF” for Media Type, and the settings page will appear as below. Please fill in the five fields marked below that are required to communicate with the device – Media Type, IP Address, HTTP Port, User Name and Password, and then click “Apply”.
- Page 73 MNR-310 System Administrator’s Manual Manage Multiple Devices After adding several devices to the system, you may get an overview of all devices on Setup pageDevice tab; this is where you may use certain fast and convenient approaches to manage a number of devices. In this section, we will guide you through how to quickly add or delete multiple devices.
- Page 74 MNR-310 System Administrator’s Manual Copy Settings Across Devices When setting a large number of devices, many settings will resemble other ones, and it is sometimes tiresome to repeat every setting again and again. You can use the Copy function to save the hassle of needless repetition.
- Page 75 There are devices that output more than one video streams to the NVR server. For example, a video encoder converts a number of analog video signals into the same amount of IP video streams; certain high megapixel cameras such as ACTi KCM-5111, supports outputting multiple VGA streams cropped from a single high-resolution video source. These multiple streams coming from a single device are managed as different cameras by the NVR server.
- Page 76 MNR-310 System Administrator’s Manual Configure Device Settings After adding a device to the NVR system, you may continue to configure its video, motion detection, PTZ or preset tour settings on Setup pageDevices tab. In this section, we will guide you through how to configure these settings and their corresponding functions.
- Page 77 MNR-310 System Administrator’s Manual you have selected “Unlimited” for Maximum Bitrate. The actual value will fluctuate slightly based on scene changes. Available for multi-streaming devices. Available for hemispheric devices. Available for hemispheric devices with “Wall” Mount Type. Available when “Video Encoder” is “MJPEG”.
- Page 78 MNR-310 System Administrator’s Manual Event Recording with Frame Rate Adjustment This mode keeps recording all the way without losing any single moment; lower frame rate can be set for non-event recording, which consumes only a little storage. Non- event Event...
- Page 79 MNR-310 System Administrator’s Manual Scenario B: You would like the system to record 24/7, and the non-event recording to be kept at a very low frame rate. Please set the event and schedule recordings at different frame rate, you will need to enable “Set Frame Rate for Event Recording Mode”, and set the “Non-event Frame Rate”...
- Page 80 MNR-310 System Administrator’s Manual Video Adjustment Attributes Field Category Field Name Description Video Flipping/ Check this box to flip the video vertically and horizontally Video Mirroring to achieve a 180-degree rotation effect. Brightness Select the Brightness value (0-100). The higher the value, the brighter the image.
- Page 81 MNR-310 System Administrator’s Manual mode. White balance refers to the device’s ability to accurately define “true white” color. In Auto mode, the camera will attempt to recognize the “true white” color and adjust the image accordingly. In Manual mode, you can configure the White Balance by adjusting the R Gain and B Gain value manually.
-
Page 82: Configure Motion Settings
MNR-310 System Administrator’s Manual Configure Motion Settings To make use of the motion and PIR detection functions supported by your devices, you need to configure the detection regions and settings. Once a motion is detected, the NVR server can trigger events and recording, bring up instant pop-up windows and show the detected area on live view. -
Page 83: Adjustment Attributes
MNR-310 System Administrator’s Manual 4. When the setting is finished, click “Apply” to save, and then “Close” to exit this page. To check or modify the regions you set, please go through clicking “Get Motion Settings”, Motion Setup” and then “Motion Enable” buttons, the saved regions are already selected on the list, select one to proceed. -
Page 84: Configure Storage Card Settings
MNR-310 System Administrator’s Manual Configure Storage Card Settings Certain camera models come with the internal storage feature. Via NVR interface, you can observe the storage card’s memory status, and configure related settings. 1. Make sure the SD card is installed properly in the camera. -
Page 85: Configure Ptz Device
Once an ACTi PTZ device is added to the NVR system, the NVR system will use the default settings of the device model and enable PTZ functions, so that you may immediately start PTZ operations. -
Page 86: Adjustment Attributes
1 second. Please refer to the baud rate setting of the analog device and choose exactly the same baud rate setting also in the NVR server. When setting up ACTi Baud rate Zoom, PTZ or Speed Dome cameras using “ACTi”... -
Page 87: How To Do Live Ptz Operation
NVR server. Address ID Available value is from 1~99. By default, ACTi devices will use “1” as Address ID, it is suggested not to change it. Important Notice Note that the functions supported for devices connected using ONVIF are live streaming and adjustments to video image settings. - Page 88 MNR-310 System Administrator’s Manual To execute optical Zoom in or Zoom out, scroll the mouse wheel forward to zoom in; scroll the mouse wheel backward to zoom out. Pan/Tilt Zoom in Zoom out Use panel controls to operate PTZ movements: Click a button on the panel to start, the red crosshair will appear in the view.
-
Page 89: Set Ptz Preset Points
MNR-310 System Administrator’s Manual Draw Zoom area Picture-in-Picture area Cancel Zoom area Set PTZ Preset Points With PTZ devices, you may define a view by where to look (through panning and tilting) and how close (through zooming) to zoom. Once these views have been saved in the NVR server as preset points, the device can always point to this view upon the event triggering or user’s... -
Page 90: Set Ptz Preset Tour
MNR-310 System Administrator’s Manual Set PTZ Command If your speed dome or PTZ device has a special function not supported in the standard protocol, you may input it in PTZ Command list and execute it. Ex: Activate the wiper to clean the window of the PTZ. -
Page 91: Configure Fisheye Cameras
The dewarping takes place in camera before the video is output to the NVR server. Since the image correction counts on the camera itself, the NVR server will not bear much extra loading, which benefits the system requiring many of these fisheye cameras (e.g. ACTi KCM-3911, KCM-7911) ... - Page 92 MNR-310 System Administrator’s Manual Full support for all types of dewarped video stream output from fisheye cameras with in-camera dewarping capability. NVR’s software algorithm can perfectly corrects the original fisheye images, generating 6 specific fisheye view modes from User’s usual perspective.
- Page 93 MNR-310 System Administrator’s Manual Fisheye Mode Description PTZ Navigation The very raw fisheye view Original View Digital PTZ One large user-defined cropped area Dewarping ePTZ 360-degree panorama view for ceiling mount 180-degree panorama view for wall mount Digital PTZ Panorama...
- Page 94 MNR-310 System Administrator’s Manual Four small user-defined cropped regions Quad ePTZ After the configuration is done, remember to click “Apply” to save the settings. www.acti.com...
-
Page 95: Schedule Recordings
MNR-310 System Administrator’s Manual Schedule Recordings Unlike the traditional analog surveillance system, the IP surveillance system provides a target-oriented recording schedule for devices; the view of each device can be recorded based on your required time segments and event types. For example, you may have a camera installed on the office ceiling do continuous recording during work hours, and record only upon the triggers (incidents that detected by system) at night. -
Page 96: Set The Schedule
Before setting up the rules, you can make use of a handy storage calculator provided by ACTi to find out the estimated storage your system requires on ACTi corporate website. http://www.acti.com/project_planner Set the Schedule Here you can configure camera’s recording schedule on 7 days / 24 hours basis. -
Page 97: Use Time Setting Quick Buttons To Set The Time In One Click
MNR-310 System Administrator’s Manual : Continuously record that channel. : Record a period of the detected motion event. Please make sure you have configured the motion settings on Setup page Device tab beforehand. : Event handling is activated. (Please refer to How to Edit an Event Rule on page 103 for Event Rules settings) -
Page 98: Lock Specific Days
MNR-310 System Administrator’s Manual Click to apply schedule from 18:00 to 06:00 every day with the settings for the rest of the time track being cleared. Click to clear all schedule setting in this device. Lock Specific Days Clicking the day of the week will lock/unlock that day from schedule setting. You can shield schedule on a certain day from being changed by changes in other weekdays. - Page 99 MNR-310 System Administrator’s Manual www.acti.com...
-
Page 100: Copy An Existing Schedule To Others
MNR-310 System Administrator’s Manual 2. As you drag any settings over the time track, it will not apply to those shielded days. Copy an Existing Schedule to Others With plenty of devices in your system, it happens that you want to apply the same schedule to multiple devices. -
Page 101: View The Entire Recording Schedule
MNR-310 System Administrator’s Manual To check the result, go to Schedule tab, and click All Devices on Device List. View the Entire Recording Schedule On Setup page Schedule tab, click All Devices on Device List, and an overview of all devices’... -
Page 102: Event Management
MNR-310 System Administrator’s Manual Event Management When something happens on the camera site, such as someone walks by, the door opens or closes, a fire breaks out or the sun goes down – these are all Events. Events which occur in the environment or were preprogrammed in the camera may be used as Triggers. -
Page 103: How To Edit An Event Rule
MNR-310 System Administrator’s Manual How to Edit an Event Rule Go to Setup page Event tab. All the editable event rules are listed in the device ID order. Select a device from the Device List on the left. Based on the trigger types this device supports, the corresponding events rules are listed accordingly on the right. - Page 104 MNR-310 System Administrator’s Manual You can enable multiple responses by first checking the boxes to enable the items: Action Items Function Description This kind of action will focus your attention on the channel when triggered. Pop-up: Brings up event pop-up instant playback window of selected channel upon trigger.
- Page 105 MNR-310 System Administrator’s Manual Makes the NVR server play beep sound or an audio file for a number of repetitions. On NVR3 Workstation client computer, you can upload a WAV file or an MP3 file as the alert sound, and set how many times this audio file is played after the event occurs.
- Page 106 MNR-310 System Administrator’s Manual Enable send email notifications via the SMTP server. The default SMTP and sender’s email settings can be set in advance in Setup page System tab Settings Email& SMTP Settings. 1. Type one or more recipients’ email addresses in “To”...
-
Page 107: Manage The Event Rules
MNR-310 System Administrator’s Manual Manage the Event Rules Event List panel gives an overview on event rules set on the NVR server. Go to Setup page Event tab select All Devices on the left. As the entire available rules of all devices are listed here, you may want to sort out some of them from the long list. -
Page 108: Delete The Event Rules
MNR-310 System Administrator’s Manual Delete the Event Rules On Event List, select the rules you wish to delete, and then click “Delete” to clear this rule. How to Setup SMTP Settings for Event Rules The NVR 3.0 system supports email notification for Event Handling sent through an SMTP server. -
Page 109: How To Setup Ftp Settings For Event Rules
MNR-310 System Administrator’s Manual Security Certain webmail providers provide the SSL/TLS-encrypted SMTP connections to secure your data when sending/receiving emails. Please check if the SMTP connection settings you use (especially the SMTP Port) now require either SSL or TLS to be enabled. -
Page 110: System Log
MNR-310 System Administrator’s Manual Mode The FTP works in two very different manners, Active mode and Passive mode. If your FTP server is behind the firewall or a NAT router, you have to use “Passive” mode. Input the upload path of the file. Default will be “/” to represent the root folder. -
Page 111: Define Search Time
MNR-310 System Administrator’s Manual Define Search Time You need to first define the time of the logs you would like to search for. On Search Time bar, define the date and time. Default is your current client time. Choose Log Type You may filter the logs by Type, User Account, and Device by selecting from the dropdown list, and then click “Search”. -
Page 112: Read The Log
MNR-310 System Administrator’s Manual Read the Log The search result will show 1000 records before and after your query time. You may click the pagination buttons to navigate earlier or later records. If there is an icon on the right top corner of an entry, click it to view the full description content. -
Page 113: Export The Log
MNR-310 System Administrator’s Manual Server start up, disk is full, disk is not found, disk System Status is available Time, source IP address, Request Log /SYS/SystemMgmt/xxxxx, 200 Note If the pagination button appears to be disabled, that means no more records found on the NVR server. -
Page 114: Storage Management
MNR-310 System Administrator’s Manual Storage Management This section describes how to manage storage space in the NVR server. Please note that this section only deals with the overall storage rules rather than the storage of individual channels. Please note that as the NVR continuously writes and deletes file from the disk drive, using a removable disk may risk losing the recordings when the device is removed while being accessed. -
Page 115: Set Hard Drives For The Recorded Files Deletion Rule
C drive as storage location. It is strongly recommended that, for MNR-310, you select other hard drives as the storage disks rather than Drive C. 2. After selecting the disk drive, please set the deletion rule. There are two ways to delete recordings, and when both are active, the NVR server will start to delete old files when any of the criteria is met. -
Page 116: Manage User Groups/ Users
User Groups: To setup user groups and its permissions for the device and functionalities. Users: To manage user accounts and configure user information. ACTi NVR 3.0 system has integrated Microsoft Active Directory service to provide network ® administrators with a more convenient choice for user management. Active Directory is a directory service built in Microsoft Server products to manage user identities and privileges www.acti.com... -
Page 117: User Groups
MNR-310 System Administrator’s Manual within the domain network. As the NVR server runs on the same domain where the Active Directory server is, you can import a user account or a group from those concurrently existing one in Active Directory into the NVR server. In this way, the user identification is processed by Active Directory centrally;... - Page 118 MNR-310 System Administrator’s Manual The domain users within that group will all be added to the NVR server at the same time. To view the whole users within this group, please select and enable the “Show users in domain groups.” The account information of these domain users, unlike those user accounts you add one by one to the NVR server, are not editable on Users page.
-
Page 119: Add Users
MNR-310 System Administrator’s Manual You may copy the Device Permissions Settings to other devices. Click “Copy” under Device Permissions tab to bring up the target device menu, check the target devices, and click “Apply”. Click “Apply” on top to save the settings. - Page 120 MNR-310 System Administrator’s Manual Note The NVR server provides a procedure to help users who have forgotten the password retrieve the original information with the “e-mail address” authentication. It is strongly recommended that you input an email address to which this user has the access when you establish the user account.
-
Page 121: Domain Users Management
MNR-310 System Administrator’s Manual Domain Users Management As the NVR server is logged in to a domain Active Directory, it can import a user account from Active Directory. Domain: ACTi NVR 3.0 Server ACTi.com Active Directory Domain Controller This type of user account is “Domain User”. Upon being added to the NVR server, the user properties stored on Active Directory database including (1) account name and (2) email address will be imported to the NVR server. -
Page 122: Customize Views
MNR-310 System Administrator’s Manual Customize Views After all devices are configured, you may start customizing the views for different users and purposes. This chapter will teach you how to add video sources, arrange the channels and manage live view layouts. -
Page 123: Step 1: Create A New View
MNR-310 System Administrator’s Manual Step 1: Create a New View On View Toolbar, click the Create View button , input the View Name, add a New Group for this View and decide whether this group is to be Public or Private, and then click “Apply”. -
Page 124: Step 4: Add Video Source
MNR-310 System Administrator’s Manual Step 4: Add Video Source In edit mode, move the mouse over the channel and click . You may also directly pull a camera from the Device panel to your desired channel. Remove the camera view: right-click on the channel and select “Remove”. - Page 125 MNR-310 System Administrator’s Manual Map brightness: To change the map brightness, right-click on the map, select “Map Mask” and choose the brightness percentage level. Map size: By default, the map will be displayed in its original size. Use the buttons on upper left to adjust the map size.
-
Page 126: Step 6: Add Devices To The Map
MNR-310 System Administrator’s Manual Remove the whole map: Right-click on the map and select “Remove”. Manage maps: All the uploaded images are managed under Map Image Manager. On Live View screen, you Map Image Manager to view, upload or delete the maps. -
Page 127: Step 7: Adjust The Channel Size & Layout
MNR-310 System Administrator’s Manual ● To remove this device from map, Click ● To move this device, left-click on the device icon and drag. ● To turn the pointed direction, mouse over the viewing angle area, and left-click on the clockwise arrow to turn the direction. -
Page 128: Step 8: Save The View
MNR-310 System Administrator’s Manual Switch channel windows: Click on a channel title until the cross arrow appears, and hold it to drag this device or map to your desired channel. Step 8: Save the View Click on View Toolbar to save it. - Page 129 MNR-310 System Administrator’s Manual 2. After the fisheye mode is selected, click the entire channel or a region of interest. Use PTZ Panel controls to operate PTZ movements: ePTZ Controls on PTZ Panel Zoom in / Zoom out 8 directional buttons ...
-
Page 130: Manage The Views
MNR-310 System Administrator’s Manual Manage the Views Each View belongs to a specific View Group. With the group management, the NVR 3.0 system makes it easy to deal with Views you create for multiple users. View Manager. After you create and save the Views on Live View screen, click 1. -
Page 131: Set View Link
MNR-310 System Administrator’s Manual Set View Link By creating a link button on a map view, you can directly be linked to another specific view by clicking the button. On the picture below shows how to create a link button to 7F View on 11F View. - Page 132 MNR-310 System Administrator’s Manual On View Toolbar, click and select Create Patrol. 1. Input the Patrol Name 2. Select the Patrol Type to be either available for all users or to the creator’s account only. 3. Define the Global Dwell Time between the views. If you want to set different dwell time length for individual Views, do not check this option, and configure them separately in the table below.
-
Page 133: Tips To Enhance Live View Performance
CPU usage is above certain percentage. When either of these two situations happens, the frame rate of all live streams will be declined. This setting will be applied to the live display of all connected clients except for the client on MNR-310. www.acti.com... - Page 134 MNR-310 System Administrator’s Manual 4. A Workstation client computer can have its own specific display configuration without being affected by the NVR universal setting. Log in as NVR3 Workstation client, go to Setup page System tab Workstation and configure the Display Performance Setting.
-
Page 135: Customize System Language
MNR-310 System Administrator’s Manual Customize System Language The NVR server supports multiple languages for user interface display. There are already 10 translated language files in the server system. Each language is open to customization based on your own needs. This section will describe how to choose or customize language strings for your site. - Page 136 MNR-310 System Administrator’s Manual Edit User Interface Wordings Each language file contains four editable string tables. Each table displays the default wordings in English and the translation in target language. To view each table: Select the language from “Select Language” dropdown list, and then select a table from the “Language List”...
- Page 137 In general, it is suggested that you always save a modified language table with a different file name in a location other than default system language folder C:\Program Files\ACTi Corporation\NVR3\Language, and then import it to use. In this way, you can avoid overwriting the original language file.
-
Page 138: Display Configurations
MNR-310 System Administrator’s Manual Display Configurations You can change the user interface style by arranging the main screen and Panel/Device List on the right or left. Go to Setup pageSystem tabSettings. In User Interface Style section, select the setting style and click “Apply”. The change will be applied upon your next login. -
Page 139: Video & Snapshot Export Configurations
MNR-310 System Administrator’s Manual Video & Snapshot Export Configurations The snapshots taken by users on Live View and all exported video files are saved to a default file location, and you may configure the destination on the NVR server. Go to Setup pageSystem tabSettings. -
Page 140: Joystick
MNR-310 System Administrator’s Manual Joystick On the NVR server, other than user interface PTZ panel and mouse operation, you may also control the PTZ movements by physical controllers. The NVR server supports two types of controllers, both of which feature in a joystick with twelve buttons for users to assign specific actions. -
Page 141: Nvr System Upgrade
MNR-310 System Administrator’s Manual NVR System Upgrade When a newer version of the NVR system software for INR-410/420 is released on ACTi website, you can download and install it directly to upgrade your NVR system. To download the latest version, please go to http://www.acti.com/downloadcenter... - Page 142 MNR-310 System Administrator’s Manual When selecting Setup Type, the default “Complete” will have the program installed on default C drive, you may select “Custom” to choose another program location. www.acti.com...
- Page 143 MNR-310 System Administrator’s Manual 3. The IP Port Checker will pop up to confirm the NVR port number with you. The installation program will use 80 as default. You may enter another available port number in “Listen Port” field and click “Apply”.
- Page 144 MNR-310 System Administrator’s Manual 4. As the server port is confirmed, the installation process is done, click “Finish”. 5. After the installation completes, connect to http://localhost:port number with Internet Explorer browser, you will see NVR Login page. Note If IIS Web Server has been installed on the computer and you are asked to restart the computer during installation process, please 1.
-
Page 145: Workstation Installation And Upgrade
MNR-310 System Administrator’s Manual Workstation Installation and Upgrade NVR3 Workstation program is wrapped together with the NVR system software in a zip file. When you upgrade the NVR system to a new version, please also upgrade NVR3 Workstation to the same version as the NVR system. - Page 146 MNR-310 System Administrator’s Manual 3. Double-click the shortcut on desktop to execute the application. www.acti.com...
-
Page 147: Back Up System Data
MNR-310 System Administrator’s Manual Back Up System Data Making regular system backups is always recommended in case of unexpected disasters or accidents that may damage the NVR server. Other than this, you may need to perform an on-demand backing up to migrate the whole NVR server data to another one. There are... -
Page 148: Step 2: Back Up Recording Files Folder (Optional)
This step is necessary for the NVR 3.0 system migration between two servers. The recording files index folder contains important video index data that the NVR server needs to process recorded video clips. Enter the server program folder ACTi Corporation\NVR3\DataSource, and back up the DataBase folder (where stores the recording files index data). -
Page 149: Restore System Data
MNR-310 System Administrator’s Manual Restore System Data Before starting restoring the system, make sure you already have the backup file (.xml). Please follow the below steps to restore the configuration. 1. Go to Setup page System tab Backup / Restore. -
Page 150: Advanced Administrative Tasks
MNR-310 System Administrator’s Manual Advanced Administrative Tasks To assist the NVR administrator in monitoring the server status and basic troubleshooting, the NVR3 Administrator Tool is installed along with NVR server program. This tool will start running as the server starts up, and resides in the system tray. You may double-click the icon to open this tool. -
Page 151: Change Authentication Method
MNR-310 System Administrator’s Manual Change Authentication Method You may enable the Digest authentication other than the basic way. With this method, User’s credentials are encrypted using MD5 algorithm. In this way, the protection is more secure to prevent from unauthorized access. -
Page 152: Switch To Redundancy Server
MNR-310 System Administrator’s Manual Switch to Redundancy Server An NVR server can serve as a redundancy server for other NVR server. ACTi’s Redundancy Server records all surveillance videos directly from camera devices, logs and performs actions for real-time event notifications on behalf of the NVR server during system downtime. - Page 153 MNR-310 System Administrator’s Manual 3. The other relevant settings pages will then appear. Enter “License” to start registering. If this server has access to Internet, please select “Online Registration” or you can perform “Offline Registration” by obtaining an activation file from http://www.acti.com/support/LicenseMgt...
- Page 154 MNR-310 System Administrator’s Manual After the registration, the license information will appear on this page. www.acti.com...
- Page 155 MNR-310 System Administrator’s Manual Set up Redundancy Server 1. Go to the “Storage” page to set up the storage space configuration 2. Go to “Target” page to edit the list of the target NVR servers. Click “Add” and fill in the connection properties of the NVR server and click “Apply”.
- Page 156 MNR-310 System Administrator’s Manual 3. After you click “Yes” to confirm this configuration, this NVR will immediate turn into an redundancy server on a first-come-first-served basis. By entering “Service” page, you can observe the service status. www.acti.com...
Need help?
Do you have a question about the MNR-310 and is the answer not in the manual?
Questions and answers