Table of Contents
Advertisement
Quick Links
Advertisement
Table of Contents

Related Manuals for Sybility PILOT X

Summary of Contents for Sybility PILOT X
- Page 1 User Manual Bedienungsanleitung Art.Nr. 150 1ES1 PILOT X August 2021...
- Page 2 User Manual PILOT X August 2021 Page 2 of 36...
-
Page 3: Table Of Contents
2.6.3 Check and Edit Recordings ..................... 23 How to Use PILOT X ........................24 Using PILOT X with Voice Commands ..................24 Using PILOT X in a Browser ....................25 User / Admin Mode........................ 25 System Menu / Settings ........................ 26 Backup ............................ -
Page 4: Overview
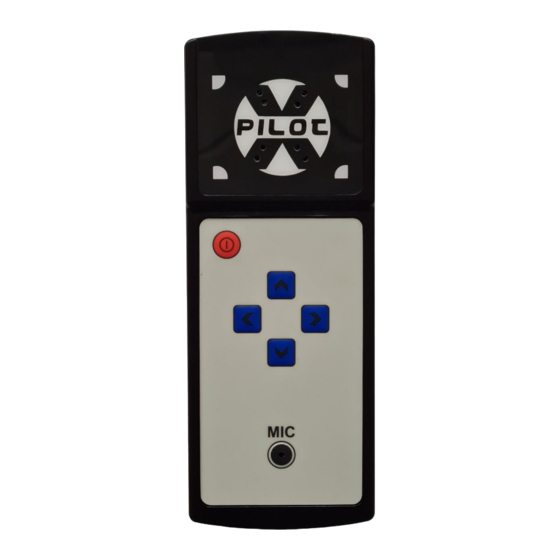
User Manual PILOT X 1 Overview IR Transmitter IR Receiver LED 4 Speaker LED 1 LED 3 Power Button LED 2 Key 2 3,5mm Stereo Socket for Ext. Microphone Key 4 Key 1 Key 3 Microphone Reset-Button Micro USB Connector LED 1: Battery status, Indicator for Power up and down and IR Learn- and Transmit Indicator. -
Page 5: About Pilot X
PILOT but also to control appliances. On top of that there is also an Bluetooth interface. PILOT X allows you to use up to 120 voice commands. The commands can be used several times with different functionality if they are used in different devices (menus). Each command can be configured with a list of actions (IR, Easywave …) to create macros. -
Page 6: Keys
Waiting for voice command while voice training 1.5 Power Supply PILOT X contains a LiPO rechargeable battery which is charged automatically as soon as the charging cable and power supply are connected. The battery status can be played back with the status function through the keys or in the browser. -
Page 7: Setup / Configuration
On the first setup you must use the Hotpot connection which you can find in the next chapter. Other options can be found at 4.4 WiFi Interface. It is recommended to use the Hotspot to link the PILOT X to an existing WiFi and continue in this connection. - Page 8 User Manual PILOT X • Now you can see the start screen • And a few seconds later the Login screen Default Login: Name: pilot Password: 1234567890 August 2021 Page 8 of 36...
- Page 9 User Manual PILOT X • Type in the default name and password and click on „Login“. Now you are logged in and can see the home screen of PILOT X. Admin Mode: User Mode: Stopped Shows that the voice recognition is stopped or not trained. This is equal with LED 2 turned on in red.
-
Page 10: Create Menus
User Manual PILOT X 2.2 Create Menus The next step is to create the menus and commands and configure them with functions. For doing that please choose the page “Menus“: → Now you can see the empty page “Menus”. Here you can create the main menu commands. -
Page 11: Creating Commands
User Manual PILOT X “delete“ deletes the menu including its commands. With the checkbox next to “on“ you can activate or hide the whole menu. If it is hidden the menu and its commands are not available for the user and on the Control page. They will also not be asked during voice training. -
Page 12: Configure Commands
With a click on you can listen to the text-to-speech result. If you want PILOT X to change into sleep mode automatically with this command you can check the option “go sleeping after command“. Now you can see the new command. -
Page 13: Creating Easywave Signals
User Manual PILOT X 2.3.1 Creating Easywave Signals The first box shows and defines the action index. With this selection you can set the order of the actions within a macro. “Channel“ and “Function“ defines the Easywave signal. There are 64 channels and... - Page 14 Please make sure that there is no directly interfering light which can cause a wrongly stored signal. The IR receiver in PILOT X is located at the top end in the middle. It is sensitive enough to point your remote in direction of PILOT X. The distance should not be more than 1 m.
-
Page 15: Creating A Pause
User Manual PILOT X Then click on “Save“ to confirm the changes. Now you can see the new signal. The signal name shows the following information: Index 10, IR signal nr 20, no repetition (x1) “edit“ allows to change the signal. “delete“ deletes the signal. -
Page 16: Sequence Of Ir Commands - Irseq
„Send“ defines the command which is used to send the collected signals. Under „Keyword“ you enter the command name, for example “dial”. If you want PILOT X to change into sleep mode automatically with this command you can check the option “go sleeping after command“. -
Page 17: Bluetooth - Hfp
PILOT X. You should connect a headset (Android) or set it to always answer in handsfree (iPhone). This page is used to pair PILOT X with your phone and also to configure the commands. Pairing Click on the button “Pairing” and PILOT X will answer “Bluetooth is visible”. - Page 18 With a click on you can listen to the text-to-speech result. If you want PILOT X to change into sleep mode automatically with this command you can check the option “go sleeping after command“. Click on “Save” to create the new command.
- Page 19 Please note If the Bluetooth connection between PILOT X and your phone gets lost, it will automatically be reconnected with the next command from the PILOT X using the Bluetooth connection. In this case PILOT X will prompt “Bluetooth connecting” after the command has been confirmed.
-
Page 20: Voice Training
During the voice training you will be asked to repeat all active menu commands and additionally the commands for waking up PILOT X and setting it into sleep mode. Every time this training is started all used commands will be asked to be trained once. - Page 21 When all recordings are done voice training will be finished. „PILOT ready“ PILOT X is now ready to listen to your commands. Tip: If a command is stored but the recording does not sound ok, please make a note. This recording can be deleted or replaced when training is finished.
-
Page 22: Training For Single Commands
To replace existing recordings, it can be done in “Audio” with “ Rec”. You can choose if PILOT X should prompt the selected command and / or playback a beep before the user should say the command. These settings are done under “Sytstem – VRec”. -
Page 23: Check And Edit Recordings
User Manual PILOT X 2.6.3 Check and Edit Recordings When voice training has been finished you can check and if necessary, delete single recordings. Please change to page “Audio“: → “Clear-all“ Deletes all recordings. “Training“ Changes to page “Training“. “Home“... -
Page 24: How To Use Pilot X
3 How to Use PILOT X 3.1 Using PILOT X with Voice Commands In the following you can see how to use a PILOT X with the example of turning on a light with these settings: Command to wake up PILOT X: “PILOT X“... -
Page 25: Using Pilot X In A Browser
PILOT X. 3.3 User / Admin Mode If you want to use your PILOT X through the browser on your computer you can activate User Mode to avoid not intended changes by accident. When User Mode is activated some options are hidden: The “Navigation”... -
Page 26: System Menu / Settings
User Manual PILOT X 4 System Menu / Settings The System Menu can be opened with the button “Navigation“ and click on “System. → You can see the page “System“. The available buttons are described in the following chapter. “Home“ will change to the start page (see page 8). -
Page 27: Backup
4.1.2 Create an Infrared-Backup Click on „Export-IR“ to create a backup file of the IR file in the PILOT X which includes all stored IR signals and names. This will create a file which is shown when finished. The filename includes the date, time and the PILOT X ID. -
Page 28: Import
After installing both files click on “Home“ to change to the main page. Now you can click on “Start Pilot“ to start the voice recognition. PILOT X confirms this with the playback “PILOT ready“. 4.1.4 Software Update If there is a software update available it can be done in the same way as an import. You will receive an update file which is uploaded and installed. -
Page 29: Voice Recognition Settings - Vrec
You can use an answer for example “yes, hello“ for the “Wakeup keyword“. During the voice training you will then hear “yes hello” but record for example “Hey Pilot X”. In this case you can say the command “Hey Pilot X” and will get the answer “yes hello”. -
Page 30: Microphone
PILOT X (s. 1.3). 4.4 WiFi Interface PILOT X can either supply a WiFi Hotspot or be linked into an existing WiFi network. If the stored WiFi is not available PILOT X will automatically change to Hotspot. -
Page 31: Connect To Wifi Network
To reconnect to PILOT X please follow: Connect your computer to the same WiFi as PILOT X is now connected. Open your browser. Go to the address line and type in the IP address of PILOT X or you can try http://pilot . You can get the IP address with the status information by pressing key 2 >... -
Page 32: Hotspot Settings
On this page you can change the settings for the WiFi hotspot. Enter SSID Type in the name for the SSID. With this name you will find the PILOT X WiFI hotspot then. Default is “pilot“ (see 2.1 PILOT X Hotspot). -
Page 33: Reboot
This function is used if there is an update of the operating system available. It can only be used if the PILOT X is connected to a WiFi network with internet connection. Please do not use this without notice from Sybility GmbH. -
Page 34: Info
User Manual PILOT X 4.4.6 Info On this page you can see different information about your PILOT X The first part shows the version of the operating system and the device ID. In the second part you can see the battery status (Netz = charging), the internal temperature and connection data. - Page 35 User Manual PILOT X Notes August 2021 Page 35 of 36...
- Page 36 User Manual PILOT X Änderungen vorbehalten Sybility GmbH Kreuzweg 15 91781 Weissenburg T +49 9141 9131689 F +49 9141 9132855 S/N: info@sybility.de August 2021 Page 36 of 36...
Need help?
Do you have a question about the PILOT X and is the answer not in the manual?
Questions and answers