Advertisement
Quick Links
Advertisement

Summary of Contents for BCP SKY5800
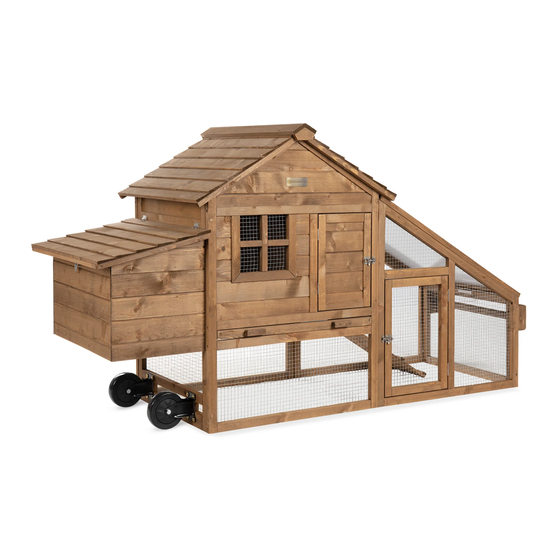
- Page 1 INSTRUCTION MANUAL Chicken Coop with Wheels SKY5800 Ver. 1...
- Page 2 As shoppers, we’re always trying to find the perfect balance between quality & value. At BCP, we believe we’ve achieved that. Our diverse catalog of everyday essentials is tailored especially to our customers & guaranteed to hit that sweet spot of high quality & low price.
-
Page 3: Tools Required
NOTICE Please retain these instructions for future reference. • Do not stand on or use any part of this item as a step ladder. • Firmly secure all bolts, screws, and knobs before use. • Reconfirm that all bolts, screws, and knobs are secure every 90 days. •... - Page 4 PARTS FRONT BACK LEFT SIDE 1 PC 1 PC 1 PC RIGHT SIDE FRONT FENCE BACK FENCE 1 PC 1 PC 1 PC CLEAR ROOF ROOF BOX ROOF 1 PC 2 PCS 1 PC TRAY RAMP SIDE FENCE 1 PC 1 PC 1 PC...
- Page 5 PARTS LEFT BOX SIDE RIGHT BOX SIDE BOX FRONT 1 PC 1 PC 1 PC BOX FLOOR I BOX FLOOR II DIVIDER 1 PC 1 PC 1 PC ROOF FRAME RAILING RAILING ARM 1 PC 1 PC 2 PCS MIDDLE SUPPORT SIDE SUPPORT WHEEL 2PCS...
- Page 6 PRODUCT ASSEMBLY Attach a part 23 side support to part 3 left side with two part J dowels and two part D screws. Attach two part 24 wheels with eight part I bolt sets.
- Page 7 PRODUCT ASSEMBLY Attach part 1 front and part 2 back to the left side with six part A screws.
- Page 8 PRODUCT ASSEMBLY Attach a part 23 side support to part 4 right side with two part J dowels and two part D screws. Attach part 4 right side with four part J dowels and four part A screws.
- Page 9 PRODUCT ASSEMBLY Attach part 11 ramp with two part C screws.
- Page 10 PRODUCT ASSEMBLY Attach part 5 front fence and part 6 back fence with four part F screws. Insert two part J dowels. Insert a part K dowel into the back fence to secure the ramp.
- Page 11 PRODUCT ASSEMBLY Attach two part 21 railing arms to part Attach the railing arms to part 12 side 20 railing with two part F screws. fence with two part J dowels and four part F screws. Attach the side fence with four part A screws.
- Page 12 PRODUCT ASSEMBLY Attach part 7 clear roof with four part A screws. NOTE: Insert the dowels into the roof.
- Page 13 PRODUCT ASSEMBLY Attach part 13 left box side and part 14 right box side with four part H bolt sets. Attach part 15 box front with four part C screws.
- Page 14 PRODUCT ASSEMBLY Place part 16 and 17 box floors. Insert part 18 divider into the designated slot.
- Page 15 PRODUCT ASSEMBLY Attach the hinges on the part 9 box roof with four part C screws.
- Page 16 PRODUCT ASSEMBLY Place two part 22 middle supports into the coop. Slide in the part 10 tray.
- Page 17 PRODUCT ASSEMBLY Attach two part 8 roofs with eight part E screws. Attach part 19 roof frame with four part G screws.
- Page 18 PRODUCT ASSEMBLY Attach two part L latches with twelve part B screws, six screws per latch.
- Page 19 Earn points while you shop. Join today! Give your friends 15% o their first order! For each successful referral you’ll receive 100 points. bestchoiceproducts.com...
- Page 20 HELP CENTER Question about your product? We're here to help. Visit us at: help.bestchoiceproducts.com CHAT Chat Support Product Inquiry Orders FAQ Product Assembly Returns & Refunds PRODUCT WARRANTY INFORMATION All items can be returned for any reason within 60 days of the receipt and will receive a full refund as long as the item is returned in its original product packaging and all accessories from its original shipment are included.
Need help?
Do you have a question about the SKY5800 and is the answer not in the manual?
Questions and answers