Table of Contents
Advertisement
Quick Links
Instruction Manual
12MM-DSTM2
CONTENTS
Safety
Warning
3 Detail operation guide
3.1 DVB-S/S2 Satellite
3.1.2 Dish Setup
3.2 DVB-T/T2 Terrestrial
3.3 DVB-C Cable
3.5 Spectrum Analyzer
3.7.6 Option
4 Technical Specifications
SAFETY
1. Please read this manual carefully before first use.
2. The LCD is not a touch screen.
3. Do not place heavy items on the device.
4. Do not leave the device near to heat sources, in direct sunlight, in places with strong mechanical vibration or dusty
environments.
5. Please place the device in ventilated surroundings.
6. The device should be fully charged before using for the first time (recommend 6 hours for the first charge).
7. Contact Matchmaster Communications Pty Ltd if malfunction of the device happens.
8. Damaging the device on operation without following the guideline will not be warranted.
WARNING
1. Avoid using batteries near heat sources.
2. Do not get wet.
3. Avoid charging in heated locations or direct sunlight.
4. Charge using only charging accessories supplied.
5. When the battery is being charged by a vehicle charger, please ensure the polarity of the charging connection is
correct.
For technical support call 1800 237 425 or visit www.matchmaster.com.au
|
Page 1 of 16
Advertisement
Table of Contents

Related Manuals for Matchmaster 12MM-DSTM2

Summary of Contents for Matchmaster 12MM-DSTM2
-
Page 1: Table Of Contents
6. The device should be fully charged before using for the first time (recommend 6 hours for the first charge). 7. Contact Matchmaster Communications Pty Ltd if malfunction of the device happens. 8. Damaging the device on operation without following the guideline will not be warranted. -
Page 2: Note
1 OVERVIEW The 12MM-DSTM2 is an HD digital signal meter and portable device for installation and adjustment of satellite and terrestrial receiving antennas. 1.1 Features •... -
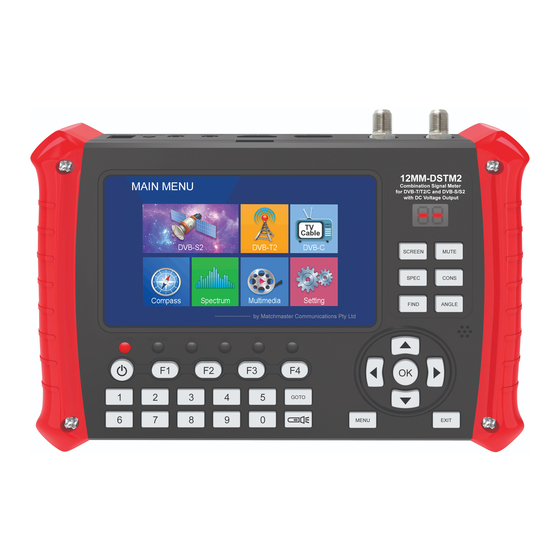
Page 3: Introduction Of Panel Function
19. OK: confirm key 20. MENU: Show main menu 21. EXIT: exit menu (main menu or sub menu) 22. Digitron: Show the current signal quality 23. LCD screen For technical support call 1800 237 425 or visit www.matchmaster.com.au Page 3 of 16... -
Page 4: Top Panel Introduction
DVB-S2, DVB-T2, DVB-C, Compass, Spectrum, Multimedia and Setting. 3.1 DVB-S/S2 3.1.1 Satellite Finding Move cursor to “Satellite Finding” and press “OK’’, then you will enter the “Satellite Finding’’ interface. For technical support call 1800 237 425 or visit www.matchmaster.com.au Page 4 of 16... - Page 5 TP you selected or input manually. It will switch to the Program page after the search (if there is a program on the Transponder). For technical support call 1800 237 425 or visit www.matchmaster.com.au Page 5 of 16...
- Page 6 Satellite Name, Longitude Direction, Longitude Angle and Band. 4. Press [F3] to delete existed satellite. If you press OK, the satellite will be deleted or you can press “EXIT’’ to exit. For technical support call 1800 237 425 or visit www.matchmaster.com.au Page 6 of 16...
- Page 7 ] to choose between None/ LNB1/ LNB2/ LNB3/ LNB4. 13. DiSEqC1.1: Press [ ] to choose between None/ LNB1~LNB16. 14. Motor: Press [ ] to choose between None/ DiSEqC1.2/DiSEqC1.3. For technical support call 1800 237 425 or visit www.matchmaster.com.au Page 7 of 16...
-
Page 8: Angle Calculation
3. Press“OK ’’, then you will see the quality bar and the strength bar. 4. Under Constellation Analyzer interface (by Frequency), press ] to switch between other Frequency of the selected satellite For technical support call 1800 237 425 or visit www.matchmaster.com.au Page 8 of 16... - Page 9 Move cursor to “DVB-C” and press “OK”, then you will enter the “DVB-C” interface. Press [ ] on Manual Search and press“OK’’ , then you will see the following menu. For technical support call 1800 237 425 or visit www.matchmaster.com.au Page 9 of 16...
-
Page 10: Compass
Connect your USB and move the cursor to “Multimedia” and press “OK”, then you will enter the “USB” interface. Press [ ] on Multimedia and press “OK”, then you will see the following menu. For technical support call 1800 237 425 or visit www.matchmaster.com.au Page 10 of 16... -
Page 11: Setting
Move cursor to “Program” and press “OK”, then you will enter the “program” interface. Press [ ] on Program Edit option and press “OK”, enter password: 000000 then you will see the TV list. For technical support call 1800 237 425 or visit www.matchmaster.com.au Page 11 of 16... - Page 12 [FAV] Key. Press [ ] to choose what “Favourite Type” and press the [OK] key. 3. Press [EXIT] Key to save the settings. For technical support call 1800 237 425 or visit www.matchmaster.com.au Page 12 of 16...
-
Page 13: Epg
Keypad Tone or Led Display between “On” & “Off”. 3.7.4 System Press [ ] on “System” and press “OK”, then you will see the following menu. For technical support call 1800 237 425 or visit www.matchmaster.com.au Page 13 of 16... - Page 14 3. Press “OK” on Set Password option to reset the user password. 4. Press “OK” on Restore Factory Default to Factory Reset. 5. Press “OK” on information option to get the hardware or software version. For technical support call 1800 237 425 or visit www.matchmaster.com.au Page 14 of 16...
-
Page 15: Picture
Save the SW onto a FAT32 formatted USB, and move cursor to “USB Upgrade” and press “OK”, then you can enter the “Software Update” interface to choose the correct SW to upgrade to. For technical support call 1800 237 425 or visit www.matchmaster.com.au Page 15 of 16... - Page 16 LCD Display 5 inch Size (WxHxD) 210x150x52mm Net Weight 0.93Kg Operating Temperature 0°C ~ + 45°C Storage Temperature -10°C ~ + 70°C Storage Humidity 5%~95% RH (Non-Condensing) For technical support call 1800 237 425 or visit www.matchmaster.com.au Page 16 of 16...
Need help?
Do you have a question about the 12MM-DSTM2 and is the answer not in the manual?
Questions and answers