
Related Manuals for AndyMark TileRunner Original 6WD


Summary of Contents for AndyMark TileRunner Original 6WD
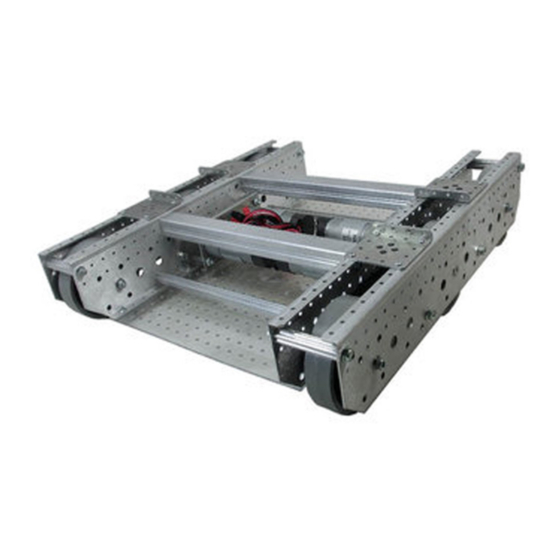
- Page 1 User Guide TileRunner Six Wheel Drive Popular Variants: TileRunner Original 6WD (BT6S84E) TileRunner Bulldozer (BT6S56E) TileRunner GTO (BT6S62E) TileRunner Hulk (BT6PB4E) TileRunner Omni Wheels (BT6OC4E)
- Page 2 Additional Instructions Available We encourage customers to seek product information at AndyMark.com, contact us via e-mail at support@andymark.com, or call Toll-Free 877-868-4770 with questions about any of our products. 2018 Updates Updated PicoBox sets with added details about assembling a TileRunner GTO 2019 Updates 9-1-19: Updated instructions to match the new 6-32 Hex Head hardware;...
- Page 3 TileRunner Frame Bill of Materials Part Number Component Quantity Part Photo am-3392_Inside Chassis Inside Plate am-3392_Outside Chassis Outside Plate am-3393 4x4 Plate am-3394 Belly Pan am-3395 Peanut, 11.25" am-3398 Churro, 11.25" am-3399 Churro, 63mm Socket Head Cap am-1443 Screw, M3-0.5 x 5mm Self-Tapping Screw, am-1310 1/4-20 x 0.75 in...
- Page 4 TileRunner Common Drive Bill of Materials Part Number Component Quantity Part Photo am-1102 Nut, Nylock Jam 1/4-20 Button Head Cap am-1420 Screw, 1/4-20 x 1.75 in Hex Head Thread am-1563 Patch, 6-32 x 0.5 in 6mm D Bore Double am-3215a Boss Nub w/Set Screw 6mm D Shaft, 100mm, am-3226-100...
- Page 5 TileRunner 6WD Bill of Materials Part Number Component Quantity Part Photo 24 Tooth HTD Pulley, am-3401_half 6mm Bore, Half 24 Tooth HTD Pulley am-3404 Extension Belt, Timing, HTD 5mm am-3378 pitch, 9mm wide, 93 Tooth Hex Head Cap Screw, am-1437 6-32 x 1.25 am-1111 Nut, Nylock M6-1.0...
- Page 6 TileRunner 6WD Wheel Options Code Part Number Component Quantity Part Photo 4” Stealth Wheel am-2648_orange 8mm Bore Orange 40 Durometer 4” Stealth Wheel am-2648_Blue 8mm Bore Blue 50 Durometer 4” Stealth Wheel am-2648_Blk 8mm Bore Black 60 Durometer 4” Stealth Wheel am-2648 8mm Bore Gray 77 Durometer...
- Page 7 TileRunner 6WD NeveRest Options Code Part Number Component Quantity Part Photo Gearmotor, NeveRest 60, with am-3103b Encoder, and Female JST VH, 2-pin Hall Effect Encoder am-2992 Cable with 4-pin Connector am-3406 PicoBox Spacer Spacer, Aluminum, 0.242” id, 0.50” od x am-3426 0.354”...
- Page 8 TileRunner 6WD NeveRest Options Code Part Number Component Quantity Part Photo Gearmotor, NeveRest Orbital 20, am-3637b with Encoder, and Female JST VH, 2- Hall Effect Encoder am-2992 Cable with 4-pin Connector am-3406 PicoBox Spacer Spacer, Aluminum, 0.242” id, 0.50” od x am-3426 0.354”...
- Page 9 TileRunner 6WD Gear Options Code Part Number Component Quantity Part Photo 40 Tooth PicoBox am-3407 Gear 35 Tooth Gear for am-3408 PicoBox 45 Tooth Gear for am-3409 PicoBox 40 Tooth PicoBox am-3407 Gear 35 Tooth Gear for am-3408 PicoBox 45 Tooth Gear for am-3409 PicoBox...
- Page 10 Center Wheel Assembly Instructions (QTY 2) NOTE: This subassembly applies to any 6WD TileRunner configuration utilizing a Stealth, Performance, or Compliant Wheel as the center wheel. See Page 20 for Performance Wheel Assembly Instructions. Step 1: Place a 6mm D-Bore Double Boss Nub Step 2: Flip the wheel over and secure the (am-3215a) into the center bore of a 4"...
- Page 11 Corner Wheel Assembly Instructions (QTY 4) NOTE: This subassembly applies to any 6WD TileRunner configuration utilizing a Stealth, Performance, Compliant, or Omni Wheel [with alternate instructions in brackets] at the corners. Step 1: Place a 6mm Round Bore Double Step 2: Flip the wheel over and secure the Nub to Boss Nub (am-3413a) into the center hole the wheel by threading two 6-32 x 1.25 in Hex Head Screws (am-1437) [6-32 x 0.75”...
- Page 12 Nub (am-3215a) into the center bore of a the gear by threading four 6-32 x 0.5 in Hex Head PicoBox Gear and align the bolt circles of Screws (am-1563) into the Nub. AndyMark suggests starting with a ¼” Nut Driver and finishing the Nub and the Gear.
- Page 13 PicoBox and Chassis Assembly Instructions Step 1: Press a 6x12x4 Flanged Bearing (am- NOTE: Make sure the flange of the 3377) into the center 12mm hole of a PicoBox bearing is on the same side of the plate Duo Gearbox Plate (am-3405) or PicoBox GEO as the flanges, and is flush against the Gearbox Plate (am-3476).
- Page 14 PicoBox and Chassis Assembly Instructions Step 6: Install the 9 mm long Aluminum Spacer Step 7: Install one Gear Assembly onto the (am-3426) on the center axle up against the center axle of the gearbox. Be sure to place the previously installed bearing.
- Page 15 PicoBox and Chassis Assembly Instructions Step 12: Insert four 1/4-20 x 1.75" Button Head Step 13: Place a PicoBox Spacer (am-3406) Screws (am-1420) into the side of the Inside over each of the four 1/4-20 screws on the side Plate with a single solid flange. of the Inside Plate with two flanges.
- Page 16 PicoBox and Chassis Assembly Instructions Step 18: Attach two 11.25" Churro Extrusions Step 17: Attach two 11.25" Peanut Extrusions (am- (am-3398) to the PicoBox - TileRunner Inside 3395) to one PicoBox - TileRunner Inside Plate Assembly (on the same side of the plate as the Plate Assembly (on the same side of the plate as the PicoBox) at the indicated attachment PicoBox) at the indicated attachment points below...
- Page 17 PicoBox and Chassis Assembly Instructions Step 23: Install a 0.25 in long Aluminum Spacer Step 24: Install the Center Wheel Assembly onto (am-3424) onto the Center Shaft. this shaft and over the spacer such that it is flush with the bottom of the cavity in the pulley. Lock the wheel in place using the #10-32 set screw on the Nub.
- Page 18 PicoBox and Chassis Assembly Instructions Step 27: Flip the plate over and press two more Step 26: Press a 6x12x4 Flanged Bearing (am- bearings into the end-most 12mm holes of the 3377) into the center 12mm hole of the Outside Outside Plate.
- Page 19 PicoBox Duo and Chassis Assembly Instructions Step 33: Repeat Steps 23-32 to assemble the Step 32: Repeat Steps 31-32 for the Outer Wheel other half of the drivetrain. Be sure to use the Assembly on the other end of this half of the same length aluminum spacers on each Outer chassis using a 0.25 in long Aluminum Spacer Wheel Assembly at each end of the chassis to...
- Page 20 TileRunner Performance Wheel Tread Assembly Instructions: Component Part Number Quantity Part Photo 4 in Performance Wheel am-3612 with Nub Bore am-2611 10 ft. of Green Grippy Tread Step 1: Cut tread to a length long enough to wrap around the wheel with a 1” overlap. Narrow each end of the tread about 3/16”...
- Page 21 TileRunner Performance Wheel Tread Assembly Instructions: Step 3: Thread the ziptie and the ends of the Step 2: Put both ends of the tread together with tread through the slot on the performance wheel. the rubber sides facing each other. Place a strong ziptie (am-1189 recommended) through the holes in the tread.
Need help?
Do you have a question about the TileRunner Original 6WD and is the answer not in the manual?
Questions and answers