
Related Manuals for Ocean Sonics BP2-B1

Summary of Contents for Ocean Sonics BP2-B1
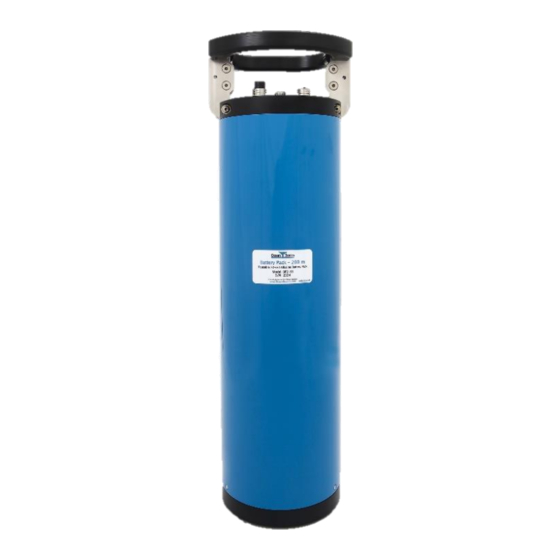
- Page 1 Battery Pack User Guide FOR MODELS: BP2-B1, BP2-B3, BP9-B3, BP35-B3 BBPBP35-B3 March 2020 Version 2.1...
-
Page 2: Table Of Contents
Table of Contents Introduction ................................2 Battery Pack Quick Start Guide ........................3 Opening the Battery Pack ..........................3 Installing New Batteries ..........................3 Closing the Battery Pack ..........................5 Locking the Handles ............................6 Confirming Voltages ............................6 Deployment ................................6 Recovery of the Battery Pack ........................ -
Page 3: Introduction
Above weights are for a 200 m depth rated battery pack. Weights will differ slightly depending on depth rating, due to end cap material. The B3 model of Ocean Sonics Battery Packs can be easily configured for the use with alkaline or lithium batteries. -
Page 4: Battery Pack Quick Start Guide
Battery Pack Quick Start Guide Opening the Battery Pack 1. Stand the battery pack upright. 2. Swing handles to release endcap. 3. Dry and clean the seal to ensure no water or dirt enters the interior. 4. Remove the inner assembly from the pressure housing. Installing New Batteries 5. - Page 5 For Model BP3: a) Confirm the ‘Battery Type’ selection switch is in the correct position on contact plate B. Other Models: If the model does not allow for selection this switch will not be present. Important: Ensure the batteries are the correct type for your battery pack (alkaline/lithium) and that the switch is in the correct position prior to installation.
-
Page 6: Closing The Battery Pack
Closing the Battery Pack 12. Clean the O-Rings and ensure they are seated properly and not damaged. (See Cleaning the Seal under Maintenance). 13. If you are redeploying the battery pack, check the anode (see Anode section below). 14. Return the inner assembly into the pressure housing with handles in open position. 15. -
Page 7: Locking The Handles
Locking the Handles 17. Secure the releasing arms in place by passing cable ties through the 2 points noted in red circles. 18. Zip tightly and cut flush to the cinch-point. Confirming Voltages A voltmeter should be used to confirm the proper voltage is being supplied to the exterior bulkhead connector. -
Page 8: Recovery Of The Battery Pack
4. Prepare your equipment for your deployment ensuring the hydrophone element is protected from the environment. 5. Deploy your hydrophone and collect data. Recovery of the Battery Pack 1. After recovery, inspect for damage and vent the Battery Pack to equalize pressure*. *if the model has a vent plug. -
Page 9: Anodes
Ocean Sonics suggests replacing the anodes before 25% remaining. If the battery pack is being deployed on a long deployment, it is recommended that you have fresh anodes. -
Page 10: O-Ring Replacement Instructions
Appendix A O-RING REPLACEMENT INSTRUCTIONS CAREFULLY REMOVE USED O-RINGS AND BACKUP RINGS USING A PLASTIC O-RING PICK. ** CAUTION: USING METAL PICKS OR TOOLS CAN PERMANENTLY DAMAGE O-RING GROOVE ** THOROUGHLY CLEAN GROOVES IN END CAP USING LINT-FREE WIPES AND ISOPROPYL ALCOHOL. INSPECT GROOVES FOR DAMAGE, SCRATCHES AND DEBRIS. -
Page 11: Webserver
Appendix B Webserver 1. Open Marco 2. Double click on hydrophone serial number to open webpage 3. Go to Data → Retrieve Page 4. Ensure all previously recorded data is deleted from the hydrophone so the maximum amount of data can be recorded during the deployment 5.
Need help?
Do you have a question about the BP2-B1 and is the answer not in the manual?
Questions and answers