Table of Contents
Advertisement
Quick Links
Advertisement
Table of Contents

Related Manuals for WalkOVR WalkOVR

Summary of Contents for WalkOVR WalkOVR
- Page 1 WalkOVR User Manual...
-
Page 2: Table Of Contents
Health Warning ..............................Product Warranty ............................Safety Instructions ............................Chapter 2 Package Contents ............................Device Layout ..............................Chapter 3 Step by Step WalkOVR ..........................Using WalkOVR .............................. OVR PORTAL 2 .............................. Firmware Upgrade ............................Calibration ................................Device LEDs ..............................Motion Profile .............................. -
Page 3: Chapter 1 Health Warning
WalkOVR is primarily designed for home use and not for commercial use, and this document is intended to be a living document which means we, as WalkOVR, will be doing our best to keep this document updated with the latest information needed to be based on current and future capability of WalkOVR. -
Page 4: Safety Instructions
WalkOVR is designed for ages 13 and over. If anybody younger needs to use Virtual Reality headsets or WalkOVR, a person at age 13 and over should always be present to ensure the user’s safety. -
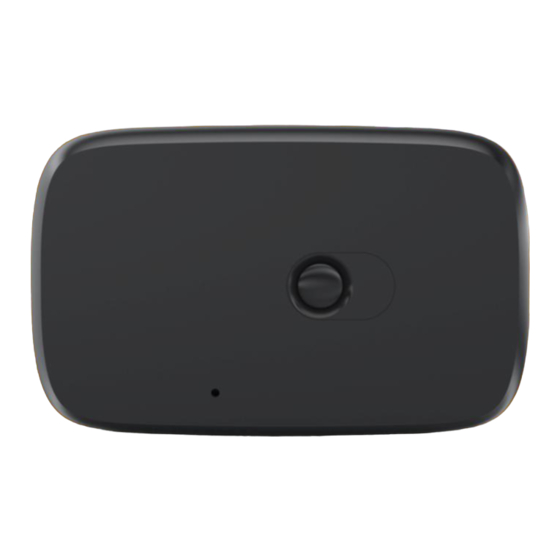
Page 5: Chapter 2 Package Contents
Package Contents Chest Strap Knee Strap USB-A to Micro USB Device Layout Power Button RGB LED Charging Connector Reset... -
Page 6: Chapter 3 Step By Step Walkovr
WalkOVR Twins comes with 2 legs (short) strap + 2 OVR Node WalkOVR Trio comes with 2 legs and 1 chest strap + 3 OVR Node WalkOVR Mocap comes with 4 legs and 1 chest strap + 5 OVR Node OVR Node positioning for Locomotion at left side, OVR Node positioning for Mocap at right side 5. -
Page 7: Using Walkovr
2 hours. Fast flashing of the blue LED indicates that the charge is full. OVR Portal 2 OVR Portal 2.0 is the client application that connects WalkOVR drivers with SteamVR. Therefore, it should be running in the background throughout your VR experience. -
Page 8: Firmware Upgrade
Windows will block software downloaded from the internet from running, so we need to allow WalkOVR Portal to run. 3. Follow the instructions and install the WalkOVR drivers and OVR Portal Client Firmware Upgrade WalkOVR is a combination of hardware and software. In contrast to the electronics design, the device software should be updated from time to time. -
Page 9: Calibration
4. Next, you will see 2 screens, in which you will be told how to proceed with the firmware upgrade process. First, your devices will be automatically configured. Your OVR Nodes will be disconnected when the configuration is ready. You must then press and hold the button on the OVR Node for 8 seconds. - Page 10 Calibration for Locomotion 1. Calibrate Nodes: In this step, magnetometer calibrations of individual OVR Nodes are made.
- Page 11 2. Manage Node Positions: In this step, you assign positions to your OVR Nodes. The following are the configurations that apply to the position assignment: WalkOVR One 1 Chest WalkOVR Twins 1 Left Knee + 1 Right Knee WalkOVR Trio...
- Page 12 After the 3-step calibration process, your OVR Nodes are calibrated and now you can ready to play the game and enjoy using WalkOVR. If you are using WalkOVR in Locomotion mode, when you open Steam VR you should see an OVR Node icon representing WalkOVR in Steam VR Status regardless of...
- Page 13 Calibration for Mocap 1. Calibrate Nodes: In this step, magnetometer calibrations of individual OVR Nodes are made.
- Page 14 2. Manage Node Positions: In this step, you assign positions to your OVR Nodes. The following are the configuration that apply to the position assignment: WalkOVR Mocap 1 Waist + 1 Left Knee + 1 Right Knee + 1 Left Ankle + 1 Right Ankle 3.
- Page 15 If you are using WalkOVR in Mocap mode, you need to turn on Steam VR before reset posture. When you open Steam VR, you will initially see only headset and controllers in Steam VR status. After reset posture, you should see an OVR Node icon representing each OVR Node in Steam VR Status, meaning a total of 5 OVR Node icons.
-
Page 16: Device Leds
Motion Profile Moves; As you may know, WalkOVR uses motion capture techniques by determining your movements. We do it through what we call “motion profiling”. Motion profiling is the way we understand your movement pattern. -
Page 17: Chapter 4 Walkovr Classic
WalkOVR Classic Package Contents Base Node & Sensors Body Strap USB-A to Micro USB Micro USB to Micro USB (x4) Knee Straps (x2) USB extension cable for Bluetooth... - Page 18 Device Layout Extension Port Reset Status Bluetooth Power Mode Right LegL eft Leg Status Power LK: Left Knee RK: Right Knee LA: Left Ankle RA: Right Ankle...
- Page 20 That cable can be plugged into your laptop’s USB connector or your smartphone’s quick charger (between 500 mAh to 2000 mAh). When you plug your WalkOVR to charging, you’ll see the red led is lit. We suggest keeping your device on charge for approximately 1,5 hours. All connected sensor nodes are powered by the main node, therefore you only need to charge the main node of WalkOVR.
- Page 21 Set Your Play Area WalkOVR’s Range of Use (up to v1.5.2) is around 5 meters with your Bluetooth dongle plugged into the extension cable we ship with your device. Without extension cable it is up to 2m; Recommended distance is always around 1.5m. For the newer versions (v1.5.2 and above) due to the protocol change, the range is more than these values...
- Page 22 2. Execute the file you downloaded – Windows will block software downloaded from the internet from running, so we need to allow WalkOVR Portal to run. 3. Follow the instructions and install the WalkOVR drivers and OVR Portal Client Strapping WalkOVR on Don't forget to charge main hub before you start, you can use the USB-A to Micro USB charging cable with any USB port in your PC.
- Page 23 VR mode rather than keyboard or gamepad WalkOVR Blue Led blinking frequency shows which mode is currently active. The following procedure is shared with the assumption that WalkOVR is in native VR mode. See page 15 for more information on WalkOVR modes...
- Page 24 6. Click the Search button and then you will see Chest, RK, LK, RA, LA 7. Click the Calibrate button or click on the calibration option in the top hambuger menu 8. Follow the instructions and calibrate the WalkOVR Playing Your Games 1. Start SteamVR 2.
- Page 25 3. You will see WalkOVR icon. That shows WalkOVR is automatically integrated to SteamVR. 4. However you still need to activate WalkOVR by starting OVR Portal. It is ‘suggested’ to start OVR Portal before SteamVR. 5. When you start OVR Portal, you need to log in with your credentials. You should have received an email regarding your login credentials before you received your WalkOVR.
- Page 26 OVR client will initially be in the BETA version, without the game profiles feature. Without game profiles, some games with headsets may not be working properly. Please contact us at support@walkovr.com to learn more if your game is in the full list of verified games on https://walkovr.com/games and not working.
- Page 27 Red led (USB Led) identifies that your device is connected to your PC’s USB port or charger. If your device is connected, WalkOVR shows it by a bright red light. Power connection is only used to charge your system and the battery level is indicated on your OVR Portal when you connect it through Bluetooth for Native VR gaming.
- Page 28 This situation makes it difficult for WalkOVR to understand if you are moving or standing still. Eventually, this may result in failure in room-scale usage and your small steps may encounter in-game...
- Page 29 5. Connect WalkOVR to OVR Portal Turning of your device There is a 10 min sleep timer for WalkOVR. In case you are not using it for 10 minutes., it automatically turns itself off. However, we recommend turning it off to prevent unnecessary usage of the battery, in case you stop using it.
-
Page 30: Help And Feedback
We really use all the feedback from our community to improve the devices and services we provide. If you need any support you can contact us anytime through support@walkovr.com or you can contact us through webchat on our website. Besides not only for the information provided in this user manual but also for anything please do not hesitate to share your feedback.
Need help?
Do you have a question about the WalkOVR and is the answer not in the manual?
Questions and answers