Table of Contents
Advertisement
Advertisement
Table of Contents

Related Manuals for Nicolaudie Wolfmix W1

Summary of Contents for Nicolaudie Wolfmix W1
- Page 1 Wolfmix W1 Reference Manual Version 0.7 | English...
-
Page 2: Table Of Contents
Disclaimer Product & company Safety notices Intended use Danger for Children Serviceable parts Operating conditions Power Introduction About this document Hardware specification Overview Components Activation Startup key-combinations Beam Engine Control Flow Fixture Setup Fixture setup list Fixture selection Fixture limits Fixture builder Fixture channels screen Channel editor screen... - Page 3 Preset Flash screens Wolf Strobe Blinder Speed Blackout Smoke Setup Projects Groups Settings DMX Values Beam Editor Lock WTOOLS app LS Cloud sign in My Wolf Projects Fixtures Settings Help...
-
Page 4: Disclaimer
The information in this document is subject to change without notice. No part of this publication may be copied, reproduced, or otherwise transmitted or recorded, for any purpose, without prior written permission by the Nicolaudie Group. Wolfmix is a registered trademark of the Nicolaudie Group. -
Page 5: Product & Company
If you are intending to discard this product at the end of its useful life, please do not dispose of it with your other household or municipal waste. Nicolaudie Group has labeled its branded electronic products with the WEEE Symbol to alert our customers that products bearing this label should not be disposed of in a landfill or with municipal or household waste. -
Page 6: Safety Notices
Safety notices WARNING Failure to follow these safety instructions could result in fire, electric shock, injury, or damage to your Wolfmix W1 or other property. Read all the safety information below before using Wolfmix W1. Intended use Use the device only as described in this user manual. Any other use or use under other operating conditions is considered to be improper and may result in personal injury or property damage. -
Page 7: Introduction
Introduction About this document Thanks for checking out the Wolfmix Reference manual. This white paper describes each and every function available on Wolfmix. We’ve written this as a quick method to look up a particular feature on the Wolf. If you’re looking to learn how to use Wolfmix, check out the Mini Guides which focus on how to achieve a particular objective rather than in this document which is more of a dictionary to document each function in-depth. -
Page 8: Hardware Specification
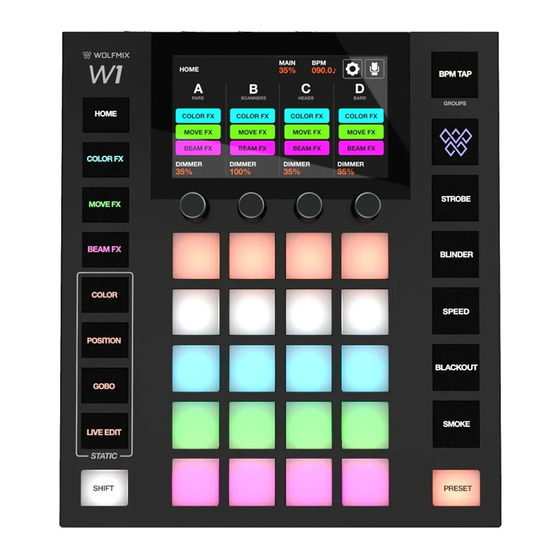
Hardware specification Overview Size & weight 195 220 62 mm / 7.68 8.66 2.44 in 1070g / 2.36lb Components Housing ABS Plastic Powder-coated steel base plate with 100mm VESA M4 6mm max) Powder-coated steel reinforced back plate Display 4.3”... -
Page 9: Activation
Activation Wolfmix must be activated at wolfmix.com/activate before it can be used. The supplied key is unique to each Wolfmix controller. Each activation key has a unique response key which will be provided by the website during the activation process. Tapping Enter Response will display a keyboard to enter the response key. -
Page 10: Beam Engine Control Flow
Beam Engine Control Flow The diagram below explains how the Wolfmix controls DMX channels. The Beam Engine is triggered every 40ms (25 fps). All DMX channels are set to their default values at the beginning of each frame, and then each effect is added one-by-one. -
Page 11: Fixture Setup
Fixture Setup The Fixture Setup screen can be accessed by tapping the button to the upper right of the home screen. Each fixture represents a physical DMX device connected to the Wolfmix. Fixture data is used to calculate effects and other DMX levels. A fixture must be added here before it can be controlled by Wolfmix. -
Page 12: Fixture Setup List
Fixture setup list A list of all fixtures which have been added to the project is shown. Displayed data: ● Fixture index and name. ● The group the fixture has been assigned to. ● The DMX universe number and the DMX address. Encoder actions: ●... -
Page 13: Fixture Selection
Fixture selection The fixture selection screen shows all available fixture profiles on the controller, ordered alphabetically by brand and fixture. Displayed data: ● Available brands, starting with the 6 most recently added fixtures, followed by fixtures which have been created directly on the Wolfmix controller, followed by brands in the public library. -
Page 14: Fixture Limits
Fixture limits The fixture limits screen allows for minimum and maximum pan and tilt values to be set on the selected fixtures. When set correctly, fixture beams will move together in the desired area. Displayed data: ● Minimum and maximum pan and tilt values of the selected fixtures ●... -
Page 15: Fixture Builder
Fixture builder The fixture builder is used to create fixture profiles. A fixture profile is a list of channels and features associated with a particular fixture. Fixture channels screen Displayed data: ● A grid showing the fixtures channel types. ● The fixtures starting address used for testing, number of beams, fixture name and total number of channels. -
Page 16: Channel Editor Screen
Channel editor screen Displayed data: ● Channel number and type ● A collection of feature buttons depending on the channel type. These may include colors, gobos and strobe. Each button displays the feature value. Encoder actions: ● Move the first encoder to change the value of the selected feature. Push the encoder to apply the change. -
Page 17: Control Screens
Control screens The 9 control screens are accessed via the 8 buttons on the left and the bottom right button. When a control screen button is pressed, both the touch display and the central matrix will update to reflect the data on the selected control screen. Each control screen has been designed for a particular purpose. -
Page 18: Home
Home Fixture groups are controlled from the home screen. Each column represents one group. Four groups are available per screen. Groups AD are displayed by default. Hold shift and hit the BPM tap button to display groups EH. Displayed data: ●... -
Page 19: Color Fx
Color FX Displayed data: ● Four buttons along the top to indicate which groups have Color FX enabled. Shift + hit the BPM TAP button to toggle between groups AD and EH. ● Eight buttons to select the Color Fx type. ●... -
Page 20: Move Fx
Move FX Displayed data: ● Four buttons along the top to indicate which groups have Move FX enabled. Shift + hit the BPM TAP button to toggle between groups AD and EH. ● Eight buttons to select the Move Fx type. ●... -
Page 21: Move Fx Sequencer
Move Fx sequencer The Move Fx sequencer allows for eight different positions to be chosen. Each position will be played sequentially according to the FX speed. Displayed data: ● Eight step buttons with the current step highlighted and shown to the bottom left. -
Page 22: Beam Fx
Beam FX Displayed data: ● Four buttons along the top to indicate which groups have Beam FX enabled. Shift + hit the BPM TAP button to toggle between groups AD and EH. ● Eight buttons to select the Beam Fx type. ●... -
Page 23: Beam Fx Sequencer
Beam Fx sequencer The Beam Fx sequencer allows for eight different beam selections to be chosen. When a beam selection is made, the selected beams will be opened. Each beam selection will be played sequentially according to the FX speed. Displayed data: ●... -
Page 24: Static Color
Static Color The static color screen contains a palette of ten colors per group. Selecting these colors will override any playing color effects on the group and set the selected colors on the fixture group. Displayed data: ● Four columns containing five colors. Each column represents one group. Shift + hit the BPM TAP button to toggle between groups AD and EH. -
Page 25: Color Picker
Color Picker Displayed data: ● The name of the currently selected button. ● A preview of the selected color. ● A color picker used to select a color. ● The color picker mode (RGBW, RGBWAU, Color grid). ● The generated color components (Red, Green, Blue, White, HUE, Amber, UV. Encoder actions: ●... -
Page 26: Static Position
Static Position The static position screen contains a palette of five positions per group. Selecting a position will override any playing move effects on the group and set all fixtures in the group to the selected position. Displayed data: ● Four columns containing five positions. Each column represents one group. Shift + hit the BPM TAP button to toggle between groups AD and EH. -
Page 27: Position Picker
Position Picker Displayed data: ● The name of the currently selected position button. ● An XY grid used to select a position. ● The generated position values. ● The FAN and FOCUS values. Encoder actions: ● Move the first encoder to control the PAN value. Shift + move for fine control. ●... -
Page 28: Static Gobo
Static Gobo The static gobo screen contains a palette of 10 gobos per group. Selecting a gobo will recall the gobo on all fixtures in the group. If a gobo is not selected, the open gobo will be triggered. When a fixture is added to a project, the Wolfmix will try to group similar gobos together within the first 5 palette items. -
Page 29: Live Edit
Live Edit The Live Edit screen contains a palette of twenty buttons which can be used to recall a value on any channel. These values override all effects and other static values. Live Edits are layered in order, therefore if two live edits have values on the same channel, the buttons towards the bottom will take priority. -
Page 30: Live Edit Editor - Values
● Three buttons to rename the live edit, set the live edit to Flash mode, and Lock the live edit which preserves the state when changing presets (useful for Parking channels). ● The currently visible Group and Page to the bottom right. Encoder actions: ●... -
Page 31: Preset
Preset The Preset screen contains 5 pages of 20 presets. Each Preset contains all selected buttons including effect status and palette item status along with group dimmers and effect properties. Displayed data: ● A grid of 20 Preset buttons including the preset name and the first 4 colors used within the preset. -
Page 32: Flash Screens
Flash screens The Flash screens are triggered by hitting the large buttons to the right of the Wolfmix. These buttons have been designed to be quickly accessible and may be triggered from any screen. They may be used to trigger quick actions during a live performance. ●... -
Page 33: Wolf
Wolf The Wolf flash effect plays a Paparazzi style white flash across all light fixtures. Hitting the Wolf button triggers the effect. The effect is released according to the set release mode. Displayed data: ● Icon to indicate the effect is playing (this can be disabled within the settings). ●... -
Page 34: Strobe
Strobe The Strobe flash effect tells all lights to strobe by triggering the fixtures strobe feature. If the fixture doesn’t have a built in strobe feature, a virtual strobe will be created by flashing the RGB or dimmer channels. The effect is released according to the set release mode. -
Page 35: Blinder
Blinder The Blinder flash effect sets all dimmers to 100% and all color mixing channels to white. The effect is released according to the set release mode. Displayed data: ● Icon to indicate the effect is playing (this can be disabled within the settings). ●... -
Page 36: Speed
Speed The Speed flash effect multiplies the speed of all effects by the set multiplier. The effect is released according to the set release mode. Displayed data: ● Icon to indicate the effect is playing (this can be disabled within the settings). ●... -
Page 37: Blackout
Blackout The Blackout flash effect shuts off all beams by setting dimmers to 0%, shutters closed, and color mixing channels to 0%. The effect is released according to the set release mode. Displayed data: ● Icon to indicate the effect is playing (this can be disabled within the settings). ●... -
Page 38: Smoke
Smoke The Smoke flash effect sets Smoke channels. The effect is released according to the set release mode. Displayed data: ● Icon to indicate the effect is playing (this can be disabled within the settings). ● The Smoke intensity. ● The set release mode. Encoder actions: ●... -
Page 39: Setup
Setup The Setup screen is accessed by tapping the icon to the top right of the Home screen to the left of the Fixture icon. ● Projects : Save and Load 6 projects. ● Groups : Set group names and map DMX input channels to group dimmers. ●... -
Page 40: Projects
Projects Up to 6 projects can be saved and opened on the controller. Projects contain the following data: ● The current fixture list, order, group assignments, and DMX addresses. ● Group names and mappings. ● All 100 presets with associated data including effect properties and palette item states. -
Page 41: Groups
Groups Each fixture is linked with a group. Effects, sub-dimmers, static colors and positions are applied to each group. Wolfmix supports up to 8 groups. 4 can be displayed at a time with groups AD and EH toggles by shift + hitting the BPM TAP button. Each group can be assigned a name and a DMX input channel on the Groups screen. -
Page 42: Settings
Settings The Settings screen shows a list of global Wolfmix settings. Displayed data: ● A list of settings is displayed on the left along with the title on the right. ● The selected setting and value is displayed along the bottom. ●... - Page 43 ● Button brightness : used to adjust the LED brightness of the button s when they are switched on. ● Lock password : the password required to unlock the controller. ● Store Group dimers in preset : when set, the group dimmer values will be stored within the preset.
-
Page 44: Dmx Values
DMX Values The DMX Values screen displays the current value of each DMX channel. It allows for the value to be changed for testing purposes, and for channel settings to be adjusted. Displayed data: ● A grid of 20 DMX channels. ●... -
Page 45: Beam Editor
Beam Editor Advanced: each fixture is split up into beams and beam features. Each beam feature contains min/max and on/off values which are set automatically by Wolfmix. These values are calculated by the fixture profile and should not require changing. However if there is a fault with the fixture profile or a special case, some of these values can be edited via the Beam Editor screen. -
Page 46: Lock
Lock Wolfmix can be locked to prevent unauthorised access. Tapping Lock All from the Settings screen will lock the entire controller. Tapping Lock Edit will lock the palette, preset and fixture editing. When the controller is locked, tapping the Lock button to the top right displays a keyboard to enter the password to unlock the controller (set via the Settings screen). -
Page 47: Wtools App
WTOOLS app The WTOOLS app is available for PC and MAC. It is not required to use Wolfmix, however it contains a toolbox of valuable features for the controller. ● Sync the BPM with Ableton Link and OS2L. ● Visualize in 3D with Easy View 2. ●... -
Page 48: Ls Cloud Sign In
Lighting Soft AG. Along with Wolfmix, Lighting Soft are part of the Nicolaudie Group. Therefore data stored within the cloud is not being passed on to a third party. See the privacy policy available on the Wolfmix website for further information. -
Page 49: My Wolf
My Wolf Information on the connected Wolfmix is displayed on this screen including: ● Serial number (to the bottom left) : this is a unique ID assigned to each Wolfmix controller. ● Active DMX universes along with their assigned XLR sockets : these can be mapped from the controller’s settings screen. -
Page 50: Projects
Projects Projects on the computer are displayed on the left and projects in the Wolfmix controller are displayed on the right. Clicking the arrow to the left of the project name will write the project to the Wolfmix controller. Clicking Backup Projects will copy all projects from Wolfmix to the computer and sync with LS Cloud. -
Page 51: Fixtures
Fixtures Fixtures on the computer and in the cloud are displayed on the left and fixtures in the Wolfmix controller are displayed on the right. ● The first category Wolfmix includes all fixtures created directly on the controller. ● The second category Cloud includes all fixtures created using the LS Cloud web Profile Builder. -
Page 52: Settings
Settings The Settings screen shows the current firmware version. Clicking Update Firmware will update to the latest firmware version which is downloaded automatically from WTOOLS when connected to the internet. Other settings: ● Erase all fixtures : remove all fixtures from the Wolfmix controller. ●... -
Page 53: Help
Help The help page contains offline versions of the Wolfmix Mini Guides, accessible directly from WTOOLS if the Wolfmix website or internet connection is unavailable.
Need help?
Do you have a question about the Wolfmix W1 and is the answer not in the manual?
Questions and answers