
Subscribe to Our Youtube Channel
Related Manuals for Bogen Nyquist NQ-T2000


Summary of Contents for Bogen Nyquist NQ-T2000
- Page 1 LCD Display VoIP Phone User Manual Nyquist NQ-T2000 2022 Bogen Communications LLC All rights reserved. 740-00119C 220114...
-
Page 3: Table Of Contents
Contents Contents Using the VoIP Phone ..............1 Hardware Components and Features ..........1 Common Status Icons............. 4 Configuring the VoIP Phone ..............6 Making Pages ..................... 7 All-Call Paging................8 Emergency-All-Call Paging ........... 8 Record Page................8 Zone Paging................10 Making Calls....................10 Playing Alarms..................11 Playing Tones....................12... - Page 4 2.10 Walking CoS (CoS: Walking Class of Service) ......23 2.11 Dial Codes Used for Simulating Calls to Admin Station from Station Call Switches..............24 2.12 Routines (CoS: Execute Routines)............24 2.13 Audio Distribution (CoS: Audio Distribution)......24 2.14 Miscellaneous Dial Codes..............24...
-
Page 5: Using The Voip Phone
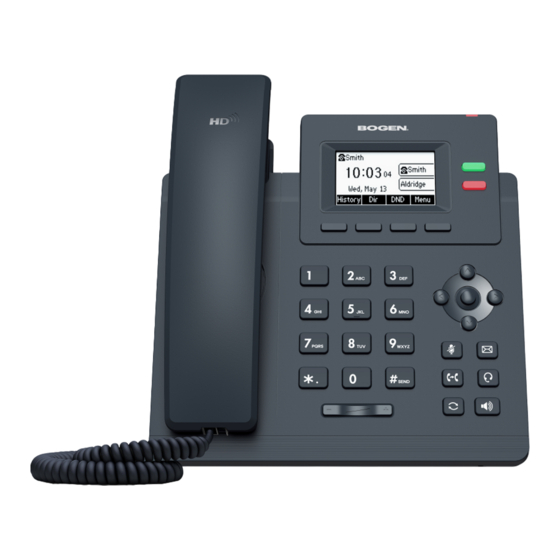
Using the VoIP Phone Using the VoIP Phone The Bogen Model NQ-T2000 VoIP Phone by Yealink is designed to serve as an admin or staff phone for various Nyquist systems. This phone combines a traditional telephone keypad with a 132 x 64 pixel,... - Page 6 Figure 1-1, Hardware Components Hardware components are described in the following table: Table 1-1, Hardware Components Item Description LCD Screen Shows information about calls, messages, soft keys, time, date, and other relevant data: • Default account • Call information—caller ID, call duration •...
- Page 7 Table 1-1, Hardware Components (Continued) Item Description Power Indicator LED Indicates call status, message status and phone’s system status. The following statuses are available: • Solid red – The phone is initializing. • Fast-flashing red (300ms) – The phone is ringing.
-
Page 8: Common Status Icons
Table 1-1, Hardware Components (Continued) Item Description Keypad Provides the digits, letters, and special charac- ters for the Nyquist application. Speaker Provides hands-free (speakerphone) audio output. Mute Key Press to mute the microphone during a handset call or speakerphone call. Hookswitch Tab Secures the handset in the handset cradle when the VoIP phone is mounted vertically. - Page 9 Table 1-2, Common Display Icons (Continued) Icon Description The phone’s ringer volume is set to 0. The call has been muted. A missed call was received. Call forwarding is on.
-
Page 10: Configuring The Voip Phone
Configuring the VoIP Phone Refer to the applicable Nyquist System Administrator Manual for instructions on adding the VoIP Phone as a station. You will need the Extension Number, Name, and MAC address for the phone. Next, configure the VoIP Phone through the phone’s web user inter- face (UI). -
Page 11: Making
192.168.0.10) in the address bar, and then press Enter. The computer will display the VoIP Phone’s web UI. Step 3 On the logon page, enter the Username (default is admin) and Password (default is bogen) and click Confirm. Step 4 Click the Settings tab. -
Page 12: All-Call Paging
All-Call Paging An All-Call page is a non-emergency page that simultaneously plays throughout the facility. To make an All-Call page: Step 1 Select the soft key labeled Directory. Step 2 Use the navigation keys to select Paging and then press OK. Step 3 Use the navigation keys to select All-Call and then press OK. - Page 13 exceeds 60 minutes, it will time out and not be saved. If the recording is silent for 60 seconds, it will time out and not be saved. Note: When the DTMF Code #{Zone Number} is used to initiate a zone page, Nyquist will start recording a queued page if the zone belongs to a queue.
-
Page 14: Zone Paging
Zone Paging You can choose to page only certain areas of the facility, called zones. The zones, which are collections of stations, must be created through the Web-based System Admin User Interface (UI) before zone paging from the VoIP Phone can occur. Zones appear in the phone’s Direc- tory under the Paging menu. -
Page 15: Playing Alarms
To make a call using the Remote Phone Book: Step 1 Select the soft key labeled Directory. Step 2 Use the navigation keys to select Stations and then press OK. Step 3 Use the navigation keys to select the station that you want to call and press OK. -
Page 16: Playing Tones
Playing Tones Note: The Directory/Tones submenu is only available on Nyquist E7000 and only if the station Type is set to Admin Phone. Nyquist provides tones that can be used with events, such as bell schedules or announcements. In addition to the default tones, tones can also be created or downloaded through the Admin Web UI. - Page 17 FXS based Admin Station is on a call, the current call will automati- cally be dropped and the Admin Station will hear a busy signal. When the Admin Station hangs up the call, the emergency call will ring the Admin Phone. If both a normal and emergency call are placed to a DAHDI FXS based Admin Station at the same time, the calls are not received in any specific order.
-
Page 18: Using The Voice Mail Feature
To turn Call Forwarding off: Step 1 Use the soft key labeled Menu. Step 2 Use the navigation keys to select Features and then press OK. Step 3 Use the navigation keys to select Call Forward and then press OK. Step 4 Select Off. -
Page 19: Playing Recorded Calls
Step 4 After the tone, record your announcement, pressing # when finished. Step 5 Select from the following options: • Select 1 to save. • Select 2 to listen to the announcement. • Select 3 to re-record the announcement. • Select 4 to play the announcement now. -
Page 20: Restart Nyquist Server
Restart Nyquist Server Note: The Directory/Features/Restart Nyquist Server submenu is only if the station Type is set to Admin Phone. To restart the Nyquist Server: Step 1 Use the soft key labeled Directory. Step 2 Use the navigation keys to select Features and then press OK. -
Page 21: Stop Scheduled Audio
Stop Scheduled Audio Note: The Directory/Features/Stop Scheduled Audio submenu is only available on the Nyquist E7000 and only if the station Type is set to Admin Phone. To stop scheduled audio: Step 1 Use the soft key labeled Directory. Step 2 Use the navigation keys to select Features and then press OK. -
Page 23: Nyquist Dtmf Feature Dialing Codes
Nyquist DTMF Feature Nyquist DTMF Feature Dialing Dialing Codes Codes Note: The use of feature dial codes is restricted by a station’s CoS assignments. Alarm/Tone Activation (CoS: Activate Alarm Signals | Manually Activate Tone Signals) *91{DTMF-Code} – Start Alarm specified by {number} *96{DTMF-Code} –... -
Page 24: Call Forwarding (Cos: Call Forwarding)
98AAANNNNNNN – Place local ten-digit call with area code 98NNNNNNN – Place local seven-digit call 98911 – Place 911 emergency call 911 – Place 911 emergency call **** – Place Emergency call to designated Admin station Call Forwarding (CoS: Call Forwarding) 970 –... -
Page 25: Conferencing
DTMF: *1<extension number> - Attended transfer (during call) DTMF: *2 - Complete attended transfer, dropping out of call DTMF: *3 - Complete attended transfer, but stay in the call DTMF: *4 - Swap to the other party (during attended transfer) *3 –... -
Page 26: Paging
*990 – Record Message (Announcement) (CoS: All-Call Paging) Note: When you record an announcement by dialing *990 or by selecting Record Announcement on the Admin phone’s Announce menu, the initial DTMF Code for the recorded and saved announcement will be set to the announcement’s row ID. You can change the DTMF Code after the announcement is saved by editing the announcement in the web interface Announce- ments view. -
Page 27: Voicemail (Cos: Voicemail)
##{Facility Number} – All-Call Page to {Facility Number} (CoS: Inter- Facility Call/Page) ##{Facility Number}#{Zone Number} – Zone Page to {Zone Number} at (Facility Number)(CoS: Inter-Facility Call/Page) ##{Facility Number}#{Zone Number}* – Real-time page to {Zone} that belongs to a queue at (Facility Number) (CoS: Inter-Facility Call/Page) *92{DTMF-Code} –... - Page 28 2.11 Dial Codes Used for Simulating Calls to Admin Station from Station Call Switches Note: During the Check-In process, a Normal call starts the check- in process for a station. 0 - Normal call to admin *0 - Emergency call to admin *00 - Urgent call to admin *000 - Outside line calling in (uses night-ring logic) 2.12...
- Page 29 0000098 – Enable Audio (CoS: Enable Audio) 920 – Stop Scheduled Audio 942#{extension}#{contact-number} – Close {contact-number} on I/O Controller {extension} (For example, dialing 942#120#1 closes con- tact number 1 on I/O Controller 120; dialing 943#120#1 opens con- tact number 1 on I/O Controller 120.) 943#{extension}#{contact-number} –...
Need help?
Do you have a question about the Nyquist NQ-T2000 and is the answer not in the manual?
Questions and answers