
Related Manuals for Sensio Beautiful TriZone

Summary of Contents for Sensio Beautiful TriZone
- Page 1 9qt TriZone Air Fryer with Touch-Activated Display ™ Instruction Manual Freidora de aire TriZone™ de 9 cuartos de galón con pantalla táctil Manual de instrucciones...
- Page 2 The kitchen is my family’s happy place. It’s where we cook and eat and bake and laugh and share our most beautiful moments together. That’s what inspired the creation of Beautiful, my new collection of easy-to-use kitchenware that you’ll want to keep out on your kitchen counter.
-
Page 3: Table Of Contents
Table of Contents Section 1: Safety Important Safeguards ...........4-6 Additional Important Safeguards ......... Notes on the Plug ............9 Notes on the Cord ............9 Plasticizer Warning ............10 Electric Power ............10 Section 2: Instructions Getting to know your 9qt TriZone™ Air Fryer ......12-13 Touch-Activated Display Control Panel ......... - Page 4 Índice Sección 1: Seguridad Medidas de seguridad importantes ........37-39 Otras medidas de seguridad importantes ....... 40-42 Notas sobre el enchufe ..........42 Notas sobre el cable ............43 Advertencia sobre plastificados ...........44 Potencia eléctrica ............44 Sección 2: Instrucciones Conozca su freidora de aire TriZone™ de 9 cuartos de galón ... 46-47 Panel de control de pantalla activado por toque ......
-
Page 5: Section 1: Safety
Section 1 Safety... -
Page 6: Important Safeguards
IMPORTANT SAFEGUARDS When using electrical appliances, basic safety precautions should always be followed, including the following: 1. READ ALL INSTRUCTIONS. 2. Do not touch hot surfaces. Use handles or knobs. Use oven mitts or potholders. 3. To protect against electric shock do not immerse cord, plugs, or appliance in water or other liquid. - Page 7 NOTE: DO NOT ATTEMPT TO REPAIR THE UNIT YOURSELF. THIS WILL VOID THE WARRANTY. 8. The use of accessory attachments not recommended by the appliance manufacturer may cause injuries. 9. Do not use outdoors. 10. Do not let cord hang over edge of table or counter, or touch hot surfaces.
- Page 8 CAUTION: After hot air frying, roasting, broiling, baking, or reheating, the fryer basket, crisping trays (if used) and the cooked foods are hot. Extreme caution must be used when handling the hot Air Fryer basket and crisping trays. FOR HOUSEHOLD USE ONLY SAVE THESE INSTRUCTIONS...
-
Page 9: Additional Important Safeguards
ADDITIONAL IMPORTANT SAFEGUARDS CAUTION HOT SURFACES: This appliance generates heat and may release steam during use. Proper precautions must be taken to prevent the risk of burns, fires, or other injury to persons or damage to property. CAUTION: This appliance is hot during operation and retains heat for some time after turning OFF. - Page 10 5. Keep the cord out of reach from children and infants to avoid the risk of electric shock and choking. 6. Place the TriZone™ Air Fryer on a flat, stable, heat- resistant work area. 7. Do not obstruct the air outlet or air inlets on the back and sides of the Air Fryer, with any objects.
-
Page 11: Notes On The Plug
NOTES ON THE PLUG This appliance has a polarized plug (one blade is wider than the other). To reduce the risk of electric shock, this plug will fit in a polarized outlet only one way. If the plug does not fit fully into the outlet, reverse the plug. If it still does not fit, contact a qualified electrician. -
Page 12: Plasticizer Warning
PLASTICIZER WARNING CAUTION: To prevent Plasticizers from migrating from the finish of the counter top or table top or other furniture, place NON-PLASTIC coasters or place mats between the appliance and the finish of the counter top or table top. Failure to do so may cause the finish to darken;... -
Page 13: Section 2: Instructions
Section 2 Instructions... -
Page 14: Getting To Know Your 9Qt Trizone™ Air Fryer
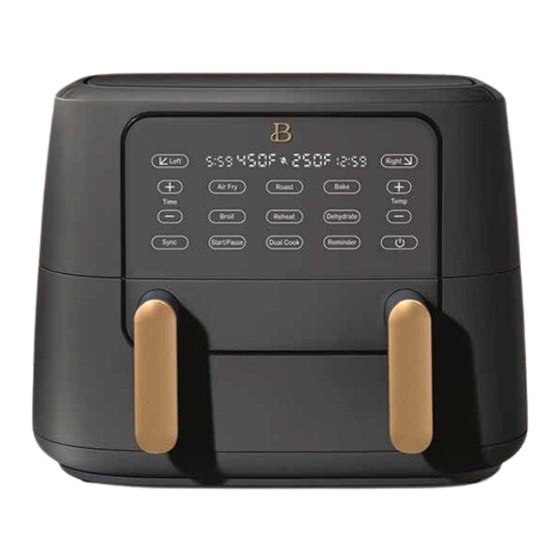
Getting To Know Your 9qt TriZone™ Air Fryer Product may vary slightly from illustration 1. Touch-Activated Display Control Panel 2. 9QT Removable TriZone™ AirFryer Basket 3. Power Cord with Polarized Plug (not shown) 4. Non-Skid Feet (not shown) - Page 15 1. 2 Non Stick Crisping Trays 2. Basket Divider...
-
Page 16: Touch-Activated Display Control Panel
Touch-Activated Display Control Panel A screen that only shows up when you need it. button and any FUNCTION button will illuminate when active and vanish when not in use. Steady high heat combined with convection air, ensures crispy results with a minimum or no oil. This Beautiful™ TriZone™ Air Fryer can be programmed for precision TIME and TEMPs. - Page 17 • When the pulsing is pressed, a tone will sound, and the 6 preset functions: AIR FRY, ROAST, BAKE, BROIL, REHEAT, DEHYDRATE and the DUAL COOK button will illuminate. Press any preset FUNCTION button to continue. • When any of the 6 preset FUNCTION buttons (AIR FRY, ROAST, BAKE, BROIL, REHEAT, DEHYDRATE) has been pressed, a tone will sound and the default TIME and TEMP will illuminate and continue to flash on your screen.
- Page 18 • Press REMINDER to turn this feature ON. The Reminder button will flash when selected. • For all preset FUNCTION selections except BROIL, REHEAT and DEHYDRATE, 5 tones will sound at 2/3 of the cook time, to remind you to shake the basket.
-
Page 19: Before Using For The First Time
Before Using for the First Time Remove all packing material and labels from the inside and outside of the Air Figure 1 Fryer. Check that there is no packaging underneath and around the fryer basket and crisping trays. 1. Your 9qt TriZone™ Air Fryer is shipped with 2 crisping trays and the basket divider packaged inside the TriZone™... -
Page 20: Operating Instructions
Operating Instructions IMPORTANT! The maximum food capacity recommended for the Air Fryer basket is 9 quarts or 7.5 lbs. of food. Using the full basket will enable you to feed up to 9 people. WARNING! This TriZone™ Air Fryer should not be used to boil water. WARNING! This TriZone™... - Page 21 Figure 2 Figure 3 Figure 4 Figure 5...
-
Page 22: Preset Functions: Air Fry, Roast, Broil, Bake, Reheat And Dehydrate
6 Preset FUNCTIONS: AIR FRY, ROAST, BROIL, BAKE, REHEAT and DEHYDRATE Preset TEMPS & TIMES Chart Menu Default Default TEMP Range TIME Range SHAKE Food TEMP TIME AIR FRY 400 °F 20 mins 170 °F - 450 °F 1 - 60 2/3 time/ 1x mins ROAST... -
Page 23: Manual Operation
MANUAL OPERATION Consult the PRESET TIMES & TEMPS chart for minimum and maximum programming options. 1. To change default TIME before or during cooking, simply press the buttons to adjust the TIME or press the buttons to adjust the TEMP. 2. -
Page 24: Trizone™ Mode: Using The Full Basket Without Basket Divider (Using Both Zones Without Basket Divider)
TriZone™ Mode: Using the Full Basket without Basket Divider (Using both zones without basket divider) 1. Plug cord in the wall outlet. An audible tone will sound and the control panel will illuminate. The button will illuminate and slowly pulse. 2. -
Page 25: Dual Cook: Using Both Zones (Left And Right Side) With Basket Divider
Dual Cook: Using both Zones (LEFT and RIGHT side) with Basket Divider 1. Plug cord in the wall outlet. An audible tone will sound and the control panel will illuminate. The button will illuminate and slowly pulse. NOTE: Insert the basket divider into the middle of the air fryer basket as well as adding both crisping trays (crisping trays optional). -
Page 26: Single Zone Mode: Using One Zone (Either Left Or Right Side) With Basket Divider
7. Press START/PAUSE button to begin operation. Pressing it again will pause the cooking cycle for both LEFT and RIGHT zones. NOTE: At any time during operation, you can adjust the time or temperature by pressing their respective . You will need to select the LEFT or RIGHT zone first. -
Page 27: Air Fry Technique
AIR FRY, ROAST or BAKE functions. Press REMINDER to set a reminder to shake or flip your food at 2/3 the cooking time for an even air frying on the surface of the food. 7. Press START/PAUSE to begin the cooking. Pressing it again will pause the cooking cycle. -
Page 28: Air Frying Pre-Packaged Frozen Foods
6. Arrange breaded food in fryer basket so that food is not touching to allow air flow on all surfaces. 7. Spray oils work best. Oil is distributed evenly and less oil is needed. Canola, olive, avocado, coconut, grapeseed, peanut, or vegetable oil work well. -
Page 29: Hints For Broil
• Place meat (fat side up) and turn over half-way through ROAST time. IMPORTANT: Turn and check food halfway through ROAST time. • Press REMINDER to turn this feature ON. Hints For Broil • Use BROIL to melt cheese or to brown crumb toppings. •... -
Page 30: Air Fry / Roast Cooking Chart
• Precise low temperatures dry out foods evenly without cooking or overheating. NOTE: Turn food several times during DEHYDRATE . Air Fry / Roast Cooking Chart Times are estimated and based on average sizes and weights. ALWAYS USE A MEAT THERMOMETER TO ENSURE THAT MEAT, POULTRY AND FISH ARE COOKED THOROUGHLY BEFORE SERVING. - Page 31 Corn on the Cob, 4 ears 390 °F 12-15 min 18-20 min Carrots, 2 1/2 cups, 1/2 inch pieces 400 °F 10-12 min 20-24 min Mushrooms, 3 cups sliced 400 °F 10-12 min 18-22 min Peppers, Jalapeno, poblano (roasted) 375 °F 10 min 12-15 min Zucchini, 1/4 inch discs...
- Page 32 Single zone TriZone™ Pork Temp Time Time Lamb Loin Chops, 1 inch thick 400 °F 8-12 min 14-18 min Pork Chops, 1 inch thick 375 °F 10 -14 min 20-25 min Pork Chops, 2 inch thick 375 °F 15-19 min 22-28 min Single zone TriZone™...
-
Page 33: Usda Cooking Guidelines
Single zone TriZone™ Deserts Temp Time Time Apple Turnovers 400 °F 10 min 14 min Donuts 350 °F 8 min 9-11 min USDA Cooking Guidelines The USDA recommends that meats such as beef and lamb, etc. should be cooked to an internal temperature of 145 °F/63 °C. -
Page 34: Dehydrate Chart
Dehydrate Chart • Turn food several times during DEHYDRATE for even drying. Herb Temp Time Herb Temp Time Oregano 135 °F Parsley 135 °F Thyme 135 °F Rosemary 135 °F Tarragon 135 °F Sage 135 °F Kale Chips 135 °F Stems Removed Fruit / Vegetables Wash all fruit skins well. -
Page 35: User Maintenance Instructions
User Maintenance Instructions This appliance requires little maintenance. It contains no user-serviceable parts. Any servicing requiring disassembly other than cleaning must be performed by a qualified appliance repair technician. Care & Cleaning Instructions WARNING! Allow the TriZone™ Air Fryer to cool fully before cleaning. 1. -
Page 36: Warranty
The warranty covers specific legal Sensio Inc. dba Made by Gather™ shall rights which may vary by state, not be liable for any incidental or province and/or jurisdiction. - Page 37 Sensio Inc. dba Made transit to Sensio Inc. DBA Made by by Gather™ Attach a tag to the Gather™ Customer Service Center. product that includes: your name,...
- Page 38 Sección 1 Seguridad...
-
Page 39: Medidas De Seguridad Importantes
MEDIDAS DE SEGURIDAD IMPORTANTES Al utilizar electrodomésticos, siempre deben cumplirse las precauciones de seguridad básicas, incluidas las siguientes: 1. LEER TODAS LAS INSTRUCCIONES. 2. No tocar las superficies calientes. Utilizar las asas o las perillas. Usar guantes de cocina o agarraderas. 3. - Page 40 7. No utilizar ningún electrodoméstico que tenga un cable o enchufe dañado, que muestre un funcionamiento defectuoso o que se haya dañado de cualquier manera. Lleve este aparato a un técnico calificado para que lo examine, repare o ajuste. NOTA: NO INTENTAR REPARAR LA UNIDAD POR CUENTA PROPIA. ESTO ANULARÁ...
- Page 41 16. Asegúrese de que la bandeja para el modo crujiente esté en su lugar antes de agregar los alimentos que se van a freír con aire. 17. Asegurarse siempre de que la canasta freidora esté completamente insertada y trabada en la parte delantera de la freidora de aire antes de ponerla en funcionamiento.
-
Page 42: Otras Medidas De Seguridad Importantes
OTRAS MEDIDAS DE SEGURIDAD IMPORTANTES PRECAUCIÓN, SUPERFICIES CALIENTES: ESTE APARATO GENERA CALOR Y PUEDE LIBERAR VAPOR DURANTE SU USO. SE DEBEN TOMAR LAS PRECAUCIONES ADECUADAS PARA PREVENIR EL RIESGO DE QUEMADURAS, INCENDIOS U OTROS DAÑOS PERSONALES O MATERIALES. ATENCIÓN: Este electrodoméstico se calienta durante su funcionamiento y retiene calor durante un tiempo luego de ser apagado. - Page 43 si no funciona correctamente. Póngase en contacto con Servicio al Cliente. 4. Si comienza a mostrar un funcionamiento defectuoso durante el uso, desenchufar el cable de inmediato. No utilizar el electrodoméstico 5. ni intentar repararlo si funciona mal. Contactar servicio al cliente. 6.
-
Page 44: Notas Sobre El Enchufe
13. No colocar el cajón de la canasta vacío (sin la canasta freidora) dentro del cuerpo de la freidora de aire. Revisar que la canasta freidora esté bien asegurada en su lugar dentro del cajón. ADVERTENCIA: Un llenado deficiente o excesivo de la canasta freidora puede dañar la freidora de aire y podría provocar lesiones físicas graves. -
Page 45: Notas Sobre El Cable
NOTAS SOBRE EL CABLE a) Se debe utilizar un cable de alimentación corto (o un cable de alimentación desconectable) para reducir el riesgo de enredarse o tropezar con uno más largo. b) Existen cables de alimentación desconectables más largos o prolongadores y pueden usarse si se hace con precaución. -
Page 46: Advertencia Sobre Plastificados
ADVERTENCIA SOBRE PLASTIFICADOS ATENCIÓN: A fin de evitar que los plastificados se adhieran al acabado de la encimera, la mesa u otro mueble, colocar un posafuentes o salvamanteles que NO SEAN DE PLÁSTICO entre el electrodoméstico y el acabado de la superficie de la encimera o mesa. - Page 47 Sección 2 Instrucciones...
-
Page 48: Conozca Su Freidora De Aire Trizone™ De 9 Cuartos De Galón
Conozca su freidora de aire TriZone™ de 9 cuartos de galón El producto puede diferir ligeramente del que aparece en las ilustraciones 1. Panel de control de pantalla activado por toque 2. Cesta de la freidora de aire extraíble de 9 cuartos de galón TriZone™... - Page 49 1. 2 bandejas antiadherentes para textura crujiente 2. Divisor de cesta...
- Page 50 Panel de control de pantalla activado por toque Una pantalla que solo aparece cuando la necesita. El botón y cualquier botón de FUNCIÓN se iluminará cuando esté activa la función y desaparecerá cuando no se utilice. El calor uniforme combinado con el aire por convección garantiza resultados crujientes prácticamente sin aceite.
- Page 51 • Cuando la freidora de aire está enchufada, sonará un tono, y el panel de control se iluminará y luego se oscurecerá. El botón iluminará y luego pulse lentamente encender y apagar. • Al presionar , sonará un tono, las 6 funciones preestablecidas, AIR FRY (Freír), ROAST (Tostar), BAKE (Hornear), BROIL (Asar), REHEAT (Recalentar), DEHYDRATE (Deshidratar) y los iconos DUAL COOK (Cocción doble) se iluminarán y permanecerán activos durante 5 minutos.
- Page 52 botones LEFT (Izquierda) y RIGHT (Derecha) se iluminarán, y el botón LEFT (Izquierda) predeterminado seguirá parpadeando en la pantalla, esto indica que primero se debe programar la Zona IZQUIERDA (lado izquierdo) y luego la zona DERECHA para cocinar 2 alimentos diferentes a la vez. •...
- Page 53 • Con el divisor de canasta en su lugar, programar cada zona de forma independiente con sus propios tiempos y temperaturas de cocción. • El valor predeterminado para el cocción dual DUAL COOK es programar primero la zona LEFT Izquierda y luego RIGHT la Derecha. SUGERENCIA: No establezca dos temperaturas extremas opuestas en cada zona.
-
Page 54: Antes Del Primer Uso
Antes del primer uso Retire todo el material de embalaje y las etiquetas del interior y el Figure 1 exterior de la freidora de aire. Comprobar que no haya embalaje debajo y alrededor de la canasta freidora y de las bandejas de fritura. 1. -
Page 55: Instrucciones De Funcionamiento
Instrucciones de funcionamiento ¡IMPORTANTE! La capacidad máxima de alimentos recomendada para la cesta de la freidora de aire es de 9 cuartos de galón o 7.5 libras de alimentos. El uso de la cesta completa le permitirá cocinar porciones hasta para 9 personas. - Page 56 Figura 2 Figura 3 Figura 4 Figura 5...
-
Page 57: Seis Configuraciones Preestablecidas: Air Fry (Freír Al Aire), Roast
Seis configuraciones preestablecidas: AIR FRY (FREÍR AL AIRE), ROAST (ROSTIZAR), BROIL (ASAR), BAKE (HORNEAR), REHEAT (RECALENTAR), DEHYDRATE (DESHIDRATAR) Tabla de TEMPERATURAS y TIEMPOS preestablecidos MENÚ TEMP TIME RANGO DE RANGO DE SHAKE (TEMPERATURA) (TIEMPO) TEMPE- TIEMPO (SACUDIR) POR DEFECTO RATURAS ALIMENTOS DEFECTO AIR FRY (Freír... -
Page 58: Operación Manual
OPERACIÓN MANUAL Consultar la tabla de TIEMPOS Y TEMPERATURAS PREESTABLECIDO para obtener las opciones de programación mínimas y máximas. 1. Para cambiar el TIEMPO predeterminado antes o durante la cocción, presionar simplemente los botones para ajustar el TIEMPO, o presionar los botones para ajustar la TEMPERATURA. - Page 59 Modo TriZone™: Cómo utilizar la canasta completa sin el divisor de canasta (ambas zonas sin el divisor de canasta) 1. Enchufe el cable en el tomacorriente de pared. Se emitirá un sonido y el panel de control se iluminará. El botón se iluminará...
-
Page 60: El Divisor De Canasta
Cocción doble: Cómo utilizar ambas zonas (lado IZQUIERDO y DERECHO) con el divisor de canasta 1. Enchufar el cable en el tomacorriente. Un tono audible sonará y el panel de control se iluminará. El botón se iluminará y pulsará lentamente. NOTA: Insertar el divisor de canasta en el centro de la canasta freidora y añadir las dos bandejas de fritura (las bandejas de fritura son opcionales). -
Page 61: Modo De Una Sola Zona: Cómo Utilizar Una Zona (Ya Sea Del Lado Izquierdo O Derecho) Con Divisor De Canasta
(Tostar) o BAKE (Hornear). Presionar REMINDER (Recordatorio) para establecer un recordatorio para agitar o voltear sus alimentos a los 2/3 del tiempo de cocción para que la superficie de los alimentos se cocine de manera uniforme. SUGERENCIA: Tiene la opción de utilizar la función REMINDER (Recordatorio) si selecciona las funciones AIR FRY (Freír), ROAST (Tostar) o BAKE (Hornear). - Page 62 3. Seleccionar DUAL COOK (Cocción doble) (Figura 5). Sonará un tono. Los botones LEFT (Izquierda) y RIGHT (Derecha) se iluminarán en la pantalla, y el botón LEFT (Izquierda) predeterminado comenzará a parpadear. 4. Seleccionar entre la zona IZQUIERDA o DERECHA para programar. 5.
-
Page 63: Técnica De Freído Al Aire
Técnica de freído al aire Consulte la tabla de freído al aire / cocción de rostizado y/o siga las instrucciones del paquete para ver el tiempo y la temperatura sugeridos. 1. Siempre seque los alimentos con palmaditas antes de cocinarlos para que se doren bien y evitar el exceso de humo. -
Page 64: Freír Al Aire Alimentos Congelados Preenvasados
8. Sacuda los alimentos fritos al aire en el área de servicio. Inserte rápidamente cualquier cesta freidora en el cuerpo de la freidora de aire y bloquéela en posición. Siga friendo al aire los lotes siguientes, si los hay. 9. Presione REHEAT para freír los alimentos al aire durante 6 minutos a 250 °F. -
Page 65: Consejos Para Rostizar
Consejos para rostizar ¡IMPORTANTE! Consulte la sección Pautas de cocción del USDA de este manual de instrucciones antes de comenzar la cocción. Siempre pruebe la carne con un termómetro de cocción preciso. • Siempre debe usarse un termómetro para carne insertado en el centro de la carne para asegurar la cocción deseada. -
Page 66: Consejos Para Asar
Consejos para asar • Use BROIL para derretir queso o dorar cubiertas de migas de pan. • Por lo general, BROIL se usa para cortes tiernos y delgados de carnes o chuletas, aves o pescado marinados, frutas y verduras. • Seque las carnes y pescados marinados antes de asarlos. -
Page 67: Consejos Para Deshidratar
Consejos para deshidratar NOTA: Al programar manualmente la selección del menú DEHYDRATE (DESHIDRATAR), TIME (TIEMPO) aumentará o disminuirá en incrementos de 30 minutos. • Deshidrate alimentos frescos y maduros para conservar los nutrientes y realzar el sabor. • El deshidratado automático de su Freidora de aire TriZone™ hace que la deshidratación en el hogar sea simple y gratificante y garantiza resultados saludables, seguros y sin preservantes. -
Page 68: Tabla De Freído Al Aire / Cocción De Rostizado
Tabla de freído al aire / cocción de rostizado Los tiempos son estimativos y se basan en tamaños y pesos promedio. UTILICE SIEMPRE UN TERMÓMETRO DE CARNE PARA ASEGURARSE DE QUE LA CARNE, LAS AVES DE CORRAL Y EL PESCADO SE COCINAN COMPLETAMENTE ANTES DE SERVIR. NOTA: Freír lotes más pequeños dará... - Page 69 Patatas blancas, en cuñas 390 °F 20 - 25 min 35 - 40 min Floretes de brócoli, 3-4 tazas 400 °F 15 - 20 min 22 - 28 min Coles de Bruselas, 1 libra 375 °F 12 - 15 min 20 - 25 min Maíz en la mazorca, 4 mazorcas 390 °F...
- Page 70 ZONA ÚNICA TRIZONE™ TEMPE- POLLO TIEMPO TIEMPO RATURA Pechuga de pollo, deshuesada, sin 360 °F 18 - 20 min 22 - 25 min pellejo Muslos de pollo, 6-8 oz cada uno, 360 °F 20 - 25 min 28 - 30 min deshuesados Filetes/ Tiras de pollo: rebozados 360 °F...
- Page 71 ZONA ÚNICA TRIZONE™ TEMPE- ALIMENTOS CONGELADOS* TIEMPO TIEMPO RATURA Palitos de queso 350 °F 6 - 9 min 10 - 12 min Papas fritas, gruesas, 2 tazas 400 °F 17 - 21 min 24 - 30 min Papas fritas 400 °F 15 - 17 min 20 - 24 min Aros de cebolla...
-
Page 72: Pautas De Cocina Del Usda
Pautas de cocina del USDA El USDA recomienda que las carnes como la ternera y el cordero, etc., se cocinen a una temperatura interna de 145 °F/63 °C. El cerdo debe cocinarse a una temperatura interna de 160 °F/71 °C y los productos de aves de corral deben cocinarse a una temperatura interna de 170 °F/77 °C - 180 °F/ 82 °C para asegurarse de que se haya eliminado cualquier bacteria dañina. - Page 73 Frutas/verduras Lavar todas las cáscaras de las frutas bien. Cortar la fruta en rebanadas de 1/4 de pulgada de grosor y organizar dejando un espacio entre cada rebanada para asegurar la deshidratación uniforme. Rote los alimentos a la mitad del tiempo de DESHIDRATACIÓN para que queden uniformes.
-
Page 74: Instrucciones De Mantenimiento Para El Usuario
Instrucciones de mantenimiento para el usuario Este aparato requiere poco mantenimiento. No contiene piezas que el usuario pueda reparar. Cualquier mantenimiento que requiera desarmarlo, aparte de la limpieza, debe ser realizado por un técnico calificado en reparación de electrodomésticos. Instrucciones de limpieza y cuidado ¡ADVERTENCIA! Deje que la freidora de aire trizone™... -
Page 75: Garantía
Las las piezas no mecánicas. A su entera tiendas minoristas no tienen derecho discreción, Sensio Inc. dba Made by a alterar, modificar ni corregir Gather™ que resulte defectuoso, o de ninguna manera los términos y emitirá... - Page 76 (con el envío y el seguro referidos a la garantía por prepagados) a la dirección de Sensio teléfono. Si este no puede resolver Inc. dba Made by Gather™. Sensio el problema, le proporcionarán un Inc.
Need help?
Do you have a question about the Beautiful TriZone and is the answer not in the manual?
Questions and answers
How do I open basket on my airfryer