Advertisement
Quick Links
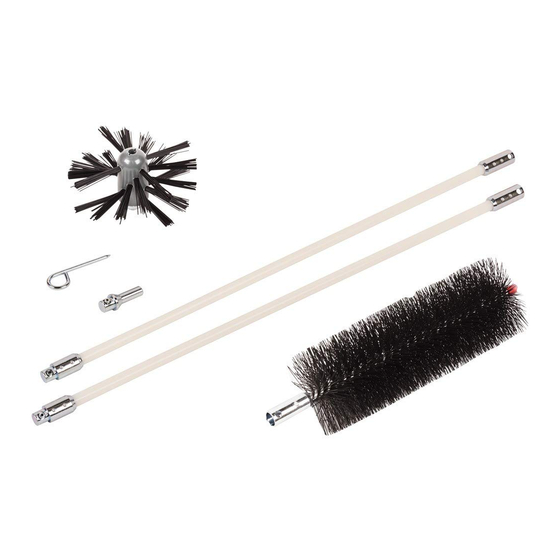
screw together to
reach into vents up to
multiple turns in your
12' from one end.
vent.
The
makes
Connect to a shop vac
to collect the lint while
rotary brushing.
System includes:
Removes heavy
blockages and clears
Exceptional 42" Reach
gutter downspouts.
when connected to
one fl exible rod.
with
Safeguards
the blower wheel by
stopping the Auger
Brush when using the
dryer air or a blower to
remove the lint while
rotary brushing.
Advertisement

Summary of Contents for HYC LintEater
- Page 1 System includes: screw together to makes Connect to a shop vac Removes heavy with Safeguards reach into vents up to multiple turns in your to collect the lint while blockages and clears Exceptional 42" Reach the blower wheel by 12' from one end. vent.
-
Page 2: Important Safeguards
Important Safeguards! • Read all safety & operating instructions before use. • All warnings in the manual should be strictly adhered to. • Failure to comply with the instructions & safety rules may result in property damage or personal injury. •... - Page 3 Limited Warranty: The LintEater kit and all accessories are designed for homeowner use. All components are warranted for a period of one year from date of purchase. Should any part fail due to a manufacturing defect, return the defective part to Gardus and we will replace it free of charge.
- Page 4 Operating Instructions Recommended Drill Set on middle setting or lower Any cordless drill with a 3/8” or 1/2” chuck with an adjustable clutch will work. Setting the Clutch on your cordless drill a. Adjust clutch to a setting in the middle of the range or slightly lower. b. You should be able to hold the properly adjusted chuck with your hand & prevent it from spinning yet there should be a fair amount of torque. Turn to adjust clutch Connecting the Rods Option 1 To connect the rods, simply screw them together and tighten with two pairs of pliers. Proceed to step 4 below. Option 2 This method requires a great deal of caution but will speed up the cleaning process. 1. Start the threads by hand to insure that they are not cross‐threaded. 2. Insert the other end of the rod into the drill chuck. ...
- Page 5 Disconnecting the Rods Hold end of rod very tightly by hand or with pliers Option 1 Use two pairs of pliers to loosen & then unscrew the rods by hand Option 2 You can disconnect each rod using the drill as well. a. Hold the end of the rod, which is inside the vent, very tightly. b. Reverse the drill while holding the rod end to unscrew the rod which is connected to the drill. CAUTION! Be sure that the rods that are still in the vent do not spin as this will cause them to disconnect inside the vent. Inserting Rods into Drill Chuck 1. The fittings on the rods are designed to fit into any type of drill without an adapter. 2. Simply insert the steel rod fitting into the chuck of the drill and tighten by hand Twist chuck to tighten ...
- Page 6 1. Place the Blockage Removal Tool onto the rod. 2. Thread the included nut onto the rod. 3. Tighten with pliers or wrench.
- Page 7 3. White vinyl or foil venting will make a dull sound while rigid or semi-rigid venting will have a positive metal to metal sound and feel. White Vinyl Foil The LintEater is designed to clean all types of venting. However, extra care must be taken when cleaning white vinyl or foil.
-
Page 8: Important Note
Step 2 Select a heat cycle on the dryer and then turn the dryer on. Step 3 Go to the exterior and check for air flow coming out of the vent hood. If there is No airflow go to step 4. Yes, there is airflow go to step 7. - Page 9 “NO” If There is Airflow Step 4 Look for visual signs of a bird’s nest such as bird droppings by exterior vent hood. Also look for straw, leaves, twigs or anything else that is not lint inside the end of the vent. Step 5 If there is a bird’s nest or other blockage, use the “Blockage Removal Tool”...
- Page 10 Step 6 Turn the dryer on again and check the airflow at the exterior vent hood. STILL NO AIRFLOW? This may be caused by a more severe problem such as; - Disconnected vent - Crushed vent - Torn vent pipe, etc. Important Note If signs of a more severe problem exist, it is recommended that a professional be called to test the system with specialized tools.
- Page 11 “IS” If There Airflow Step 7 Tape or clip damper on hood in the open position or remove louvers on louvered vent hood. Remove the louvers by bending them slightly in the middle. Caution! Be careful not to break the plastic pin on the ends of the louvers.
- Page 12 Step 9 Clean area behind dryer as well as the back of the dryer itself using the Lint Trap brush and a vacuum Step 10 a) Remove vent from the back of the dryer. b) Hook-up a shop vac using the included “Vacuum Adapter”...
- Page 13 CLEANING FROM OUTSIDE WITH A CORDLESS DRILL Step 11 Cleaning From Outside: 1. Thread 4” Auger Brush onto flexible rods. 2. With the vacuum/blower running, go to the exterior and begin spinning the rods & brush into the vent. Important: a) Be sure the clutch is set on in the mid range (or lower).
- Page 14 CLEANING FROM OUTSIDE WITH A CORDLESS DRILL Step 11 (cont) 6. Once you feel you have reached the end, go to the interior, disconnect the vacuum or blower and look inside the vent to see if the brush has reached the end. If the brush is not visible, and you felt the brush binding up when you were rotary cleaning, it may be necessary to finish cleaning from the inside toward the outside.
- Page 15 Step 12 Optional Method for Removing the Rods from the Vent: Method 2: It’s also possible to remove all of the rods at one time by spinning the rods (always in the clockwise direction) and pulling them out of the vent as you walk away from the vent hood.
- Page 16 Step 14 Remove the tape or clip from the damper or re-install the louvers if you have a louvered vent hood. Be careful not to break the pins on the ends of the louvers. Step 15 Once the vent system is cleaned, connect the vent to the back of the dryer using the proper material.
- Page 17 Connecting Dryer Vent Replace all white vinyl or foil venting with all metal venting. If you have white vinyl or foil venting behind the dryer or throughout the venting system it should be replaced with flexible metal or rigid metal venting. The following are some tips to help you install flexible metal venting from your dryer to the wall or ceiling.
- Page 18 Additional Cleaning Methods Method 1 Using the dryer to blow the lint out while rotary brushing The “Dryer Adapter” has a built-in guard to prevent the rotating Auger Brush from entering the dryer thus preventing damage to the blower wheel within the dryer.
- Page 19 Additional Cleaning Methods Method 2 Using an Electric Leaf Blower to blow the loosened lint out of the vent while rotary brushing from outside An electric blower can also be attached to the vent on the inside to blow the lint out while you rotary brush from the outside toward the inside.
- Page 20 Additional Cleaning Methods Method 4 Rotary brushing from inside with vacuum connected outside a) Connect the vacuum hose to the exterior vent hood. b) Rotary brush from the inside toward the exterior while the vacuum collects the loosened lint on the outside.
- Page 21 Cleaning Lint Trap & Lint Screen Duct Works for dryers with lint screens in the “Top” of the dryer (as shown) & for dryers with lint screens inside the front door! 1. Always “scoop” the lint up toward you when clean the lint trap area.
- Page 22 Cleaning baseboard heat or under refrigerator with the Lint Brush Baseboard Heat: Works great to remove the dust buildup on the fins inside your baseboard heat. Simply run the brush over the fins while brush clockwise. Use a vacuum to clean the brush as you go. Be careful not to damage the fins.
- Page 23 Position LintCatcher Secure with over the vent drawstring How to Purchase Accessories & Spare Parts If you would like to purchase additional accessories or spare parts, please go to www.linteater.com then click on the “Where to Buy” tab. Thank You...
- Page 24 customerservice@hy-c.com 800-325-7076 (toll free) www.gardusinc.com www.hy-c.com Made in China...
Need help?
Do you have a question about the LintEater and is the answer not in the manual?
Questions and answers