
Summary of Contents for Cobra RC Toys E-GLIDER 2.0
- Page 1 E-GLIDER 2.o INSTRUCTION MANUAL MANUEL D’UTILISATION 2.4 GHZ E-GLIDER by COBRA RC TOYS L’E-GLIDER 2.4 GHZ de COBRA RC TOYS #909334...
- Page 2 WARNING | AVERTISSEMENTS Product not suitable for those under the age of 10. Keep hands, body and face away from blades at all times. Always turn off power on the plane and the transmitter immediately after completing a flight. Fly only in an open area away from all potential hazards including people, animals, power/phone lines, buildings etc.
- Page 3 IMPORTANT | IMPORTANTE This plane is made with precision electrical components. Treat it like any electronic device and keep it away from any heat or moisture sources. A heavy crash where the product is damaged may result in a product that is unsafe to fly.
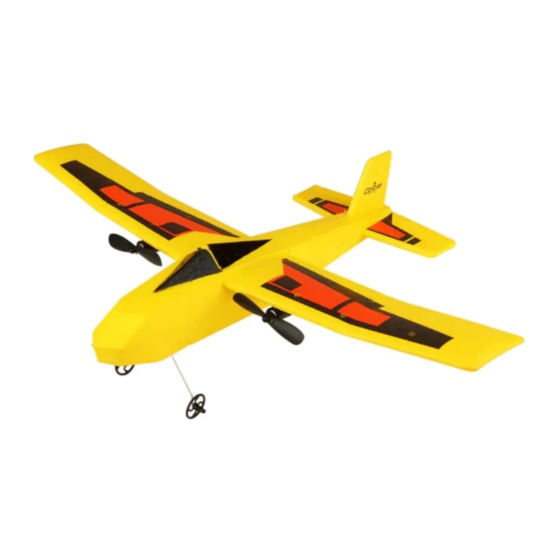
- Page 4 PACKAGE INCLUDES L’EMBALLAGE COMPREND E GLIDER CONTROLLER LANDING GEAR USB CHARGER 2 SPARE PROPELLERS LES PATINS LE CHARGEUR USB DEUX HÉLICES L’E-GLIDER L’ÉMETTEUR D’ATTERRISSAGE DE RECHANGE RECHARGEABLE, REPLACEABLE AND SWAP-ABLE: LIPO 3.7V, 150 MAH LONG LIFE BATTERY BATTERIE LI-PO 3,7V, 150 MAH LONGUE DURÉE, RECHARGEABLE ET REMPLAÇABLE. ...
- Page 5 DIAGRAMA DEL CONTROL Power LED Turn Right Forward Power Switch Turn Left Alimentation DEL Virez à droite Avant Interrupteur Virez à gauche...
- Page 6 CHARGING THE RECHARGEABLE E GLIDER BATTERY Push the tab on the battery compartment cover of the glider (toward the nose of the plane) and lift the cover to the open position. Unplug the battery connector (if it’s plugged in) from the glider and remove the battery. Connect the USB charging wire to a computer USB outlet.
- Page 7 CHARGE DE LA BATTERIE DU E-GLIDER Lorem ipsum Pour ouvrir le compartiment à batterie, faire glisser le couvercle (vers le haut du planeur) puis soulevez-le. Débranchez le connecteur de la batterie du planeur (s’il est branché), puis retirez la batterie. Branchez le câble USB du chargeur au port USB d’un ordinateur.
- Page 8 OPERATING YOUR GLIDER FONCTIONNEMENT DE L’E-GLIDER Prior to Flight, ensure the motors are moving freely, and there is no excessive damage to the wings, motors, and body of the aircraft. Your E-Glider is designed to absorb a certain amount of impact, and minor exterior scratchers should not affect flight.
- Page 9 With the transmitter in the off position, ensure the throttle (left) stick is at the lowest position (down). L’émetteur éteint, vous assurer que la manette des gaz (gauche) est à la position la plus basse (vers le bas) Turn both the transmitter and the E-Glider power switch to the “ON”...
- Page 10 Move the throttle (left) stick to the maximum position (up) and back down to the lowest position (down). This will unlock the propellers the E-Glider is ready to take flight. Positionnez la manette des gaz (gauche) à la position la plus haute (vers le haut) puis à...
- Page 11 Lorsque vous faites décoller votre E-Glider sur la main, pointez l’avion dans la direction du vent pour obtenir de meilleurs résultats. Positionnez la manette des gaz au milieu et lancez doucement l’avion à l’horizontale. Si vous lancez l’avion vers le sol, cela pourrait entrainer une chute, si vous le lancez trop haut, l’avion pourrait caler.
- Page 12 Control the direction of the plane with the right stick. Practice making nice long circles in one direction until you are comfortable with your E-Glider Le contrôle directionnel se fait à l’aide du levier droit. Exercez-vous à faire quelques grands cercles dans la même direction jusqu’à...
- Page 13 NOTE | REMARQUES | NOTA NOTE | REMARQUES | NOTA Your E-Glider is a fun and easy way to learn the basics of RC plane flying. Crashes may happen, which is why it is important to fly over a soft surface is: grass, with plenty of room to maneuver Le temps de vol est d’environ 10 à...
-
Page 14: Replacing The Propellers
Simply remove the damaged propeller from the motor shaft, and install the new prop. Note: Spare parts can be purchased on our website at www.cobratoys.com or by a licensed Cobra RC Toys dealer. - Page 15 90 DAY LIMITED WARRANTY GARANTIE LIMITÉE DE 90 JOURS La compagnie Cobra RC Toys réparera et remplacera, à sa seule discrétion, tout défaut de fabrication dans les 90 jours de la date d’achat. La compagnie s’engage aussi à payer les frais de retour seulement aux clients résidant aux États Unis continentaux et au Canada.
Need help?
Do you have a question about the E-GLIDER 2.0 and is the answer not in the manual?
Questions and answers