Table of Contents
Advertisement
Available languages
Available languages
Quick Links
Advertisement
Chapters
Table of Contents

Related Manuals for Lantheus Medical Imaging VIALMIX

Summary of Contents for Lantheus Medical Imaging VIALMIX
- Page 1 V I A L M I X ® ® AC T I VAT I O N D E V I C E F O R D E F I N I TY V I A L F O R P E R F L U T R E N L I P I D M I C RO S P H E R E I N J E C TA B L E S U S P E N S I O N ’...
- Page 2 Technical Service Reference: If you need technical assistance or have questions about Vialmix ® call Lantheus Medical Imaging Technical Services at 1-800-362-2668. Customer Service Reference: For customer orders, please call Lantheus Medical Imaging Customer Services at 1-800-299-3431. Caution: The only intended use of Vialmix is for the activation of ®...
-
Page 3: Table Of Contents
C O N T E N T S ■ ■ ■ ■ ■ ■ ■ ■ ■ ■ ■ ■ ■ ■ ■ ■ Q U I C K S TA RT I N S T R U C T I O N S I N T R O D U C T I O N Safety Precautions System Features Overview... - Page 4 ® Press START and countdown from “45” to “00” will begin. R E M OV I N G V I A L When the full 45-second cycle is complete, open Vialmix cover. ® Press lever downward and to the left to open the carrier.
-
Page 5: I N T R O D U C T I O N
Except for fuse re p l a c e m e n t , all repairs should only be done by ■ Lantheus Medical Imaging ap p roved personnel. Do not open unit housing. 5 1 5 3 7 0 - 0 8 1 0... -
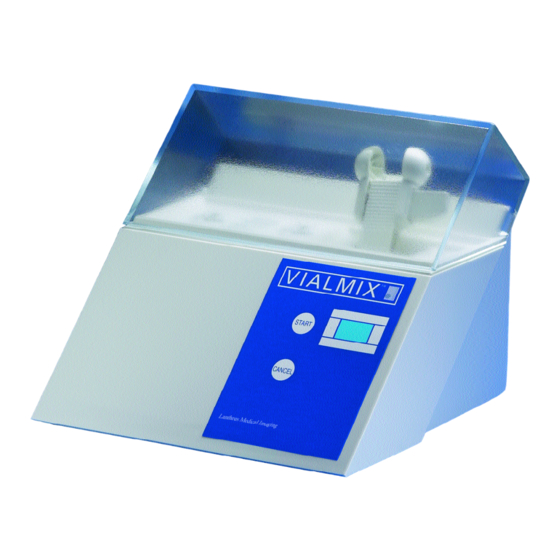
Page 6: System Features Overview
® activate the agent vial and requires shaking in order to create the lipid-encapsulated adequately. Using microbubbles.The shaking rate and duration are controlled by Vialmix ® Vialmix to shake ® to ensure reproducible activation of Definity ®... -
Page 7: Set-Up
Remove the red transport collar from the base of the vial carrier. Before plugging Vialmix into an electrical outlet, verify that the voltage ® on the type plate on the back of Vialmix corresponds to the local ® power line voltage. -
Page 8: O P E R At I O N
® P O W E R I N G O F F V I A L M I X Vialmix should be powered off at the end of the day.This is done by ® moving the switch on the back of the unit to the “0” position. -
Page 9: Loading The Vial
Close the Vialmix cover. ® without a vial in the carrier. Refer to the illustration on the Vialmix unit, to the left of *NOTE: ® the vial carrier for the loading procedure. 5 1 5 3 7 0 - 0 8 1 0... -
Page 10: Activating The Vial
After completion of an activation cycle, allow a minimum of 7 an uninterrupted NOTE: minutes before beginning another cycle.This allows the Vialmix motor shaking cycle. ® to cool. 5 1 5 3 7 0 - 0 8 1 0... -
Page 11: Removing The Vial
“00”), the vial can be removed for use.To remove the vial, open cover should be the cover and follow these steps:* closed when Vialmix is not in ® Press the lever down to unlatch the vial carrier, then press the lever use. -
Page 12: S A F E T Y F E At U R E S
If the cover is lifted during operation, the shut-off switch will cause the ■ activation cycle to stop. The following table shows the LED message for each of the above situations, the associated Vialmix response, likely cause of the message, ® and the action required of the user:... -
Page 13: Cancel Button
The CANCEL button is available in the unlikely event that the activation unacceptable for cycle must be stopped for safety reasons (for example, should the vial use. Retain the become dislodged or a mechanical failure of Vialmix occur). ® vial and call... -
Page 14: Thermal Sensor Shut-Off Switch
In the unlikely event that the motor overheats, the sensor triggers the motor to shut down.The LED message (“EE” alternating with “LO”) and an audible alarm alert the user that the motor has overheated. Under this condition,Vialmix will not allow a cycle to begin until the ®... - Page 15 L E D A L E RT M E S S A G E S ■ ■ ■ ■ ■ ■ ■ ■ ■ ■ ■ ■ ■ ■ ■ ■ In order to ensure acceptable activation of Definity , Vialmix ® ® See table on programmed to display LED messages that alert the user in the event following page.
- Page 16 (See pg 10.1) Power off the Mechanical “EE” alter- Stops shaking, ■ u n i t . Do not use failure of Vialmix nating with emits an ® the Definity affecting the “LO.” audible alarm ®...
- Page 17 Vialmix ® must be performed Do not use the unit if it does not work as specified or is visibly damaged. by Lantheus Medical Contact Technical Services for a Vialmix replacement. (See pg 10.1) ® Imaging approved technical personnel.
- Page 18 IMPORTA N T: If you need assistance, or have Message Corrective Action Required Likely Cause technical questions about Vialmix ® , call LED display does No main power Check power supply and powe r not operate c o rd connection.
- Page 19 Vialmix ® The use of isopropanol to clean Vialmix is not recommended since over ® during cleaning; time it may cause the plastic housing to become brittle.
- Page 20 Remove the fuse and replace it with a new one. Press the fuse clamp back into the fuse box until you hear the ratchet snap into place. Put the fuse box back into the unit. IMPORTANT: The fuse is the only part of Vialmix which may be replaced ®...
- Page 21 18-30° C Line Voltage: 100 V, 110V, 120 V, 230 V, 50 Hz or 60 Hz Individual voltage (V)/Hertz (Hz) ratings are listed on the type plate on the back of the Vialmix ® Power Input: 330 VA Dimensions: Height:...
- Page 22 ■ ■ ■ ■ ■ ■ ■ ■ ■ ■ ■ ■ ■ ■ ■ ■ ■ ■ ■ ■ ■ ■ ■ ■ ■ ■ ■ ■ ■ ■ ■ ■ US and Canada If you need technical assistance, or have questions concerning Vialmix ® please call Lantheus Medical Imaging Technical Services at: (U.S.) 1-800-362-2668...
- Page 23 ® V I A L M I X EQUIPO PARA ACTIVACIÓN DEL FRASCO AMPULA ® DE DEFINITY PERFLUTREN EN MICROESFERAS DE LÍPIDOS SUSPENSIÓN INYECTABLE G U Í A D E L U S U A R I O ■ ■ ■ ■ ■ ■ ■ ■ ■ ■ ■ ■ ■ ■ 5 1 5 3 7 0 - 0 8 1 0...
- Page 24 Referencias de Servicio Técnico: Si necesita asistencia técnica o tiene preguntas respecto al Vialmix , llame a: ® En Estados Unidos: Lantheus Medical Imaging Al teléfono 1-800-362-2668 Precaución: El único uso propuesto del Vialmix es para la activación del frasco ámpula ®...
- Page 25 Panorama General de las Características del Sistema Puesta en Funcionamiento O P E R A C I Ó N Encendido/Apagado de la Corriente Colocación del Vialmix ® Activación del frasco ámpula Remoción del frasco ámpula C A R A C T E R Í S T I C A S D E S E G U R I D A D Interruptor de apagado de la cubierta Botón “CANCEL”...
- Page 26 éste en la copa izquierda del port a - f r a s c o ; coloque el frasco ámpula e n t re las dos copas. Libere la palanca; después cierre la cubierta del Vialmix ® Presione “START” y se iniciará la cuenta regresiva de “45” a “00”.
-
Page 27: I N T R O D U C C I Ó N
No sumerja la unidad en ningún líquido. Excepto para el reemplazo de fusibles, todas las reparaciones deberán ■ ser realizadas por personal calificado de Lantheus Medical Imaging. No abra la caja protectora de la unidad. 5 1 5 3 7 0 - 0 8 1 0... -
Page 28: Panorama General De Las Características Del Sistema
■ El Vialmix tiene solamente dos botones operacionales. Uno para iniciar ® 45 segundos el ciclo, y otro para cancelar el ciclo, si es necesario. El Vialmix permite ® la carga fácil del frasco ámpula de Definity dentro del porta-frascos. -
Page 29: Puesta En Funcionamiento
Antes de conectar el Vialmix a una toma de corriente, verifique que ® el voltaje en la placa de características en la parte posterior del Vialmix ® corresponde al voltaje de la toma de corriente local. Coloque el Vialmix sobre una superficie plana. -
Page 30: O P E R A C I Ó N
■ ■ ■ ■ ■ ■ ■ ■ ■ ■ ■ ■ ■ ■ ■ ■ ® E N C E N D I D O D E L V I A L M I X Con el Vialmix conectado adecuadamente a la corriente, la unidad ®... - Page 31 Cierre la cubierta de Vialmix ® *NOTA: Refiérase a la ilustración en la unidad Vialmix , a la izquierda ® del porta-frasco para el procedimiento de colocación.
-
Page 32: Activación Del Frasco Ámpula
NOTA: Después de finalizar el ciclo de activación, espere un mínimo de 7 interrupción. minutos antes de iniciar otro ciclo. Esto permite que el motor del Vialmix ® se enfríe. 5 1 5 3 7 0 - 0 8 1 0... -
Page 33: Remoción Del Frasco Ámpula
(indicado por el “00” en la pantalla), se puede retirar el frasco ámpula para mantenimiento, su uso. Para retirar el frasco ámpula, abra la cubierta y siga estos pasos:* la cubierta del Vialmix debe estar ® Presione la palanca hacia abajo para liberar el porta-frasco; después... -
Page 34: Interruptor De Apagado De La Cubierta
■ automático parará el ciclo de activación. La tabla siguiente muestra los mensajes en la pantalla para cada una de las situaciones anteriores, la respuesta relacionada del Vialmix , la causa ® probable del mensaje y la acción requerida por el usuario: Respuesta Acción... -
Page 35: Botón "Cancel
Lantheus Medical La tabla siguiente muestra el mensaje en la pantalla cuando se presiona el Imaging. (Ver la botón CANCEL, la respuesta relacionada del Vialmix , la causa probable del ® pagina 10.1) mensaje y la acción requerida por el usuario: Respuesta Acción... - Page 36 El mensaje en la pantalla (“EE” alternando con “LO”) y una alarma audible alertaran al usuario que el motor se ha sobrecalentado. Bajo estas condiciones, el Vialmix no permitirá el comienzo de un nuevo ®...
- Page 37 M E N S A J E S D E A L E RT A E N L A PA N TA L L A ■ ■ ■ ■ ■ ■ ■ ■ ■ ■ ■ ■ ■ ■ ■ ■ Para garantizar la activación aceptable de Definity , el Vialmix está ® ®...
- Page 38 Ver la pagina 10.1) “EE” alternan d o Se detiene la • Falla mecánica Apague la unidad. con “LO” agitación, emite del Vialmix No use el frasco ® una alarma que afecta la ámpula de Definity ® La velocidad de audible.
- Page 39 Vialmix ® deberán No use la unidad si no trabaja como está especificado o si está ser realizadas por visiblemente dañada. Comuníquese a Lantheus Medical Imaging para personal técnico un reemplazo del Vialmix . (Ver la pagina 10.1) ® calificado de Lantheus Medical Imaging.
- Page 40 ® velocidad de a c e p t a b l e. C o n s e rve el frasco ámpula y agitación c o muníquese a Lantheus Medical Imaging aceptable. para recibir asistencia técnica. ( Ver la pagina 10.1) El fusible está...
- Page 41 éstos pueden dañar el plástico. limpiadores líquidos penetren dentro No se recomienda el uso de isopropanol para limpiar el Vialmix ® del Vialmix ® que con el tiempo puede causar que las partes de plástico se vuelvan pudiera ocurrir un quebradizas.
- Page 42 Lantheus Medical Imaging Comuníquese a Lantheus Medical Imaging si hay algún problema con el V i a l m i x .( Ver la pagina 10.1) ®...
- Page 43 Dimensiones: Altura: 160 mm Profundidad: 195 mm Ancho: 195 mm Peso: 3750 g Fusibles: Fusibles para amperaje dentro de los rangos indicados en la placa posterior del Vialmix ® 5 1 5 3 7 0 - 0 8 1 0...
- Page 44 ■ ■ ■ ■ ■ ■ ■ ■ ■ ■ ■ ■ ■ ■ ■ ■ Estados Unidos y Canada Si necesita asistencia técnica, o tiene preguntas que conciernen el Vialmix ® por favor llame al Servicio Tecnico de Lantheus Medical Imaging al teléfono:...
- Page 45 5 1 5 3 7 0 - 0 8 1 0...
- Page 46 Distributed in USA by Lantheus Medical Imaging 331 Treble Cove Road North Billerica, Massachusetts 01862 USA Telephone toll free: 1-800-362-2668 For Massachusetts and International: 1-978-667-9531 August, 2010 Printed in USA 5 1 5 3 7 0 - 0 8 1 0...
Need help?
Do you have a question about the VIALMIX and is the answer not in the manual?
Questions and answers