
Related Manuals for Platinum Curve Stairlift

Summary of Contents for Platinum Curve Stairlift
- Page 1 Platinum Curve Stairlift Installation Manual THIS GUIDE IS COMPANY CONFIDENTIAL. PLEASE RETAIN THIS GUIDE. THIS GUIDE IS NOT TO BE LEFT WITH THE CUSTOMER. Exclusively Curved...
-
Page 2: Table Of Contents
Contents Page ……………………………………………………………………… Stairlift Discription Controls ……………………………………………………………………………….……………………………………………………………….. ……………………………………………………………….…………………………………………………………………….. Swivel Seat Charging Points ………………………..……………………………………………………………………………………………………………. Remote Controls ………………..……………………………………………………………………………………………………………………. Kitting List …………………………………………..............…………………………............ Required Installation Equipment ………………………………………............. Installing the Stairlift …………………………………………………………..................Installation Drawing …………………………………………………....................Assembling the Rail ……………………………………………………………………………………………………………….. Fixing the Rail Assembly in Place ……………………………………………………………….. - Page 3 The information in this guide assumes that you have already completed specialist training on how to install a Platinum Curve stairlift and you have perfomed an installation before, either at a customers dwelling or as part of a training course.
-
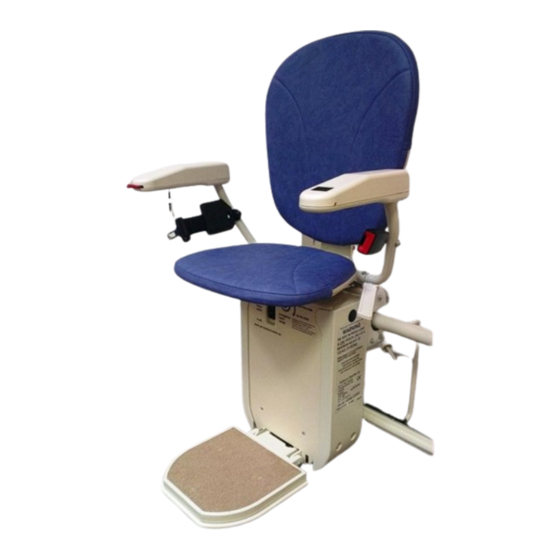
Page 4: Stairlift Discription
About the Stairlift Meaning Meaning Arm rests (fold up and down) Battery Isolator Switch Lap Belt Seat (folds up and down) Seat Swivel Lever Keyswitch Powered footrest control (if option fitted) Direction Control Emergency Hand-wind Mechanism Mains Power Switch Diagnostic Display Charging Point Safety Limit Covers Remote Control... -
Page 5: Controls
Controls Mains Power Switch The stairlift should be plugged in at the nearest mains socket. This could be at the top or bottom of the stairs. The lift needs to be plugged in and switched on at all times. When the power is on, a green indicator light will be shown on the power supply, mounted nearby. -
Page 6: Swivel Seat
Swivel Seat For safety, the seat (10) is locked into one of two positions. In the normal travel position, the seat will be locked into position with your back parallel to the track. This is so you do not catch your feet on the steps during travel. -
Page 7: Charging Points
Safety Interlocks The footrest and the motor unit are fitted with Safety Interlocks (7). These are pressure pads which will stop the lift if they come into contact with any obstructions. If the lift stops because it has encountered an obstruction, a fault code will be displayed on the diagnostic display. -
Page 8: Kitting List
Typical Kitting List A typical installation will use the following numbers of these parts: Leg bases (number specified on the Installation Drawing) Track sections (number specified on the installation drawing) 45mm long spirol pins for legs (two per leg) ... -
Page 9: Required Installation Equipment
Required Installation Equipment To perform a typical installation you will need to use the following types of equipment: Safety Goggles and Rigger Gloves Spirit level, plus 5 metre tape measure Drillbits: 6mm, 5.9mm, 5mm & 4.2mm HSS Drill Bits. 5mm Tap ... - Page 10 Health & Safety Guidance Electrical Safety Installation of the stairlift is mainly a manual process. Although you do need to plug the stairlift into a mains power supply socket, this socket MUST already have been installed by a qualified electrician. All work on the 240Volt system must be done by a qualified electrician.
-
Page 11: Installing The Stairlift
Installing the Stairlift Understanding the Installation Drawing The installation of a stairlift is specific to each site. Details of components and installation requirements are listed on the Installation Drawing and Kitting Checklist which are contained within the Kit box.This includes detailed measurements of how components should be arranged and precisely where and at what height they should be fitted. -
Page 12: Assembling The Rail
Laying out the Components Each complete stairlift consists of the carriage box, the chair box, the kit box and several rail sections. A Kitting List is included in the kit box detailing all of the parts you have received. Remove any protective packaging from the components. It is usually best to start at the bottom of the stairs, and work your way upstairs. - Page 13 Set the height of the next rail section approximately with vice grips. Slide the higher rail assembly downwards into the lower rail assembly taking care not to trap charge current cable. Again, clamp the legs to ensure that the rail stands level vertically.
-
Page 14: Fixing The Rail Assembly In Place
Moving the Rail into the correct Position The Rail Assemblies are now assembled, but still need to be aligned accurately on the stairs. Refer to the Installation Drawing for details of the distances that the rail should be set over the first and last noses (steps) and the clearances that should be set between the rail and any walls, newell posts or other obstructions. -
Page 15: Fitting The Carriage To The Rail
Fitting the Carriage to the Rails AUTION The weight of the Carriage is 34 kg when the batteries and all the components are installed. Open the carriage box and remove the skate retention packing cardboard. Ensure that the top skate loom is free and will not catch the top skate assembly as it moves while travelling on the track. -
Page 16: Fitting The Batterys
A second, shorter, loading bar can be used in the bottom rail tube if you find it easier to fit this way. Lift the carriage and thread the top skate rollers onto the top loading bar. Holding the carriage vertical, slide it down the loading bar. - Page 17 Place the stepped rubber divider on the bottom of the battery compartment. Place the first battery vertically in the compartment with the terminals at the top, facing towards you. Place the flat rubber divider on to of the battery and then place the second battery on top of the first vertically in the compartment with the terminals at the bottom, facing...
-
Page 18: Fitting The Combined End Stops/Charging Ramps
Fitting the Combined End Stops/Charging Ramps The combined end stops/charging ramp units are used, as the name suggests, to stop the carriage at the end of the rails and to recharge the batteries while the lift is not being used. They should be fitted at both the bottom and the top of the rail. -
Page 19: Charge Circuit
Connecting the Charge Circuit A DC charger is used to supply power for the charging circuit. This power supply should be mounted using the bracket supplied near a convenient mains outlet socket. All cables must be securely clipped or trunked to the vicinity of either the top or bottom of the stairlift rail, in accordance with current regulations. -
Page 20: Intemediate Charge Point
2. As a safe position for the customer to get on or off the lift on intervening floors. In addition to using the red park button on the remote control, by selecting the correct option from the menu system, the lift will also stop at the parking point from the joystick control, enabling the customer to either get off the lift, or, by pressing the control again continue to the next charging point. -
Page 21: Fitting The Chair To Carriage
Fitting the Chair to the Carriage Remove the 4 M8 x 10 Hex bolts from the seat boss on the top of the carriage and retain. Remove the chair from the packaging. The key for the keyswitch (11) is attached to one of the chair arms. Remove, insert into keyswitch and turn clockwise thru 90°. -
Page 22: Chair And Carriage Electrical Connections
Chair and carriage electrical connections Inspect the individual connector blocks. The standard manual carriage will have one 6 way minifit molex connector. If your carriage is fitted with powered options, it will be supplied with additional connectors. There will be an extra 6 way minifit molex connector for the powered footrest. -
Page 23: Test Running Stairlift Unladen And Unprogrammed
Test Running the Stairlift, Unladen and Unprogrammed. Important: If there any issues with the stairlift, the system may display System Status Codes. Refer to the System Status Codes section for more details of what these codes mean. To test run the stairlift (unladen): Make sure the area covered by the movement of the stairlift is free of obstructions. - Page 24 Bring the lift to the bottom stop/charge point, and ensure the lift is correctly on charge. The diagnostic display should read “Platinum”. There are 2 red momentary buttons located on the PCB. The button on the right, Menu Switch, cycles through the...
- Page 25 250mm before it comes to rest against the top stop. The lift will recognise that it has reached the top and exit programming mode. The display will revert to “Platinum” and the carriage will travel according to the program...
-
Page 26: Installing Remote Controls
Installing the Remote Controls There are 2 types of remote control: 1. Infra-Red. These controls have 3 buttons, Up, Down and a Red park button. The park button is only used in conjunction with the optional intermediate charge point. This is the Standard control supplied with most stairlifts. - Page 27 Dip switches To change the signal. Remove battery cover and batteries from the control. Remove the four screws holding the back cover of the control. Remove the four small screws holding the cover for the receiver (black plastic enclosure) Carefully remove the cover feeding the wires through the holes as you go.
-
Page 28: Test Running The Stairlift Fully Laden And Programmed
Test Running the Stairlift, fully laden and programmed Important: The lift must be tested up to it’s full laden capacity before handover to the customer. Test running the stairlift fully laden ensures the lift is working correctly, and that it clears any obstacles. It also begins the bedding in process. -
Page 29: Final Checks
Electrical, Battery and Operational Tests Detailed measurements and tests must be carried out before handover to the customer. An example of these tests are detailed on the “Platinum Stairlifts Certificate for Test & Examination After Installation” form on the next page. This is the document that our installers complete and it ensures that all electrical and safety systems are working correctly and that the stairlift operates in a safe manner. -
Page 30: Certificate For Test And Examination After Installation
Certificate for Test & Examination After Installation Platinum Stairlifts Unit 10, Crosshills Business Park Crosshills, Keighley, BD20 7BW Tel:- 01535 631177 Fax:- 01535 631188 ………Kg... -
Page 31: Instructing The User
Instructing the User Before using the stairlift for the first time the customer must be instructed in the safe use of all aspects of the stairlift. The User guide is a good starting point for this instruction. Once the training is complete, the User Guide must be retained by the user of the stairlift. -
Page 32: Paperwork
Certified section of the test certificate. User Guide Hand a copy of the Platinum Curve User Guide to the customer, requesting that they keep it to hand for easy reference by themselves, any family members, carers or other helpers. -
Page 33: Connection Diagram
Connection Diagram... -
Page 35: Technical Information
AUTION Modifications which have not been expressly approved by the manufacturer may void the warranty and may cause damage. Your stairlift should be inspected and maintained by a Platinum approved service engineer. Hand Winding the Stairlift If necessary, for example to release the safety gear after the OSG has activated or to return the carriage from an over-run position, the stairlift can be manually hand-wound using the supplied winding handle. -
Page 36: Diagnostic Codes
No power 1. Check the battery isolator switch is in the “I” position 2. Check batterys are correctly connected and in good order Platinum The stairlift is on charge and everything is OK, lift should operate normally. Safety Circuit Final Limit Fault/Safety Circuit short to 0v 1. - Page 37 Code Meaning Seat Swivel Seat in Swivelled position (Powered Swivel Only) Lift cannot move until powered swivel seat is returned to travel position. 1. Check Powered swivel option is selected in menu. 2. Check lift is set as correct hand in menu. 3.
-
Page 38: Mains Power, Battery Power And Power Cuts
Engineers Menu Further diagnostics and settings are available by cycling through the menu system. Code Meaning Position 12345 Lifts current position on rail. Bottom end stop is 00000. Press and hold menu button to reprogram. Remote 1/2/3/4 Shows current Remote channel selection. Press adjust button to change. Right/Left Hand Shows current installation hand selected. -
Page 39: Servicing
Servicing The Standard 120 Kg (19 stone) stairlift requires a service every 12 months. The Heavy Duty 160Kg (25 stone) stairlift reqires a service evey 6 months. Items listed below should be checked and renewed if necessary. If pinion and/or main load roller need replacing, you will require an 3 legged bearing puller to remove pinion and cam. - Page 40 Remove any debris including excessive, built up grease and clean all surfaces. Replace plastic covers ensuring they fit together correctly. Replace metal covers ensuring the springs are in place and safety edges operate correctly. Re-load carriage on to rail. Re-fit end stop. 3.
- Page 41 Service Rail Clean excessive grease off racking and inspect for damage/wear. If necessary re-apply lubrication. We recommend that you lubricate three teeth every 300mm on the rack. Inspect rack jointing bolts and replace/re-fit if necessary. Clean rail tubes and inspect for damage/wear. ...
- Page 42 Notes:...
- Page 43 Notes:...
- Page 44 Unit 10, The Crossings, Crosshills Business Park, Keighley BD20 7BW Telephone 01535 - 631 177 Fax 01535 - 631 188 Email enquiries@platinumrails.com...
Need help?
Do you have a question about the Curve Stairlift and is the answer not in the manual?
Questions and answers